Back to featured insights
How to Customize WooCommerce Shop Manager (Step-by-Step Guide)
Want to give your WooCommerce Shop Manager more control — or limit what they can do? This step-by-step guide shows you how to customize the Shop Manager role, create custom permissions, and manage user roles efficiently to keep your online store running smoothly and securely.

Table of Content
Share
Creating a custom role based on WooCommerce Shop Manager can help you tailor permissions specifically for your team. By doing this, you improve store security and ensure that users have exactly the access they need.
This guide is perfect for store owners, developers, or anyone managing a WooCommerce store who wants more control over user roles. In this step-by-step guide, we’ll show you exactly how to create, edit, and manage a custom Shop Manager role.
What Is the WooCommerce Shop Manager Role?
The WooCommerce Shop Manager role is a default user role that WooCommerce automatically creates when you install it on your WordPress website. This role is specifically designed for users who need to manage the online store’s daily operations, such as handling orders, products, and customers without having full administrator privileges.
In other words, the Shop Manager acts as a middle-level manager between the Administrator and regular users. They can access the WooCommerce dashboard and most store features, but they cannot modify website settings, install plugins, or manage other users’ permissions.
The main purpose of this role is to delegate store management tasks safely. By assigning the Shop Manager role, store owners can allow staff to help operate the business efficiently while keeping the website secure and stable.

Why You Might Need a Custom Role
Creating a custom role in WooCommerce can help you fine-tune permissions and improve your store’s workflow. While the default Shop Manager role is versatile, it may not fully fit your team’s needs. Here are the most common reasons you might need a custom role:
- Customize permissions: Give users access to only what they need, such as managing products but not orders.
- Define clear responsibilities: Assign different access levels for sales, marketing, customer service, and accounting teams.
- Enhance security: Limit permissions to prevent accidental changes or unauthorized access to sensitive settings.
- Support complex workflows: Adapt roles to fit multi-step processes or larger teams with distinct functions.
- Manage multiple stores or vendors: Ideal for multi-vendor marketplaces or agencies handling several WooCommerce sites.
- Improve efficiency: Reduce confusion by ensuring each staff member only sees tools and data relevant to their job.
- Maintain control: Prevent overlapping permissions that could cause operational errors or conflicts between roles.
In short, a custom user role allows you to create a more organized, secure, and efficient management system for your WooCommerce store.
How to Customize a User’s Role in WooCommerce
Updating a user’s role in WooCommerce is quick and straightforward. From your WordPress admin dashboard, you can easily assign or modify any user’s role whenever needed. Here’s how to do it step by step.
Step 1. Log in to Your WordPress Admin Dashboard
Begin by signing in to your WordPress website using an account with Administrator privileges. This is important because only administrators have the authority to manage and modify user roles within WooCommerce.
Once you’ve logged in, you’ll be directed to the WordPress Dashboard, where you can access all site settings, users, and WooCommerce options.
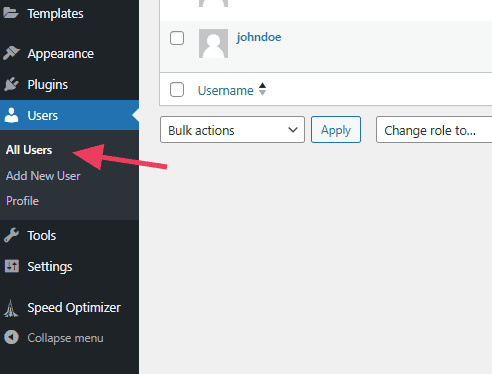
Step 2: Navigate to the Users Page
In your WordPress dashboard, navigate to Users → All Users. This section displays a complete list of every registered user on your website, along with their usernames, email addresses, and assigned roles. From here, you can easily view, edit, or manage any user account.
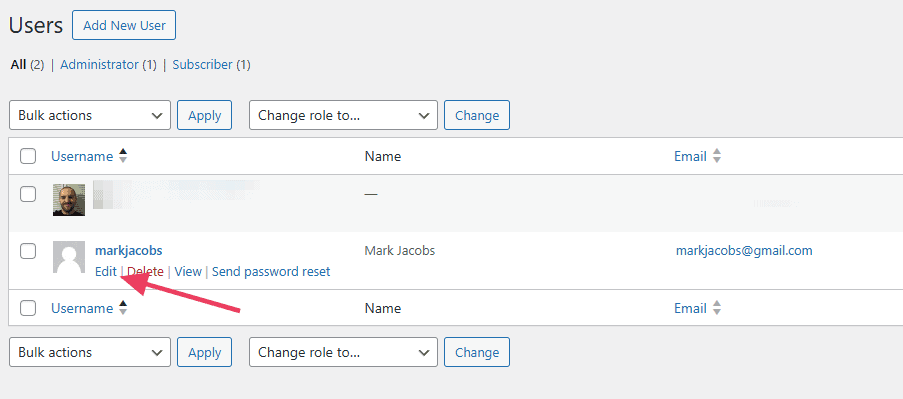
Step 3: Find the User You Want to Edit
Browse through the list of users or use the search bar to quickly find the specific user whose role you’d like to update. Once you’ve found them, hover your cursor over their name, and an Edit link will appear beneath it. Click this link to open the user’s profile settings.
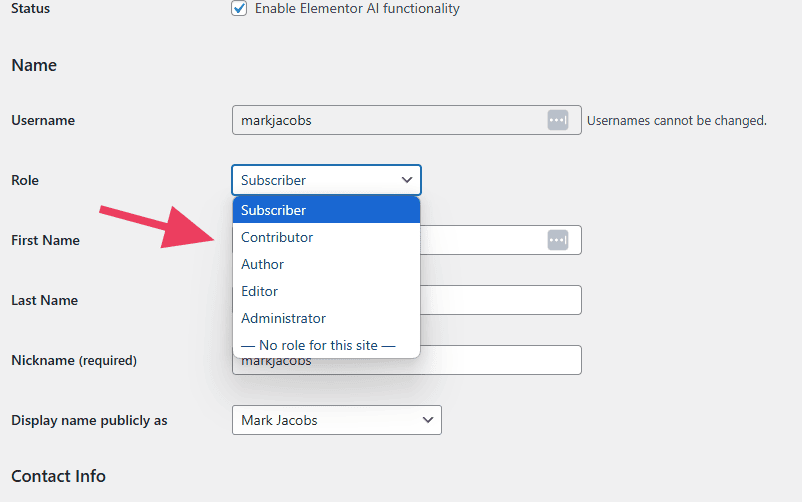
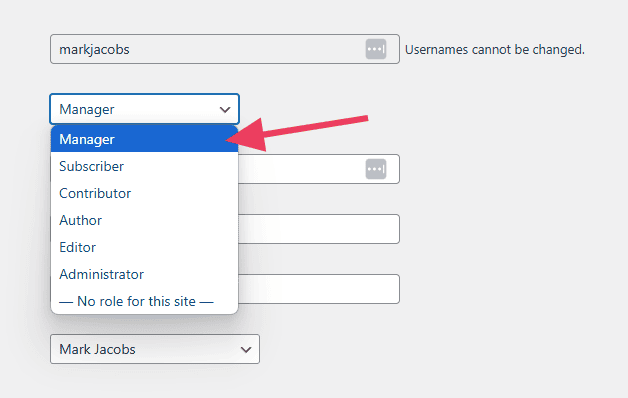
Step 4: Edit the User’s Role
On the user’s profile page, scroll down until you reach the Role section. You’ll see a dropdown menu listing all available WordPress user roles. From there, simply choose the new role you want to assign to that user — for example, Custom Shop Manager or Editor.
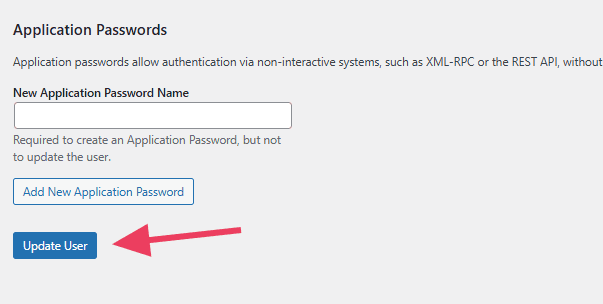
Step 5: Save the Changes
After selecting the new role, scroll to the bottom of the page and click Update User to apply the changes. Once saved, the user’s permissions will automatically adjust according to the newly assigned role.
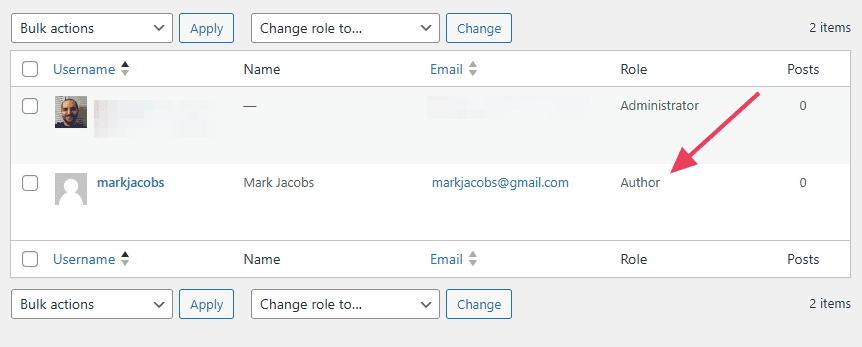
Step 6: Verify the Role Change
Once the update is complete, go back to the All Users page to verify the changes. In the Role column next to the user’s name, you should now see the newly assigned role displayed, confirming that the update was successful.
How to Create a Custom WooCommerce Shop Manager Role
If you want more control over your WooCommerce store, creating a custom Shop Manager role allows you to assign specific permissions tailored to your team’s needs.
How to Create Custom User Roles in WooCommerce with a Plugin
Sometimes, the default WooCommerce user roles don’t fully meet your store’s requirements. If your business needs more tailored permissions or responsibilities, you can easily create custom roles and define specific capabilities for each.
The easiest way to do this is by using a WooCommerce role management plugin. Below, we’ll explore three of the best plugins that help you create and manage custom user roles effortlessly.
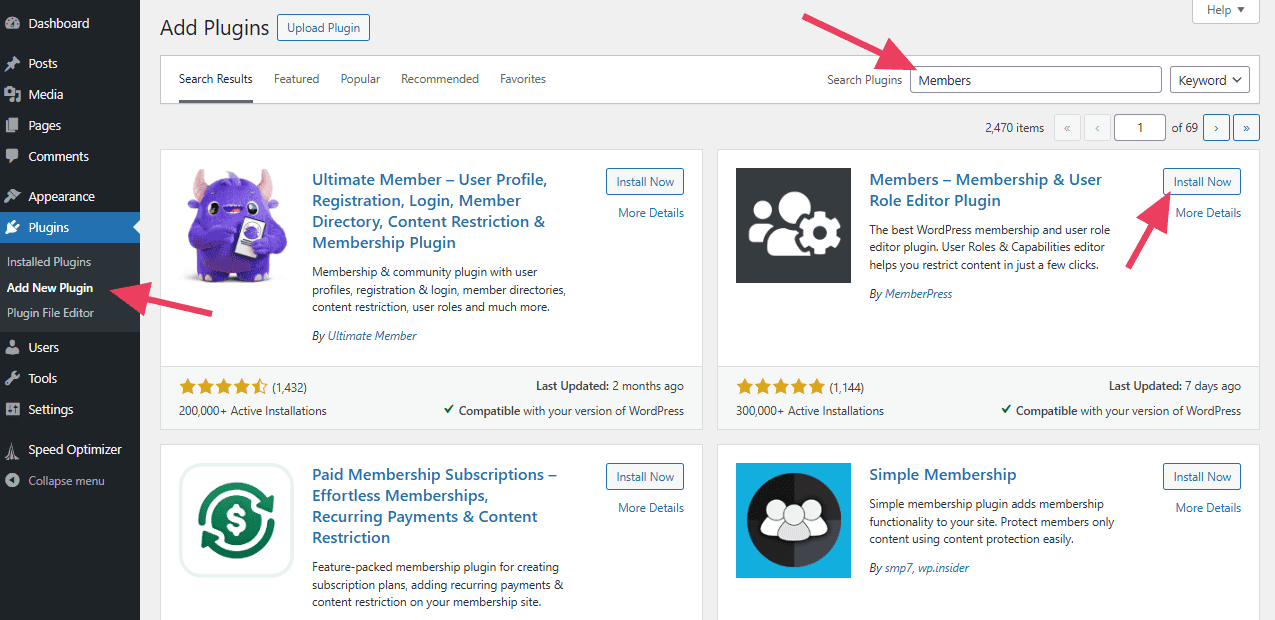
Members is one of the simplest and most popular plugins for managing WordPress user roles. It allows you to create, delete, and edit roles in just a few clicks, making role management quick and hassle-free.
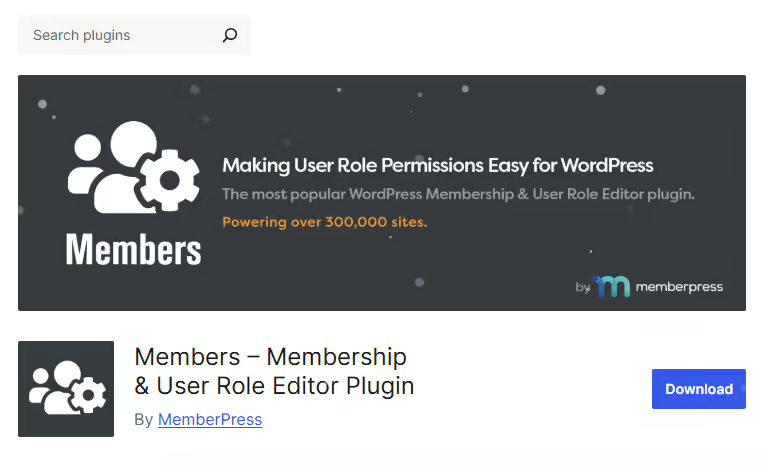
To get started, go to your WordPress dashboard and navigate to Plugins → Add New. In the search bar, type “Members”, then click Install Now and Activate to enable the plugin on your site.
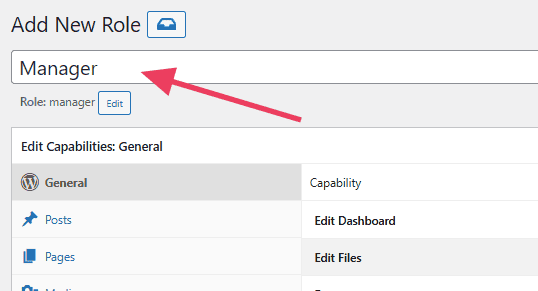
Next, go to Members → Add New Role in your WordPress dashboard. This is where you can create a completely new user role with customized permissions and capabilities.

Assign a name to your new role. For example, let’s name it “Manager.” Users with this role will have permission to manage themes and plugins but won’t be able to modify any post or page content.
Below the role’s name, you’ll find the capabilities editor. The tabs in the left column represent different categories of permissions. Click through these tabs to select the capabilities that best suit the role you’re creating.
For our new Manager role, we’ll open the Appearance tab and select Grant All to allow Managers to modify the site’s theme. We’ll repeat the same process in the Plugins tab so they can manage plugins as well.
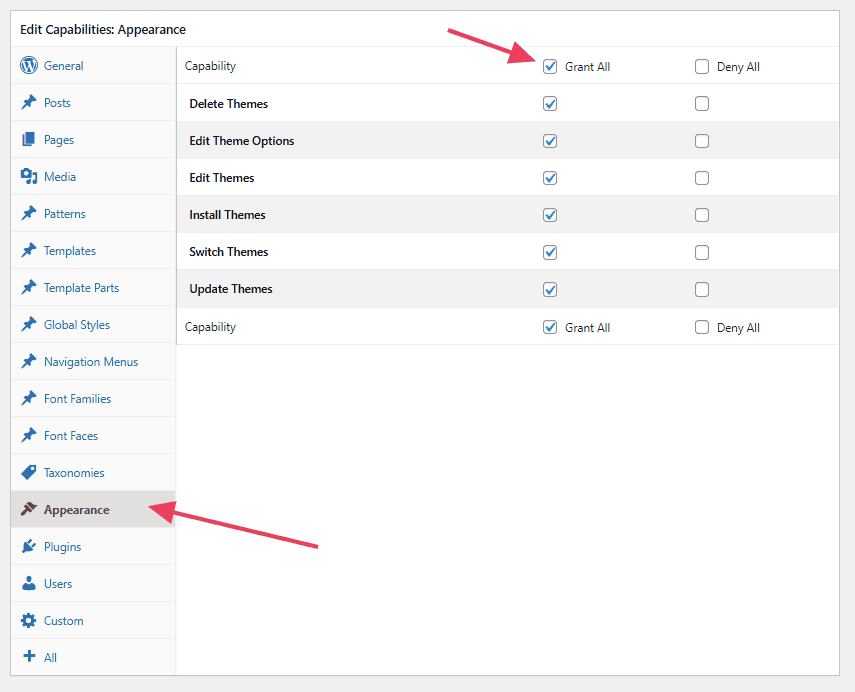
Finally, click the Add Role button to save your new user role.
To modify an existing role, go to Members → Roles. Locate the role you want to edit, and then adjust its capabilities in the same way as when creating a new role.

If you want to explore more plugin options for managing WooCommerce Shop Manager roles, check out our detailed guide: 7 Best Plugins to Manage the WooCommerce Shop Manager Role Easily
Creating WooCommerce User Roles with Code
To create custom WooCommerce user roles without using a plugin, you need to add some code to your theme’s functions.php file. The key function for this is add_role(), which requires three main parameters:
- $role (string, required): A unique identifier for the role.
- $display_name (string, required): The name that will appear in the dashboard.
- $capabilities (array, optional): An array of permissions to assign to this role.
Before editing any code, it’s highly recommended to create a child theme. A child theme inherits the design and functionality of your current (parent) theme, allowing you to update the parent theme without losing your customizations.
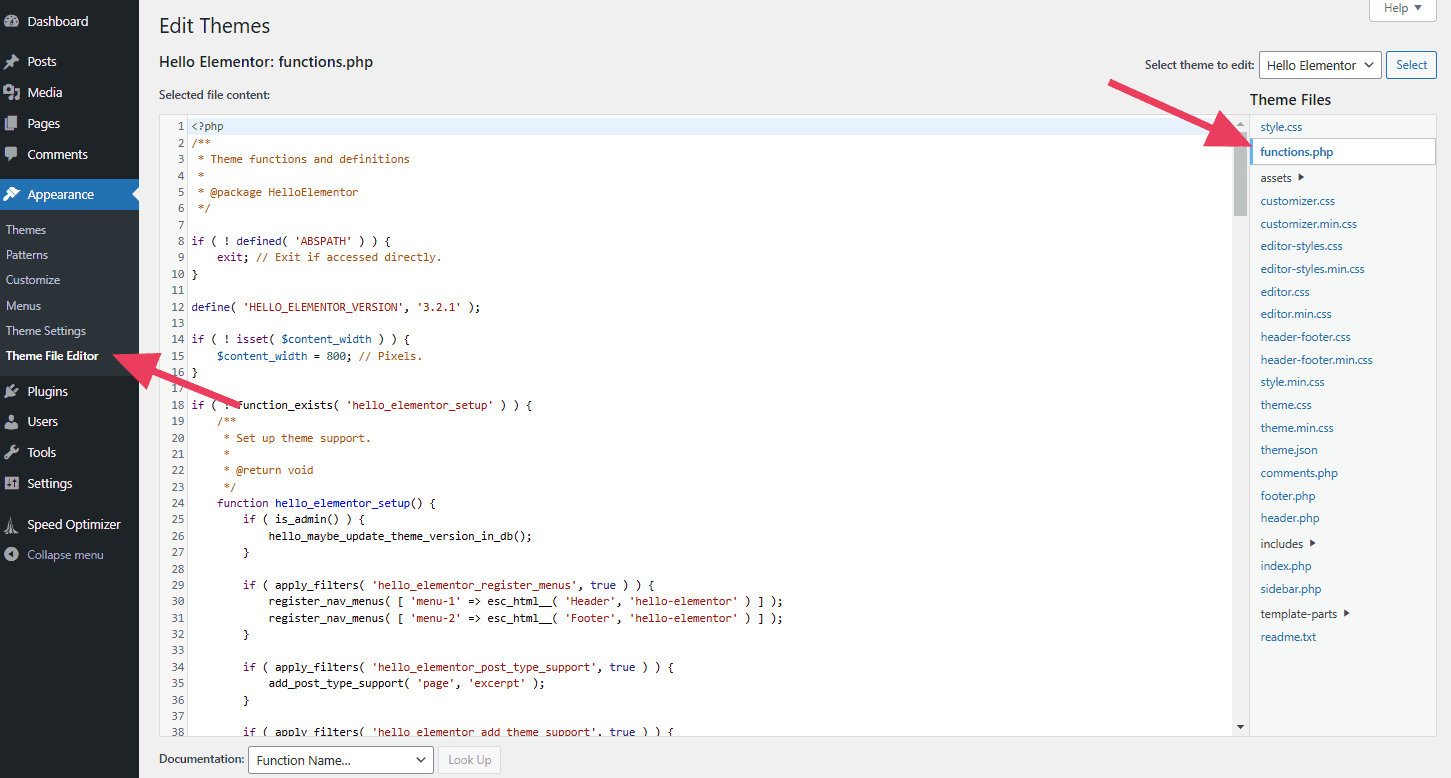
To begin, go to Appearance → Theme File Editor in your WordPress dashboard, then select the functions.php file from the theme files on the right-hand side.
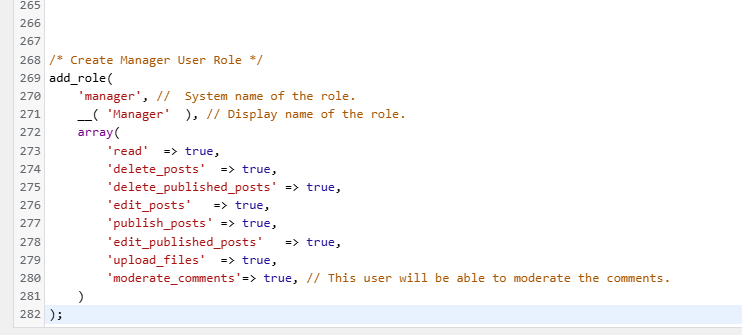
Scroll to the bottom of the functions.php file and paste the following code. This snippet will create a new user role named “Manager”. For now, we’ll assign it the same capabilities as the Editor role.

It should look like this:
Go to Users → All Users in your WordPress dashboard and open any user profile. You should now see the newly created role available in the Role dropdown menu.
If you want to modify any of the capabilities for this new role, simply update the corresponding true values to false in your code. For example, if you want to prevent users from editing other people’s posts, change the appropriate capability from true to false.

to…

After making your changes, click the Update File button to save the edits to your functions.php file.
If you need to remove a custom WordPress user role you previously created, simply delete the code you added to the functions.php file.
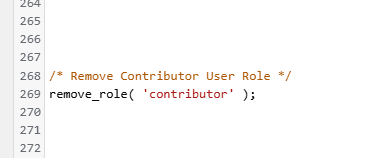
To remove a default WordPress role, use the remove_role() function. Add the following snippet to your functions.php file, replacing the text in quotes with the role you want to delete.

Click the Update File button to save your changes.
Common Mistakes to Avoid When Creating Custom WooCommerce User Roles
When creating and managing custom WooCommerce user roles, it’s easy to make mistakes that can affect your site’s security and workflow. Here are some common pitfalls to watch out for:
- Giving Too Many Permissions: Assigning excessive capabilities to a role, such as Administrator-level permissions, can put your site at risk. Only grant the permissions necessary for the role’s responsibilities.
- Not Testing the Role: After creating a custom role, always test it with a user account to ensure the permissions work as intended. Skipping this step can lead to unexpected access issues.
- Editing Roles Without a Child Theme: If you add custom code directly to the parent theme’s functions.php, updates to the theme could overwrite your changes. Always use a child theme for code customizations.
- Forgetting to Update Roles When Needed: Your store’s needs may change over time. Regularly review and update custom roles to ensure they still match the responsibilities and security requirements of your team.
- Ignoring Capability Conflicts: Some plugins or themes may require specific capabilities. Ensure your custom roles are compatible to avoid conflicts that could break functionality.
Best Practices for Managing Custom Roles
Creating custom WooCommerce roles can improve your store’s workflow and security, but managing them properly is key. Here are some best practices to follow:
- Define Roles Clearly: Before creating a custom role, clearly define its responsibilities and the capabilities it needs. This ensures that each role has a distinct purpose and avoids overlapping permissions.
- Use Descriptive Names: Give your roles meaningful names that reflect their function, such as Custom Shop Manager or Product Editor. Clear names make it easier to assign roles correctly and maintain consistency across your team.
- Start with Minimum Necessary Permissions: Apply the principle of least privilege: assign only the capabilities necessary for the role to perform its tasks. You can always add more permissions later if needed.
- Document Your Roles: Maintain a record of each custom role, its assigned capabilities, and which users have it. Documentation helps prevent confusion and makes role management easier, especially for larger teams.
- Regularly Review and Update Roles: Your store’s needs may evolve. Regularly review custom roles and adjust permissions to ensure they remain relevant and secure.
- Test Roles Thoroughly: Always test new or updated roles using a test account. Verify that users can perform required tasks without having access to areas they shouldn’t.
Frequently Asked Questions
1. What happens if I assign too many permissions to a custom role?
Assigning excessive permissions can compromise your site’s security and cause accidental changes. Always follow the principle of least privilege.
2. Can I create a custom role without a plugin?
Yes. You can use WordPress’s add_role() function in your theme’s functions.php file. However, using a plugin like Members is safer and easier, especially for beginners.
3. How do I test if a custom role works correctly?
Create a test user with the custom role and log in as that user. Verify that they can access and perform the tasks allowed, and cannot access restricted areas.
4. Can I edit an existing WooCommerce Shop Manager role?
Yes. Plugins like Members or User Role Editor allow you to edit the capabilities of existing roles without touching the code.
Conclusion
Creating and managing a custom WooCommerce Shop Manager role gives you greater control over your store’s workflow and security. By following the steps in this guide, you can assign the right permissions to the right users, streamline your store operations, and protect sensitive data.
At Arestós, we specialize in WooCommerce development and customization services. Whether you need help setting up custom roles, optimizing your store, or building advanced functionality, our team can provide tailored solutions to meet your business needs.
Contact us now to get professional support and take your online store to the next level.
Subscribe to our newsletter!
Get updated to
the lastest IT trends
Related Posts
Update the latest technology trends for your business