Back to featured insights
How To Create A WordPress Online Shop For The Hong Kong Market
Discover how to set up a WordPress Online Shop tailored for Hong Kong businesses. From installation to optimization, this guide covers everything you need to start selling online with confidence.

Table of Content
Share
Building a WordPress online shop is one of the fastest and most effective ways to start selling online. With WooCommerce, you can create a professional store that’s easy to customize and scale as your business grows.
This guide walks you through everything from setup to growth strategies, helping you attract customers and drive sales.
Why Use WordPress to Start an Online Shop?
Before we dive into the technical “how-to,” let’s tackle the “why.” With so many e-commerce platforms available, what makes the combination of WordPress and WooCommerce the go-to choice for millions, powering everything from small boutique shops to major online retailers?
Here are the key reasons:
- It’s Free & Open-Source: Both the core WordPress software and the WooCommerce plugin are completely free to use. Your only essential costs are a domain name and web hosting. This drastically lowers your initial startup costs, especially when compared to platforms that require hefty monthly subscription fees.
- You Have Full Control and Ownership: This is a massive advantage. With a self-hosted WordPress site, you own your website and all its data—100%. You aren’t “locked in” to a proprietary platform, meaning you have the freedom to move your store to any web host you want, whenever you want.
- Unlimited Flexibility and Customization: Whatever you can imagine for your store, you can build it with WordPress. Thanks to a vast ecosystem of thousands of themes (for visual design) and plugins (for features), you can customize everything. Need to sell digital downloads, set up a subscription service, or offer product personalization? There’s a plugin for that.
- It’s Excellent for SEO (Search Engine Optimization): WordPress is built with clean code that search engines like Google love, making it easier for them to crawl and rank your site. Furthermore, with powerful SEO plugins like Yoast SEO or Rank Math, you can easily optimize every product, page, and post to attract organic traffic from potential customers.
- It’s Highly Scalable: You can start small with a handful of products, and as your business grows, your WordPress site can grow with it. It can handle everything from a few dozen products to thousands of them, along with high volumes of traffic, as long as you have the right hosting plan.
- A Massive Support Community: As the world’s most popular website platform, WordPress has an enormous global community of users and developers. Whenever you get stuck, an answer is just a Google search away. You can find solutions in forums, read blog tutorials, watch YouTube videos, or hire a professional developer for help.
According to MobiLoud, WooCommerce powers around 20.1% of all eCommerce websites worldwide, which equals more than 3.5 million online stores currently in operation.

Read more: Compare WooCommerce vs Shopline to find the right fit for your store.
How to Start a WordPress Online Shop
Starting a WordPress online shop may seem daunting at first, but by following these seven simple steps, you can set up a fully functional store ready to sell your products.
- Step 1: Define the products or services you plan to offer.
- Step 2: Select a hosting provider optimized for WooCommerce.
- Step 3: Set up and adjust your WooCommerce configurations.
- Step 4: Personalize your store using an eCommerce-friendly theme.
- Step 5: Configure secure and convenient payment options.
- Step 6: Upload and organize your products in WooCommerce.
- Step 7: Add extra plugins to enhance your store’s capabilities.
Let’s dive into each step in detail.
Step 1: Define the products or services you plan to offer
Your choice of products will influence every aspect of your eCommerce venture, from how you market your brand to the way your store is designed. Selecting items that align with your skills and passions not only makes the process more enjoyable but also encourages you to invest more in improving product quality and growing your business.
Leverage product research tools such as Google Trends and Trend Hunter to uncover high-demand, profitable items. For additional ideas, explore our curated lists of trending products and lucrative items to create and sell.
Whether you plan to sell physical goods or digital downloads, WordPress combined with WooCommerce offers the flexibility and functionality to support your goals. This powerful duo can cater to a wide range of businesses, from niche boutiques to expansive eBook marketplaces.
Step 2: Select a hosting provider optimized for WooCommerce
When choosing a host for your WooCommerce store, look for providers offering these key features:
- High Performance: Utilizes SSD storage and server-side caching to ensure fast loading times and improve conversion rates.
- Robust Security: Includes a free SSL certificate, a Web Application Firewall (WAF), and regular malware scanning to protect customer data.
- A 99.9%+ Uptime Guarantee: Ensures your store is consistently online and available to shoppers around the clock.
- Automatic Daily Backups: Provides peace of mind with easy, one-click restoration in case anything goes wrong.
- Expert Support: Offers a support team with specialized knowledge of WordPress and WooCommerce, not just general hosting.
- Easy Scalability: Allows you to seamlessly upgrade your resources to handle traffic spikes and future business growth.
Step 3: Set up and adjust your WooCommerce configurations
After installing WordPress, you can set up your WooCommerce store by following these steps:
Install and activate the WooCommerce plugin to launch the Setup Wizard. Then, click “Set up my store” to begin the configuration process.
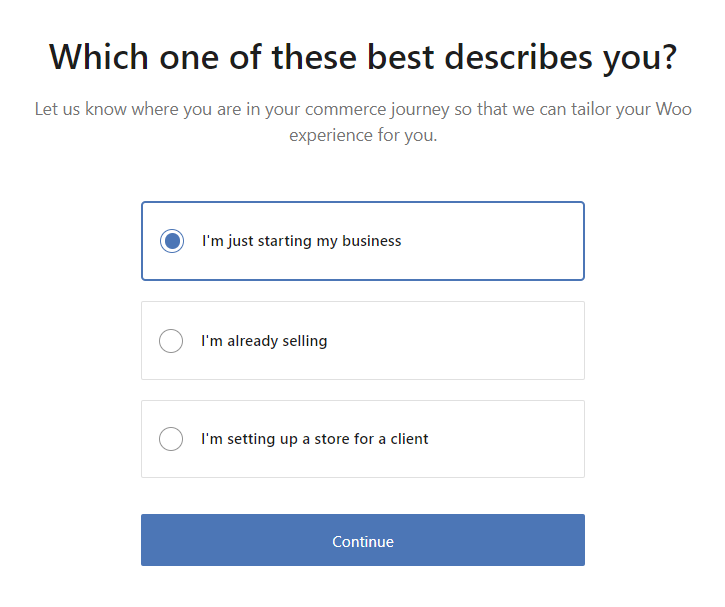
Select the seller profile that most accurately represents your business.
Enter your store’s name, business location, product category, and contact email address.
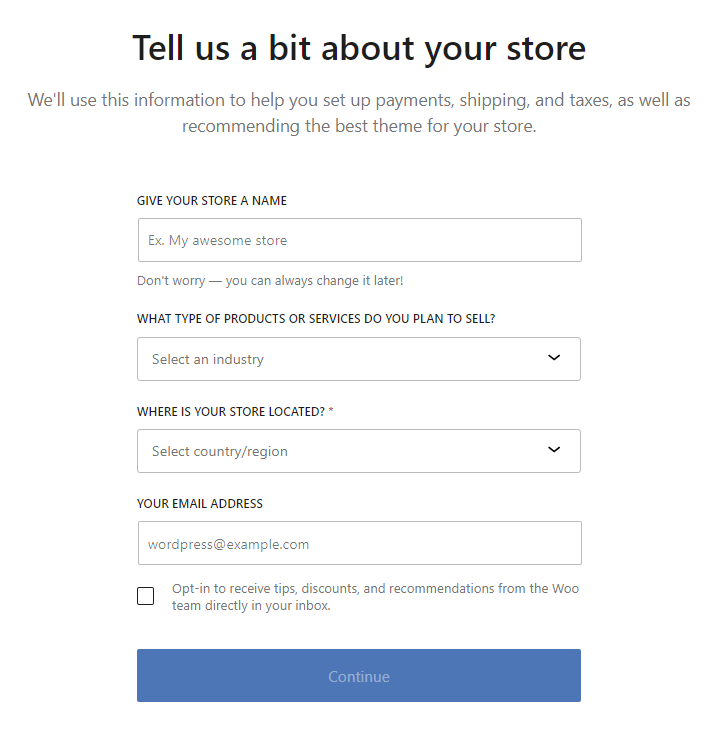
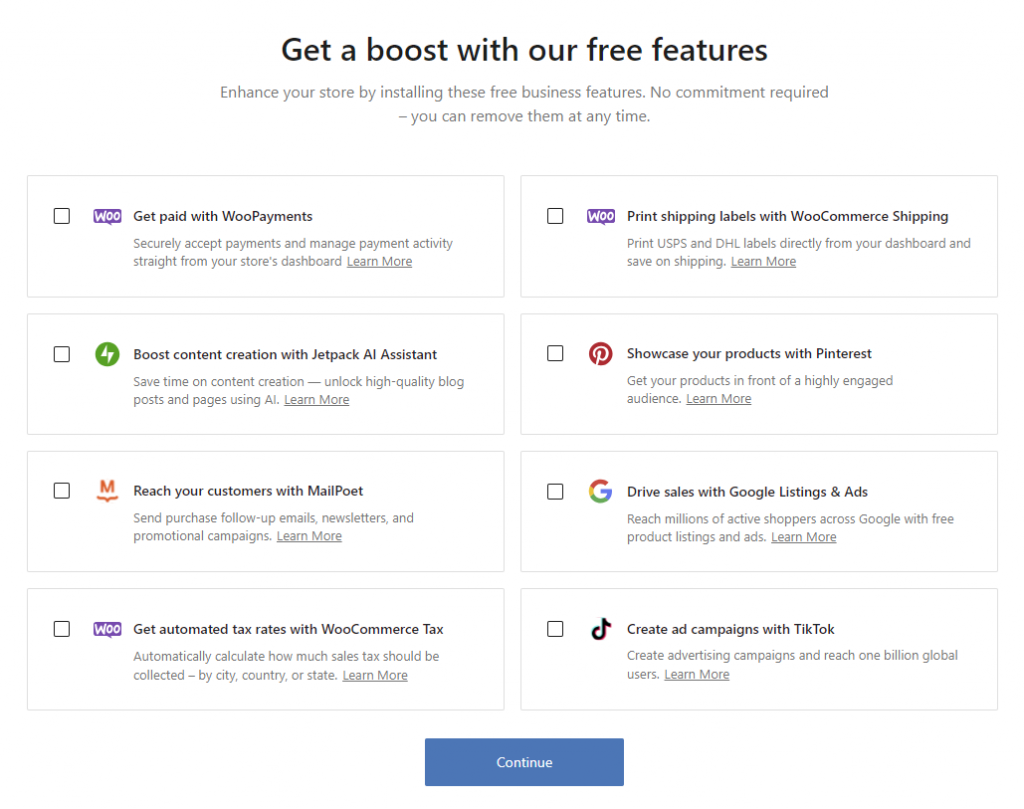
WooCommerce provides free tools to help grow your WordPress eCommerce store. For now, click “Continue” to move on to the next step.
Once the initial setup is finished, you’ll be redirected to the WooCommerce dashboard.
Step 4: Personalize your store using an eCommerce-friendly theme
Your store’s design plays a key role in shaping your brand identity and influencing the overall shopping experience. The good news is, WooCommerce offers a diverse selection of high-quality eCommerce themes tailored to different industries.
When selecting a theme, focus on one that reflects your brand’s personality and showcases your products effectively. The ideal theme should be visually engaging, easy to navigate, and well-structured.
Here’s how to update your store’s design:
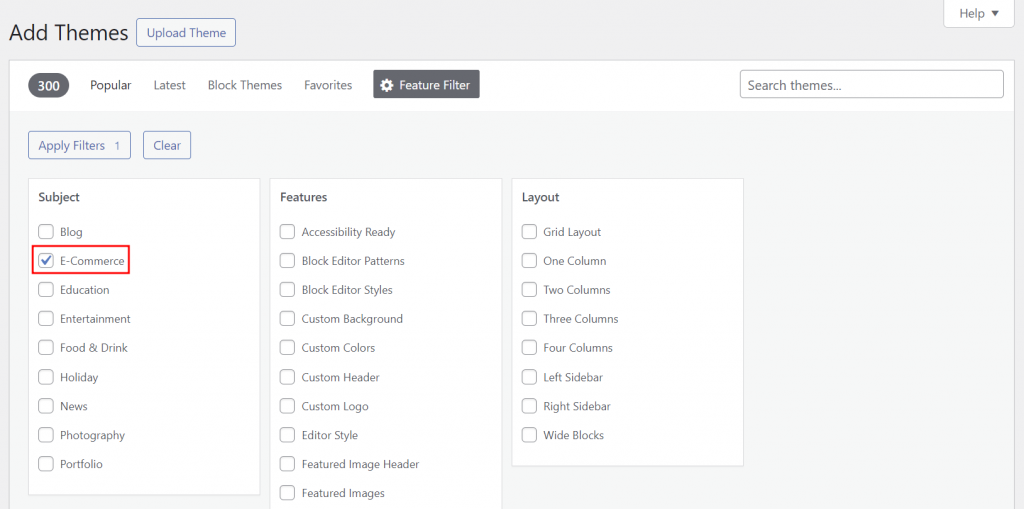
From your WordPress dashboard, go to Appearance → Themes and click “Add New Theme.
Click “Feature Filter”, choose “E-Commerce” under the Subject category to display only eCommerce themes, then click “Apply Filters” to confirm your selection.
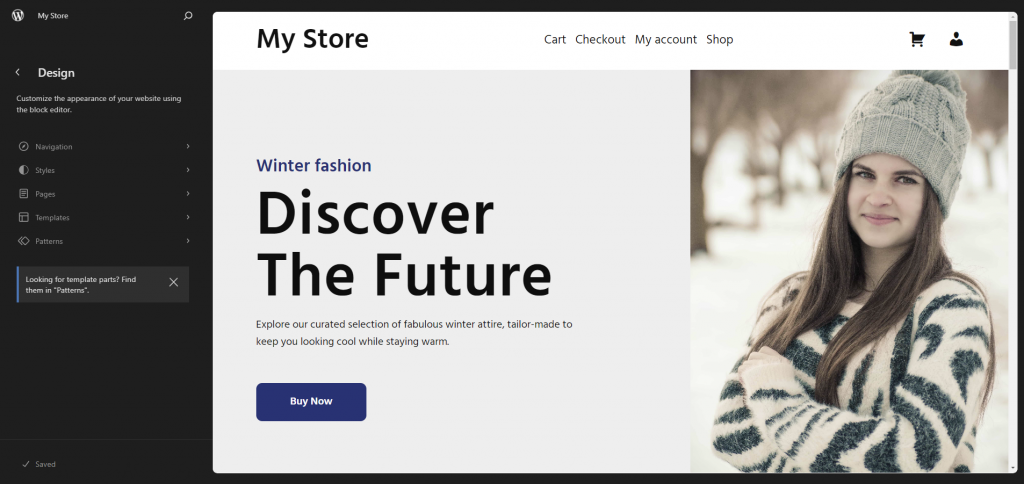
Install and activate the WordPress theme that best fits your online store’s style and needs.
Click the “Customize” button on your selected theme to open the WordPress Theme Editor, where you can adjust your site’s appearance.
Step 5: Configure secure and convenient payment options
The payment gateway you choose determines how your store processes customer transactions. Selecting the right one ensures secure, hassle-free checkouts, making proper setup essential.
WooPayments supports debit and credit cards as well as various local payment methods, making it one of the most reliable options for WooCommerce. It offers smooth integration and is easy to manage.
Additionally, WooCommerce works with popular third-party gateways such as Stripe, PayPal, and Apple Pay. You can connect these by installing their extensions or purchasing the respective plugins from the WooCommerce Marketplace.
Here’s how to set up WooPayments on your online store:
From your WordPress dashboard, navigate to WooCommerce → Settings.
Next, click on the Payments tab to view all available payment options.
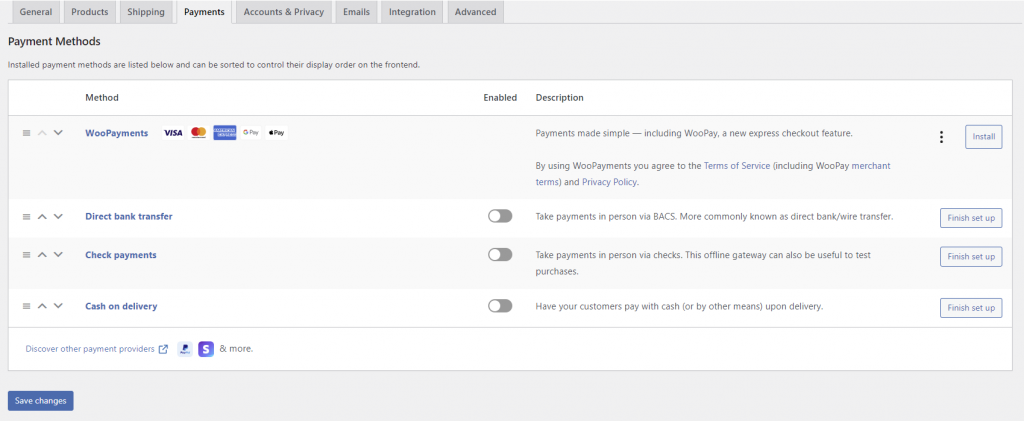
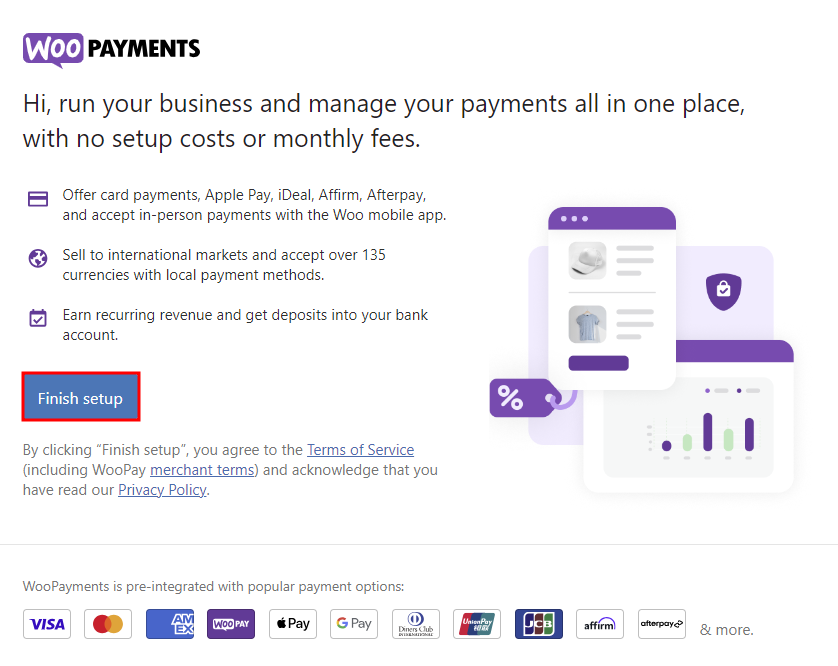
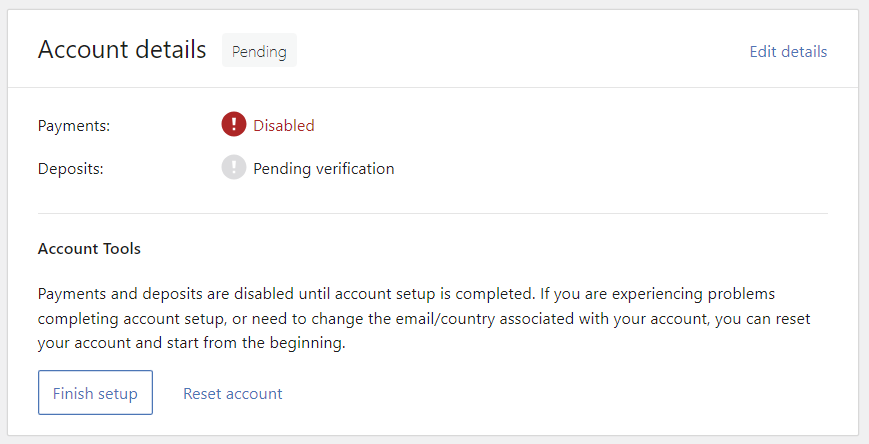
Click “Install to enable WooPayments. When redirected to the Payments page, choose “Finish setup” to complete the process.
Provide your email address to verify and establish the connection.
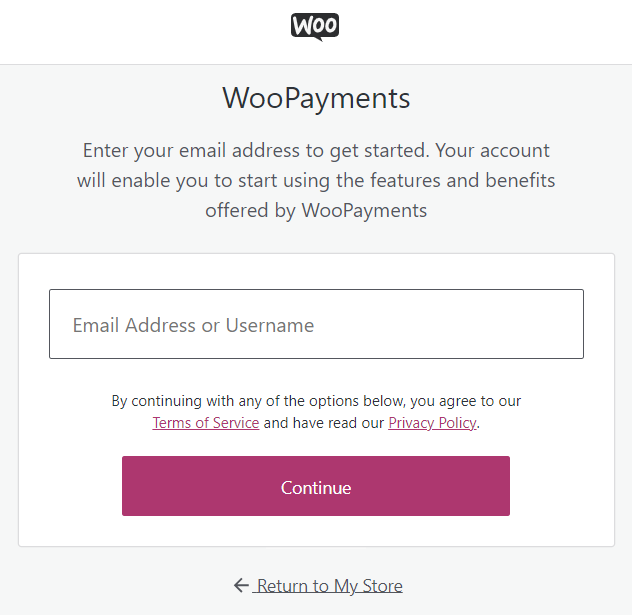
WooCommerce will send you an email containing a link to connect your store with WooPayments — click it to proceed with the setup.
Provide your personal details to create a WooPayments account.
Fill in your business information, including the store’s legal name and website URL.
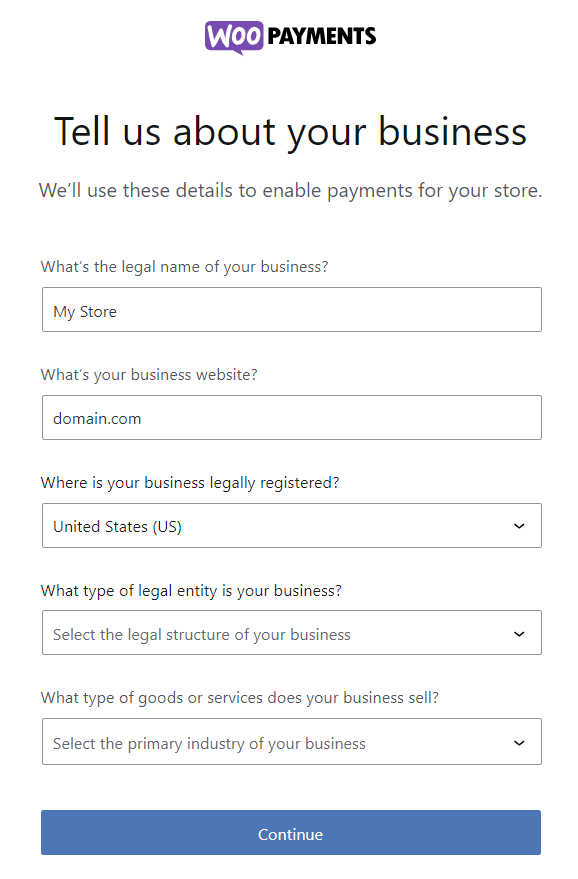
Specify your projected annual revenue and your planned launch date.
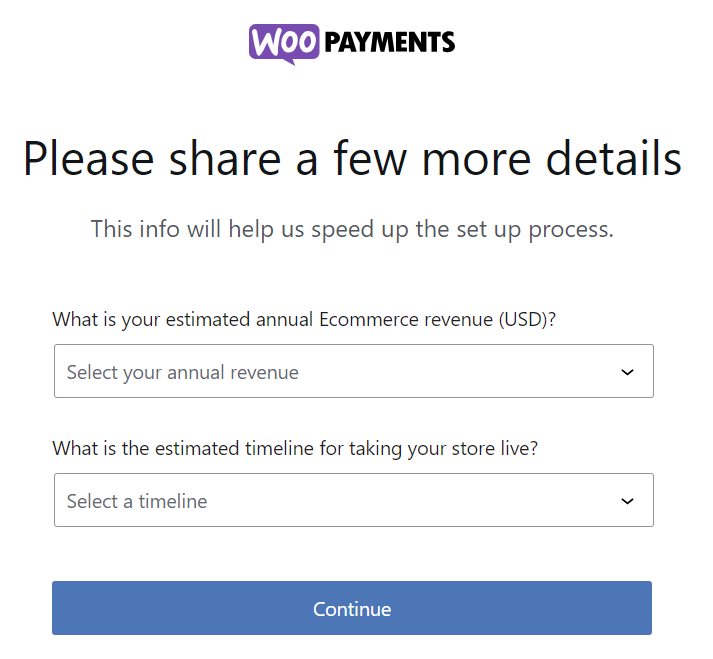
Complete the remaining steps in the setup wizard to link WooPayments with your bank account or debit card. Your store will be ready to accept payments once the payment status shows Enabled.
Step 6: Upload and organize your products in WooCommerce
Once your WordPress eCommerce site is ready, the next step is adding products.
Here’s how:
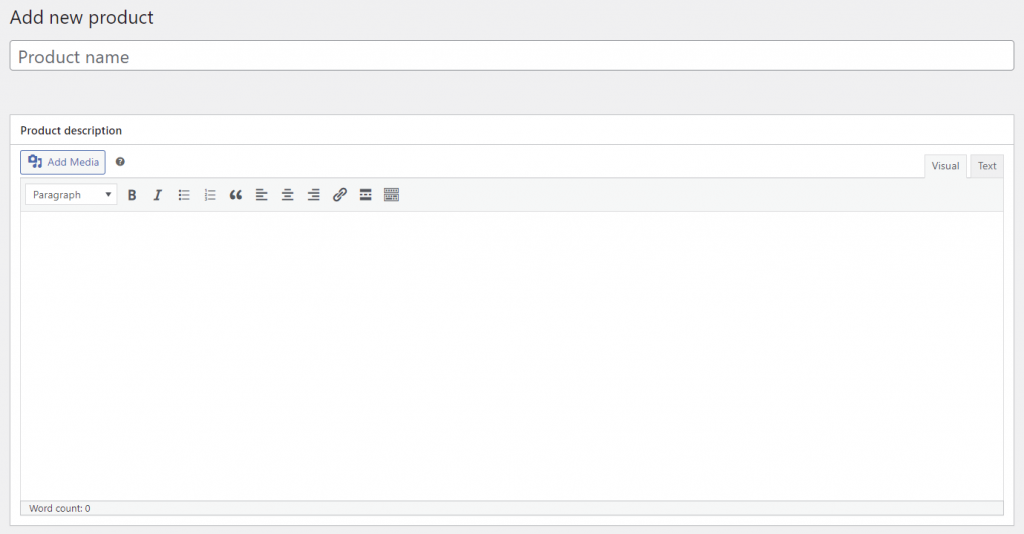
From the WordPress dashboard, navigate to Products → Add New.
Input your product’s name and detailed description.
In the Product data section, choose a product type from the dropdown menu:
- Simple product – for single items, like a lamp. Select Virtual if it’s intangible, or Downloadable if it includes files for customers to access after purchase.
- Grouped product – a collection of related items sold individually, such as a tea set with cups and saucers.
- External/Affiliate product – products listed on third-party sites but promoted on your WordPress store.
- Variable product – items with multiple variations, like shirts available in different colors and sizes.
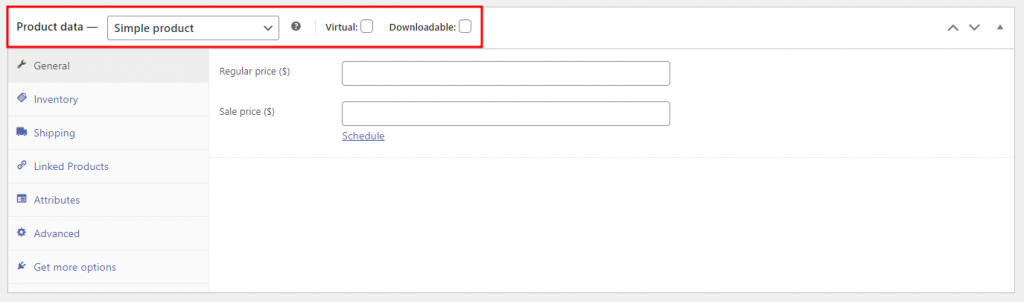
Complete the necessary details according to the product type, including pricing, stock status, and attributes.
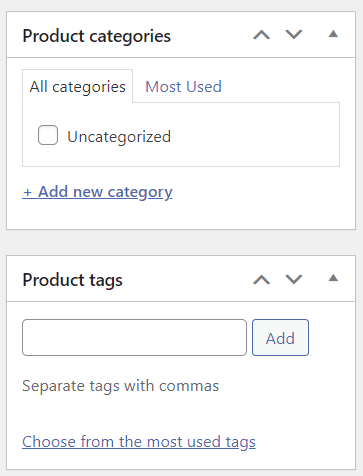
Then, use the right-hand menu to assign a product category and add relevant tags.
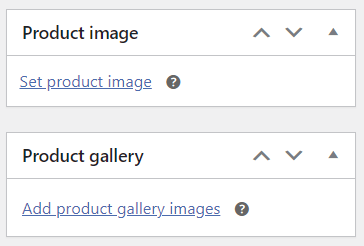
Upload your product’s main image under Product image and add additional visuals in the Product gallery section.
Set the product listing to private or password-protected if you’re not ready to publish it. Alternatively, schedule a future publish date to make it publicly visible later.

Click “Preview” in the Publish section to check how the product page appears. Once satisfied with the layout and details, click “Publish”.
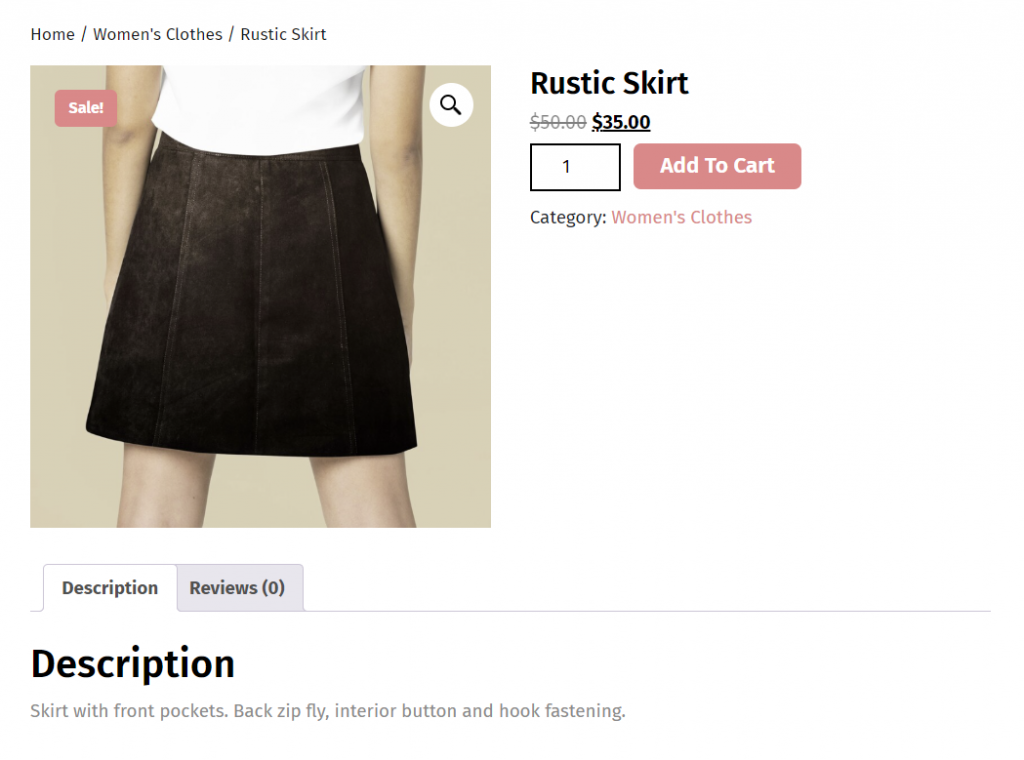
Here’s an example of what a WooCommerce product page looks like:
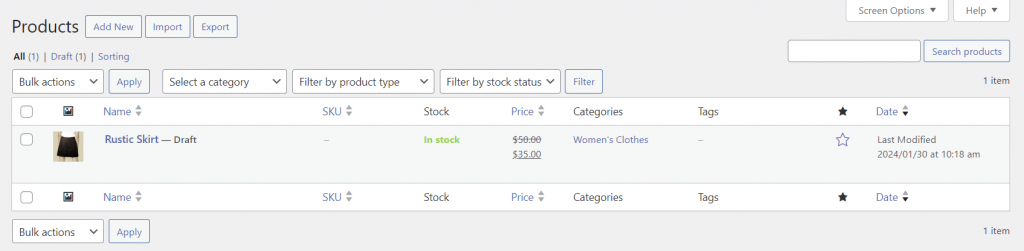
You can manage all your product listings by going to Products → All Products. Use the filters to sort items by product type, stock status, and other criteria as needed.
Crafting compelling product listings is essential for drawing in and converting customers. To create effective product pages, use high-quality images that display your products from multiple angles. Write detailed descriptions incorporating relevant keywords and clear calls to action to boost both search engine visibility and sales performance.
Step 7: Add extra plugins to enhance your store’s capabilities
WooCommerce equips you with all the fundamental tools needed to operate an online store. Yet, to enhance your WordPress site with advanced features, a variety of powerful WooCommerce plugins are available.
Here are some top WooCommerce plugins we recommend:
- OptinMonster – a leading pop-up builder designed to capture visitor attention and increase conversions.
- MonsterInsights – integrates Google Analytics to track your store’s performance and visitor traffic.
- PluginHive – provides both free and premium extensions for booking systems and shipping integrations.
- Weglot – enables translation of your website content and meta descriptions, helping you build a multilingual online store.
- WP Fastest Cache – boosts site speed and lowers load times, improving SEO.
- ATUM Inventory Management – offers robust inventory controls with quick editing capabilities.
Only install plugins essential to your business needs, as too many can slow down your store. Always download plugins from trusted sources and keep them updated to ensure compatibility with the latest WordPress versions and other integrations.
Take advantage of WordPress’s auto-update features to automate updates for the core system, themes, and plugins. With auto-updates, you can track changes and easily revert to previous versions directly from your hosting dashboard.
What You Should Do After Creating an Online Shop
Launching your online store is just the beginning of your journey. To grow your business and set it up for long-term success, consider these strategies:
- Keep WordPress up to date – regularly update WordPress, WooCommerce, themes, and plugins to ensure your site runs smoothly and securely.
- Follow security best practices – protect your store by adhering to proven security measures and using a comprehensive security checklist.
- Optimize site speed – continually assess and improve your website’s loading times to enhance user experience and boost SEO rankings.
- Focus on SEO – apply effective WooCommerce SEO techniques to increase your site’s visibility in search engine results.
- Start a blog – publish valuable posts related to your products or industry to engage visitors, attract traffic, and establish your authority. Maintaining a consistent posting schedule amplifies these benefits.
- Leverage affiliate marketing – collaborate with influencers and bloggers in your niche to expand your reach and drive sales.
- Build an email newsletter – grow your mailing list to keep customers updated on new products, promotions, and content.
- Monitor website performance – use analytics tools to track site speed and user behavior, enabling you to make informed improvements over time.
Frequently Asked Questions
1. Can I create a professional WordPress online shop without coding skills?
Yes, WordPress combined with WooCommerce allows you to build a fully functional online shop with minimal technical knowledge.
2. Is WooCommerce the best choice for a WordPress online shop?
WooCommerce is the most popular and widely supported eCommerce plugin for WordPress, offering extensive customization and scalability for shops of all sizes.
3. Can I sell both physical and digital products?
Yes, WooCommerce supports physical items, digital downloads, subscriptions, and more.
4. How can I improve my store’s performance?
Optimize images, use caching plugins, choose reliable hosting, and limit unnecessary plugins to keep your site fast.
Conclusion
Setting up a WordPress online shop with WooCommerce gives you everything you need to launch, manage, and grow your eCommerce business. From configuring themes and payment gateways to adding products and optimizing performance, this guide has shown you the essential steps to build a secure, scalable, and customer-friendly store. With the right plugins, SEO practices, and marketing strategies, your online shop can achieve long-term growth and success.
At Arestós, we specialize in delivering end-to-end WordPress and WooCommerce solutions tailored to your business needs. Whether you’re starting from scratch or looking to scale an existing store, our team of experts ensures seamless setup, smooth integrations, and ongoing optimization to help your business thrive in the digital marketplace.
Contact us now to unlock the full potential of your WordPress online shop with Arestós!
Subscribe to our newsletter!
Get updated to
the lastest IT trends
Related Posts
Update the latest technology trends for your business