Back to featured insights
How To Build A WordPress Website From Scratch
In today's digital age, having a website is essential for businesses, bloggers, and individuals looking to establish their online presence. WordPress, a popular content management system, offers a user-friendly platform for building professional websites.
Table of Content
Share
Want to build a WordPress website but not sure where to start? Whether you’re launching a personal blog, portfolio, or online business, WordPress is one of the most powerful and flexible platforms out there. The good news? You don’t need to be a developer to get started.
In this step-by-step guide, we’ll walk you through everything you need to know to build a WordPress website from scratch — no coding required.
What is WordPress?
WordPress is a widely used, open-source Content Management System (CMS) that has evolved significantly since its debut in 2003. While it started as a platform for bloggers, it has grown into a powerful website-building tool trusted by millions worldwide.
With WordPress, you can build virtually any type of website, from personal portfolios and blogs to business websites and full-scale eCommerce stores. Its intuitive interface and flexibility make it accessible to both beginners and seasoned developers.
Best of all, you don’t need to write a single line of code. Thanks to a wide range of user-friendly, no-code tools and themes, launching a professional-looking site is easier than ever.

How to Build a WordPress Website for Beginners
Just getting started? Follow these easy steps to create your WordPress website without any hassle:
- Step 1: Choose a Web Hosting Provider
- Step 2: Register a Domain Name
- Step 3: Install WordPress
- Step 4: Understanding the WordPress Dashboard & Settings
- Step 5: Choose and Install a WordPress Theme
- Step 6: Customize Your WordPress Theme
- Step 7: Install Essential Plugins
- Step 8: Add Content to Your Website
- Step 9: Optimize Your WordPress Website for SEO
- Step 10: Set Up Website Security
- Step 11: Launch Your WordPress Website
- Step 12: Maintain and Update Your WordPress Website
Let’s now explore each step in detail to learn how to build your WordPress website correctly and effectively.
Step 1: Choose a Web Hosting Provider
To get started with WordPress, you’ll need to choose a web hosting provider. This is where your website’s data will be stored and served to visitors, so it’s an essential first step.
Selecting the right host means considering several important factors: performance, features, support, and cost, to ensure your site runs smoothly now and in the future.
Here are some key criteria to help guide your decision:
- WordPress Compatibility: Most hosting services support WordPress, but some are optimized specifically for it. These providers often offer tools like one-click installations, pre-configured environments, and automatic updates that simplify setup and maintenance.
- Speed and Uptime: Your website’s performance depends heavily on your host’s infrastructure. Prioritize providers that guarantee high uptime and fast load times to deliver a seamless experience for your visitors.
- Technical Support: Even experienced users occasionally need help. Choose a host with responsive, knowledgeable support, ideally available 24/7, so you’re not left stranded when issues arise.
- Room to Grow: As your website scales, your hosting plan should be able to keep up. Look for providers that offer flexible upgrade options, including more storage, bandwidth, or dedicated resources.
- Pricing and Value: Cost is a factor, but it shouldn’t be the only one. Focus on getting good value: reliable performance and useful features at a reasonable price.
In short, take the time to compare your options carefully. A reliable host can make running your WordPress site easier and more enjoyable, while a poor choice could lead to ongoing frustrations.
Step 2: Register a Domain Name
Great, now that you’ve chosen a reliable hosting provider, it’s time to secure a domain name. Your domain acts as your website’s address on the internet. It’s how users will find and remember you, so choosing the right one is crucial.
Here’s how to choose an effective domain name:
- Start with Ideas: Think of names that are relevant to your brand, easy to spell, and simple to remember. Shorter names tend to be more user-friendly and professional.
- Check Availability: Most hosting providers offer a domain search tool to help you see what’s available. If your preferred name is taken, try slight variations or consider adding keywords.
- Register Your Domain: Once you’ve found an available name that fits, go ahead and register it, either through your hosting provider or a domain registrar. Domain names are typically billed on a yearly basis.
Your domain name is a major part of your online identity, so choose wisely. Stick to familiar extensions like .com, .net, or .org for a more credible and trustworthy presence.
Avoid using complicated words, hyphens, or lengthy combinations that are easy to mistype or forget. A clear, concise domain helps set a strong foundation for your brand online.
Step 3: Set up WordPress
To set up WordPress, you can choose between two main methods:
One-click installation (the easiest option):
Did you know that getting started with WordPress can be as easy as a single click? Many hosting providers offer a “one-click install” feature, making the setup process incredibly simple. Just sign up for a hosting plan, go to your hosting dashboard, and click “Install WordPress.” It’s the fastest and most beginner-friendly way to launch your website.
Manual installation (requires some technical know-how):
If your hosting provider doesn’t support automatic installation, you can still set up WordPress manually. This method requires downloading the WordPress software to your computer and uploading it to your hosting server using FTP or a file manager. While it’s a bit more complex, it’s a great opportunity to gain a deeper understanding of how your website works.
If you’re not sure where to start, check out our detailed WordPress installation guide for beginners.
Step 4: Understanding the WordPress Dashboard & Settings
Welcome to your WordPress admin dashboard. Think of it as the central hub where you manage every aspect of your website. From creating content to customizing the design, everything you need is just a few clicks away. Once you become familiar with the layout, using it will feel effortless.
Upon logging in, you’ll land on the main dashboard. Here’s a quick breakdown of the key sections:
- Posts: Create, edit, and organize your blog articles here.
- Pages: Manage your site’s static pages such as Home, About, and Contact.
- Media: This is your media library, where all uploaded images, videos, and documents are stored.
- Appearance: Customize your site’s design, including themes, widgets, and menus.
- Plugins: Add new functionality and features to your site by managing plugins in this section.
- Settings: Adjust core settings like your site’s title, tagline, timezone, and permalink structure.
Before diving into customization, it’s important to adjust a few essential WordPress settings to make sure your site is properly configured from the start.
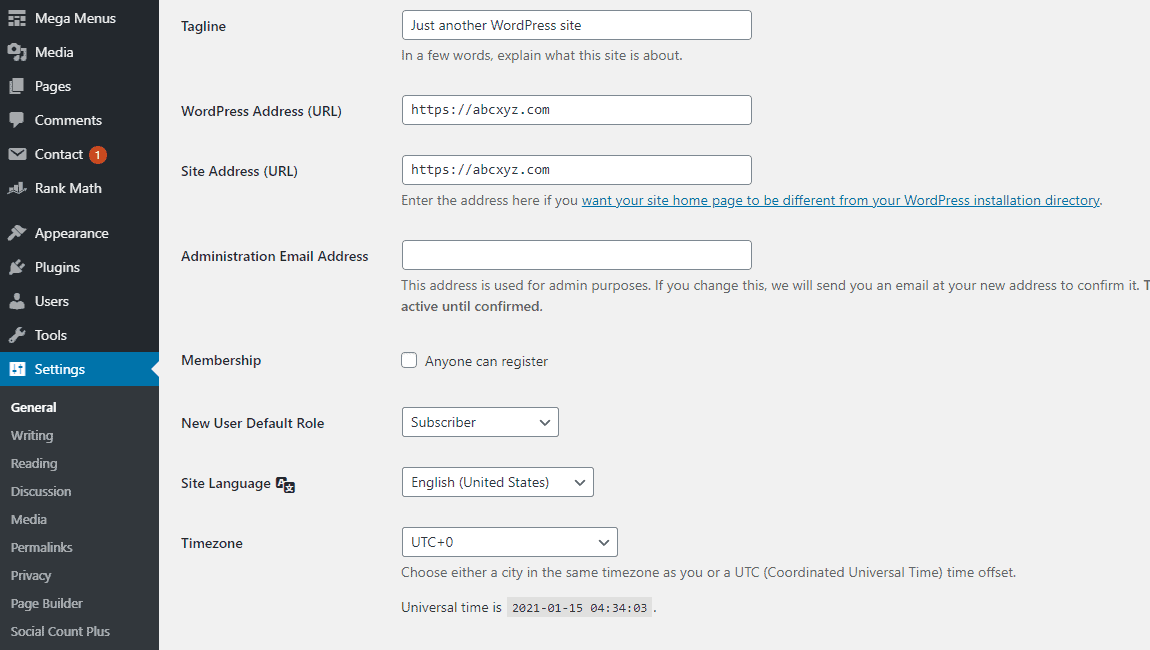
- Site Title and Tagline: Navigate to Settings > General and update your site title and tagline to clearly represent your brand or the purpose of your website. These details often appear in search engine results and browser tabs, so make them count.
- Timezone and Date Format: While still in Settings > General, set the correct timezone to match your location. You can also choose your preferred date and time format for consistency across your content.
- Permalink Structure: Head over to Settings > Permalinks and select the “Post name” option. This setting creates cleaner, more SEO-friendly URLs—for example, yourdomain.com/sample-post/ instead of yourdomain.com/?p=123.
- Disable Comments (Optional): If you’re not planning to run a blog or don’t want visitors to leave comments, go to Settings > Discussion and uncheck the option labeled “Allow people to submit comments on new posts.” This helps keep your site clean and free from unwanted input.
Step 5: Choose and Install a WordPress Theme
Now it’s time for one of the most exciting steps: designing your website’s look and feel.
In WordPress, the theme determines the overall appearance and layout of your site. You can think of it as your website’s visual identity—it shapes how your content is presented and how visitors experience your brand. With thousands of free and premium themes available, you have the flexibility to choose a design that matches your goals, whether you’re building a blog, business site, or online store.
Once you’ve selected a theme, installing it is straightforward:
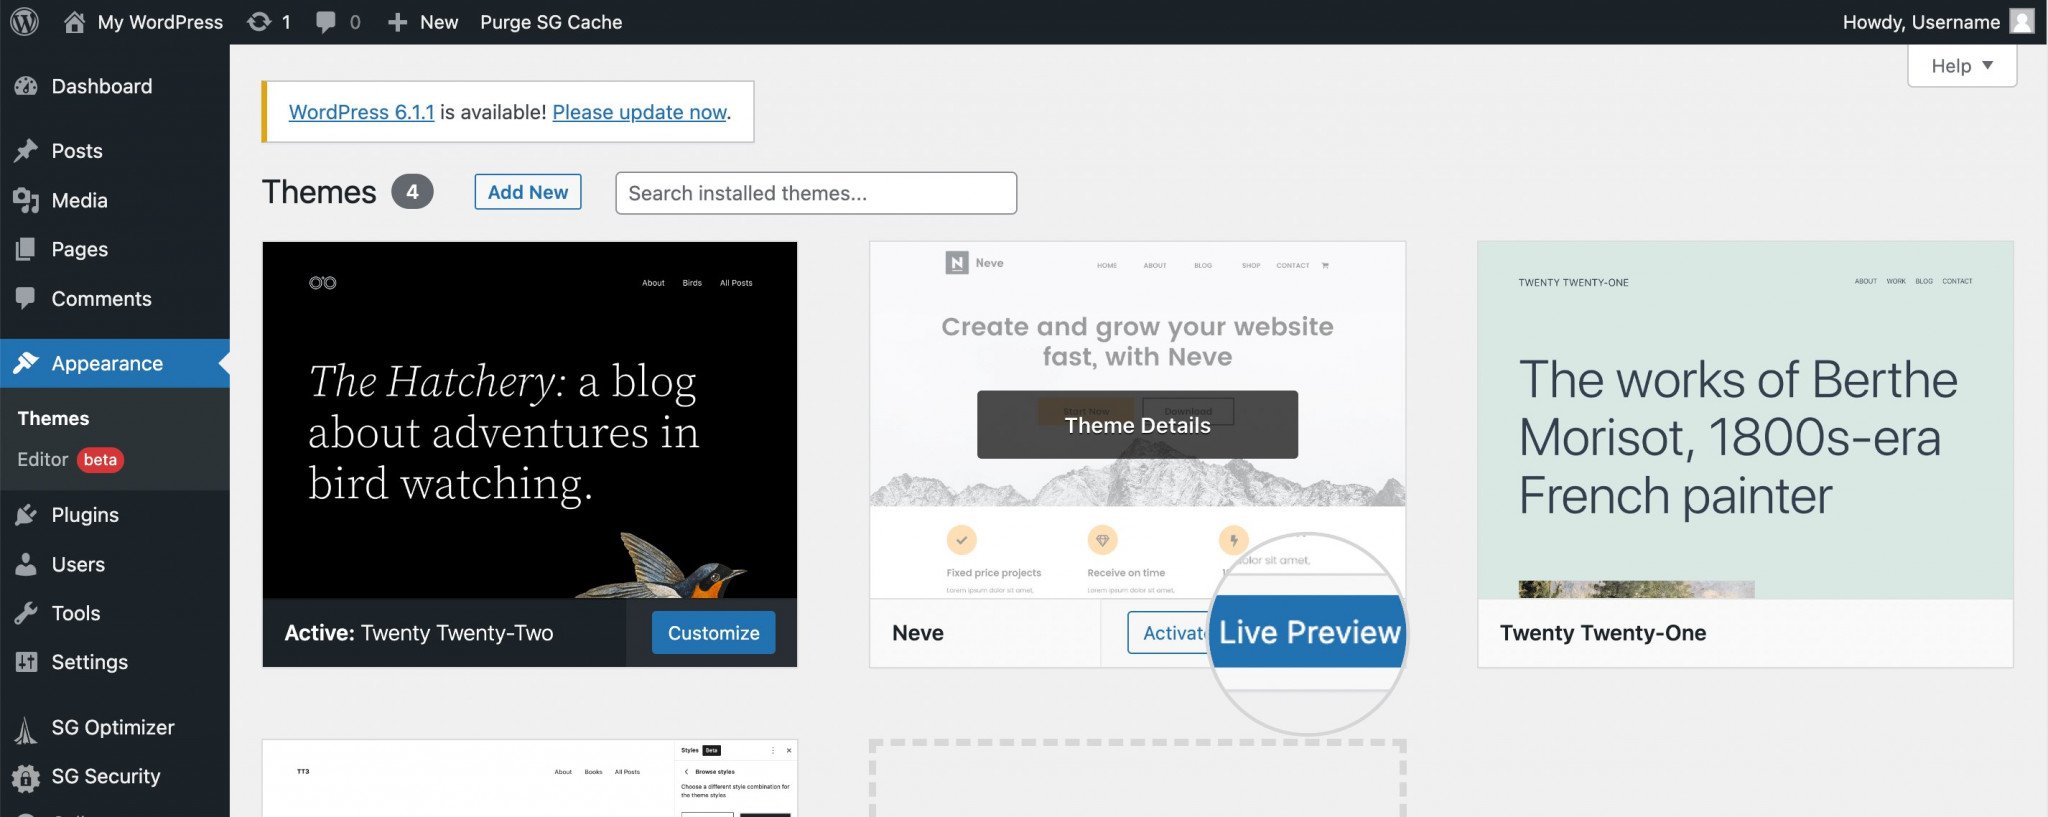
In your WordPress dashboard, navigate to Appearance > Themes
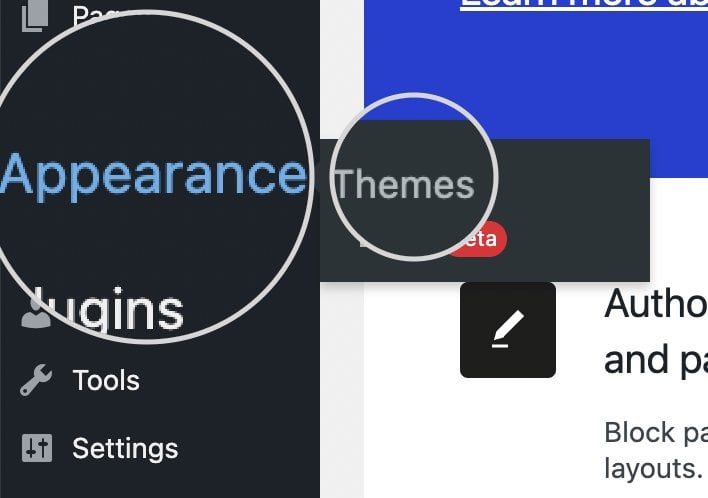
In that section, you’ll find all the default themes that come with WordPress or other previously installed themes.
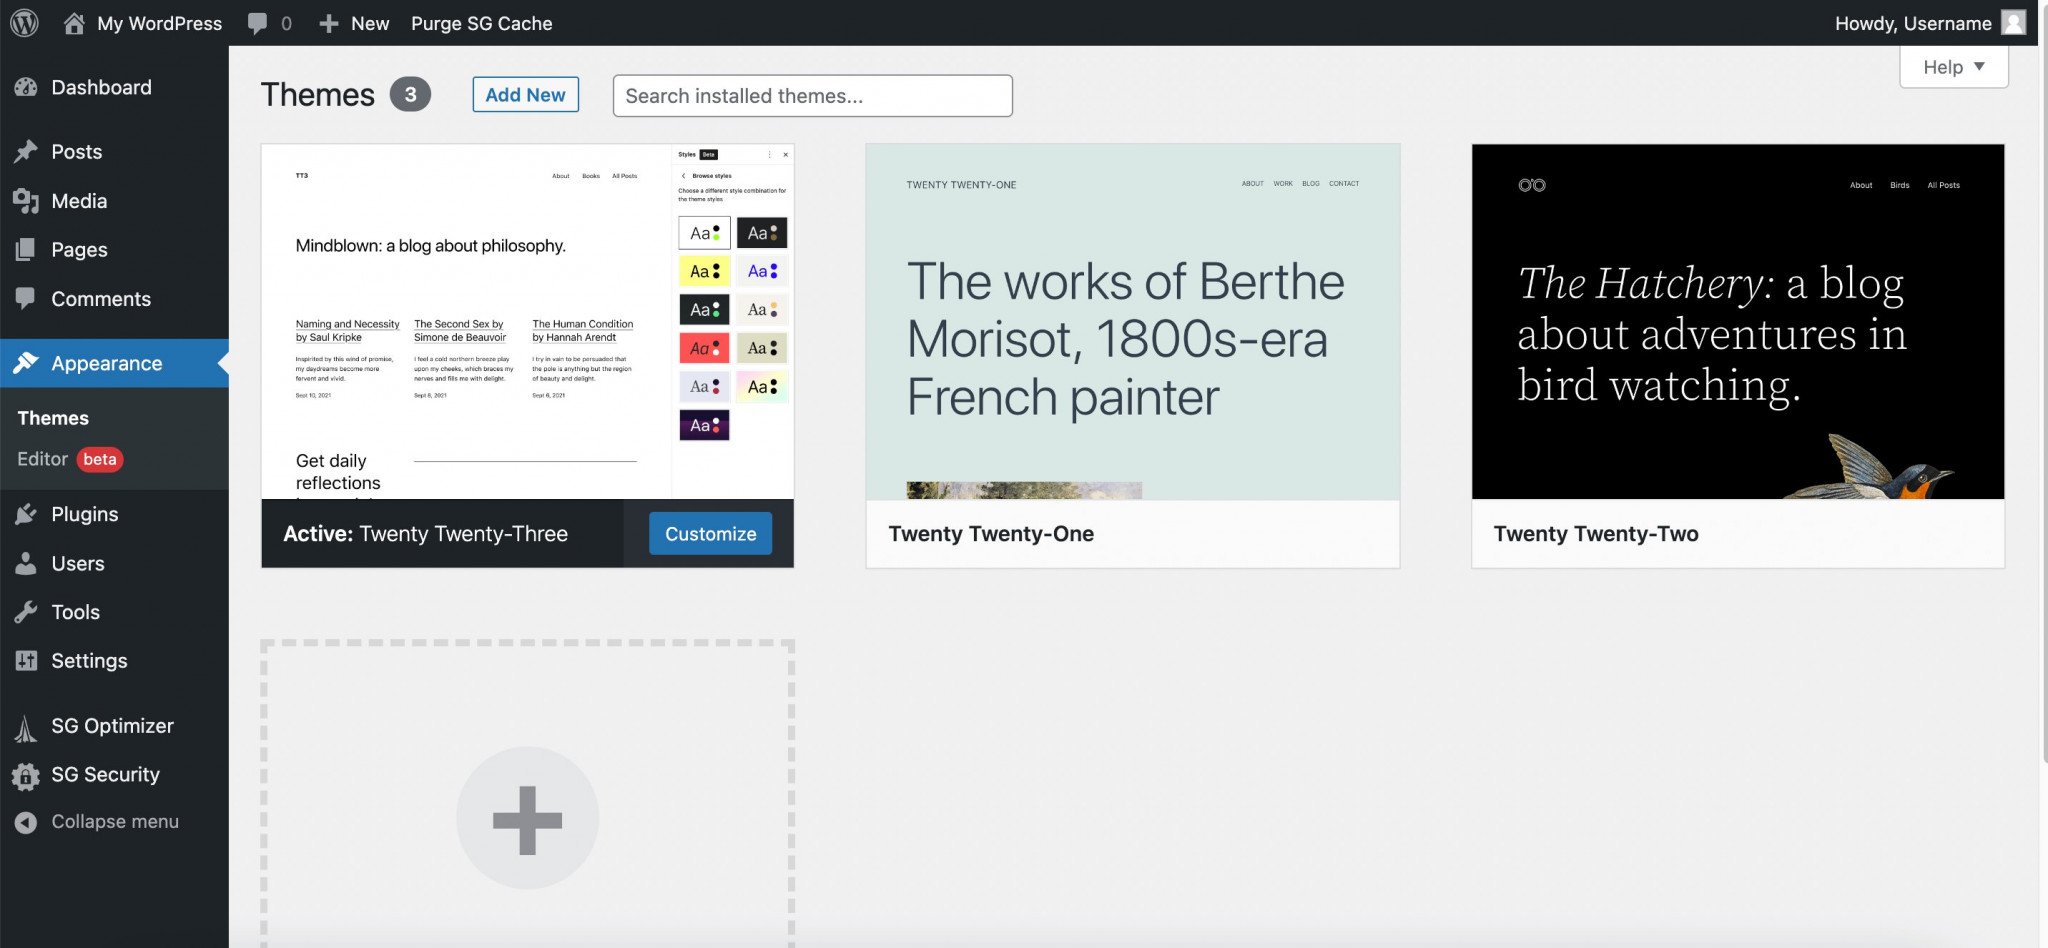
To add a new WordPress theme, click the “Add New” button located near the top center of the screen.

Clicking the “Add New” button will open a page displaying a collection of popular WordPress themes. You can browse through the options and select the one that best suits your style and website goals.
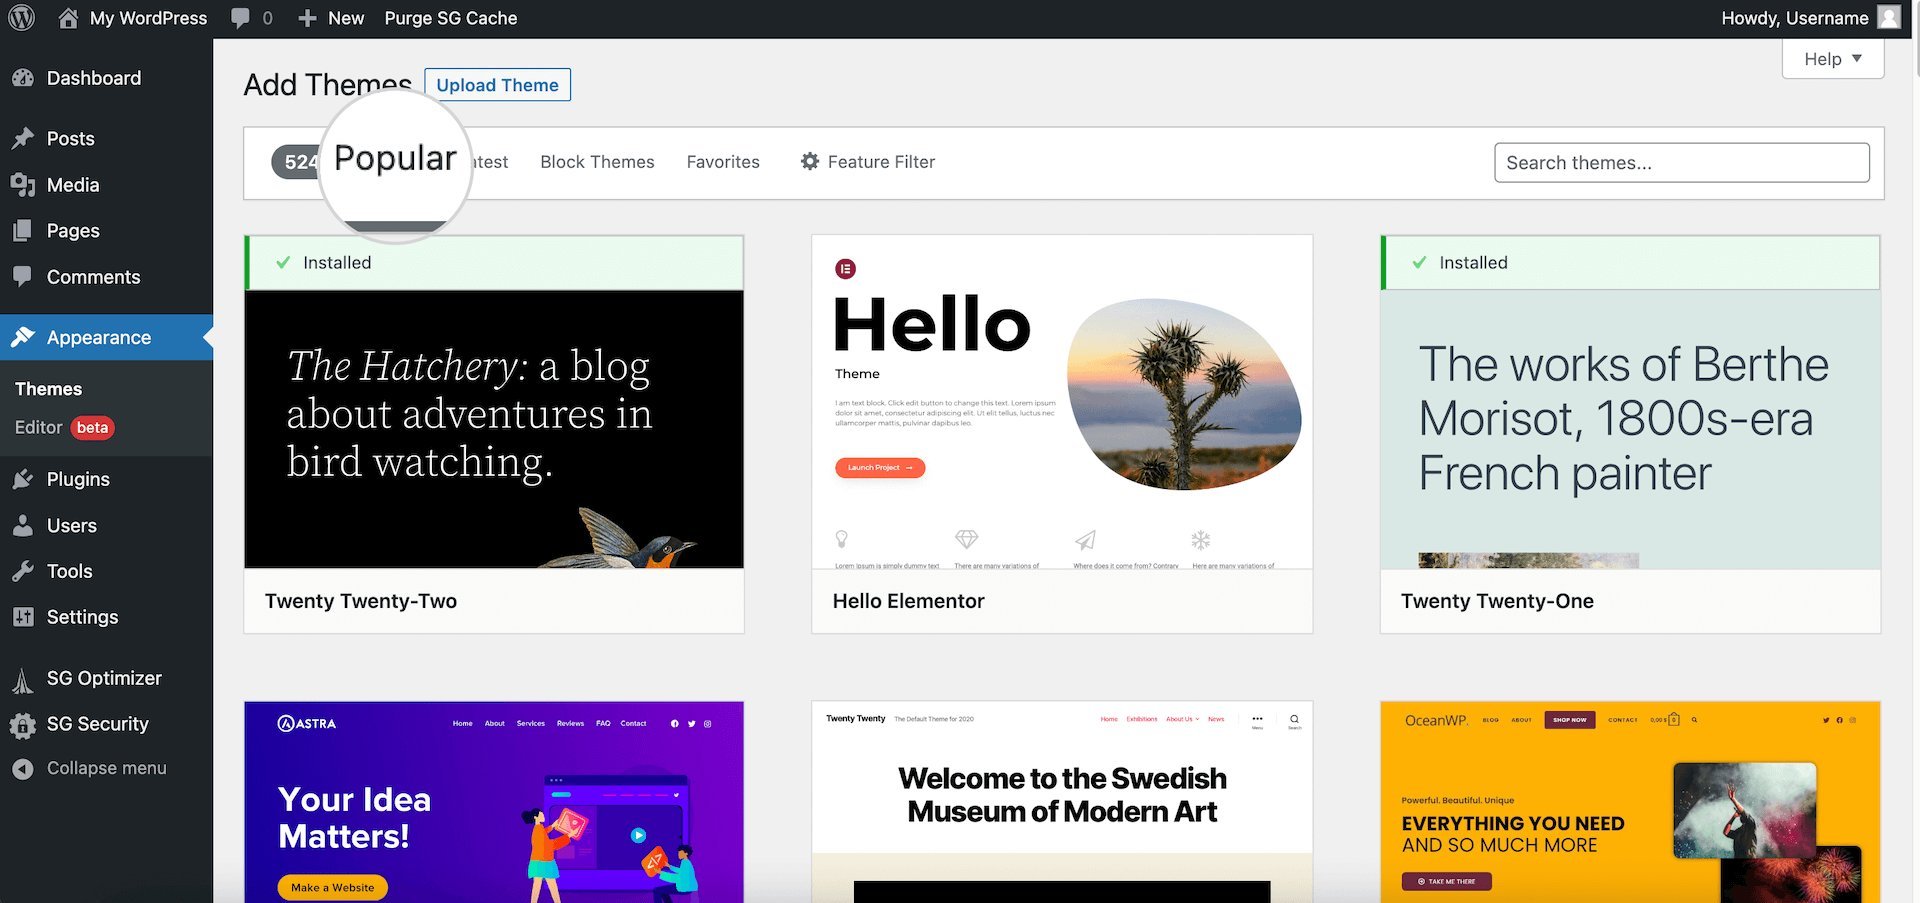
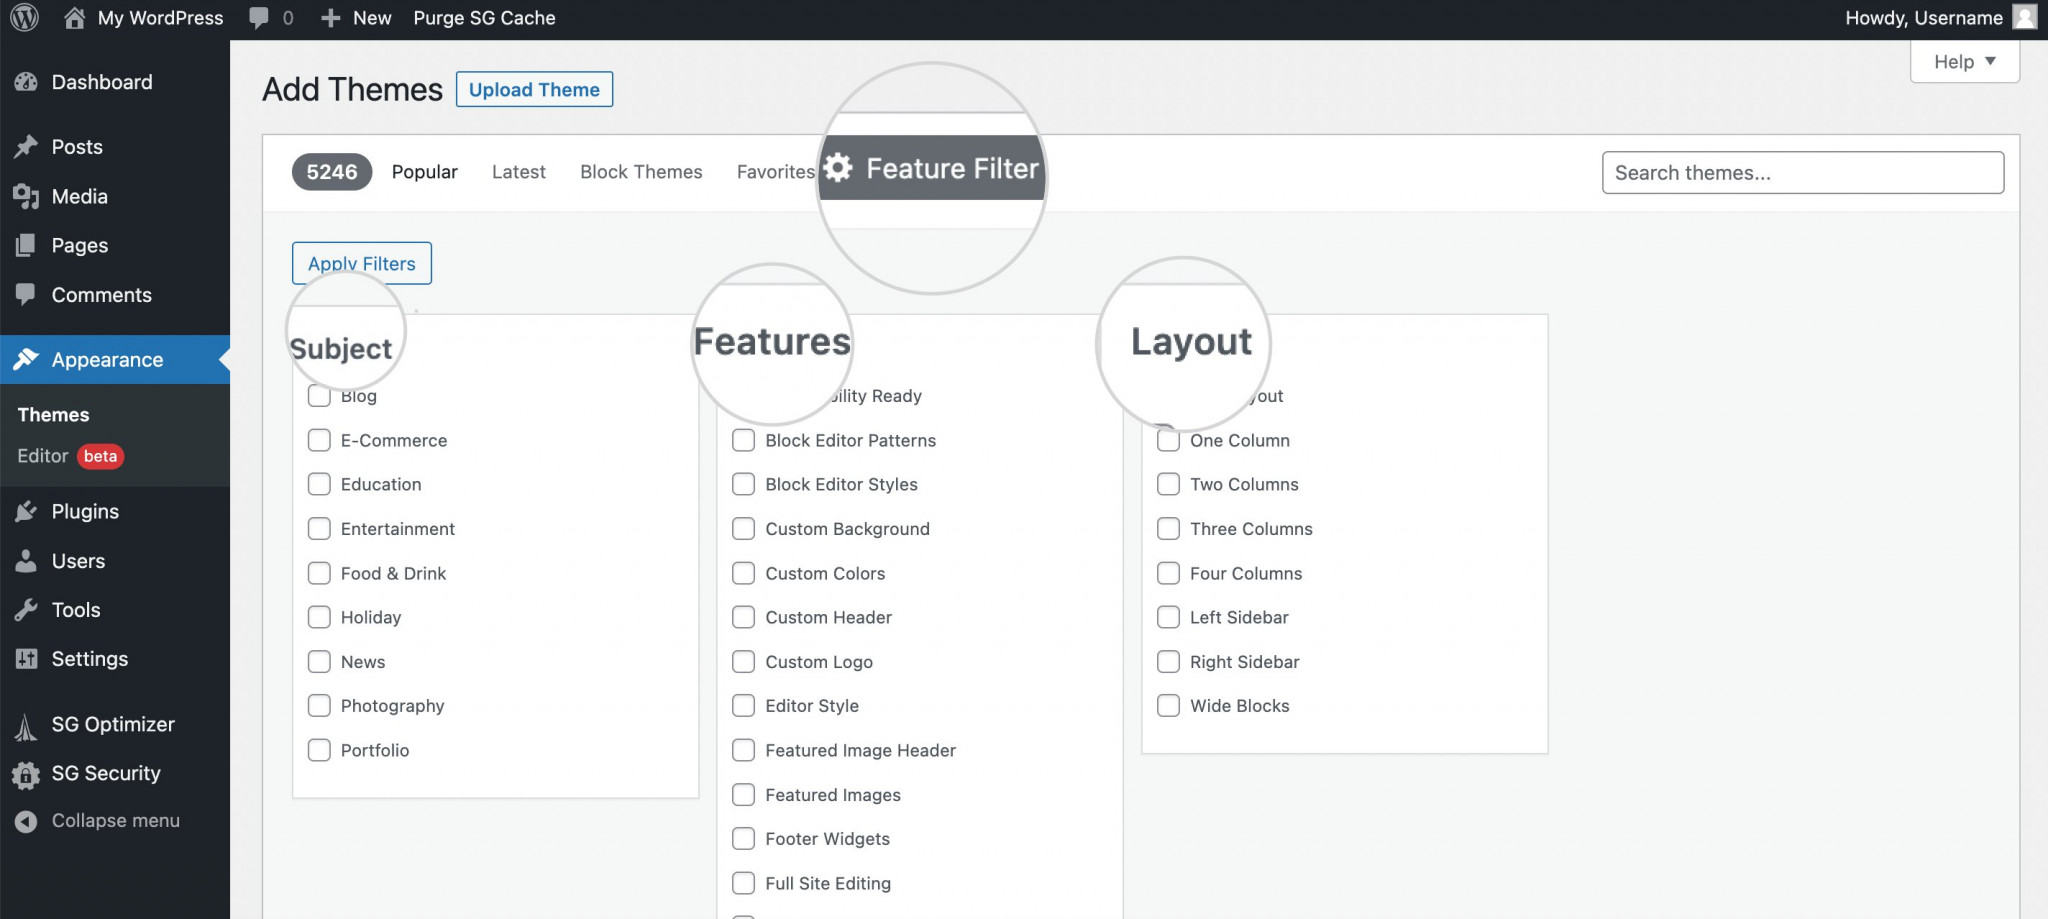
If you’re looking for something more specific, you can use the Feature Filter at the top of the page. This tool lets you narrow down themes based on your site’s topic, desired features, and preferred layout, making it easier to find a theme that fits your exact needs.
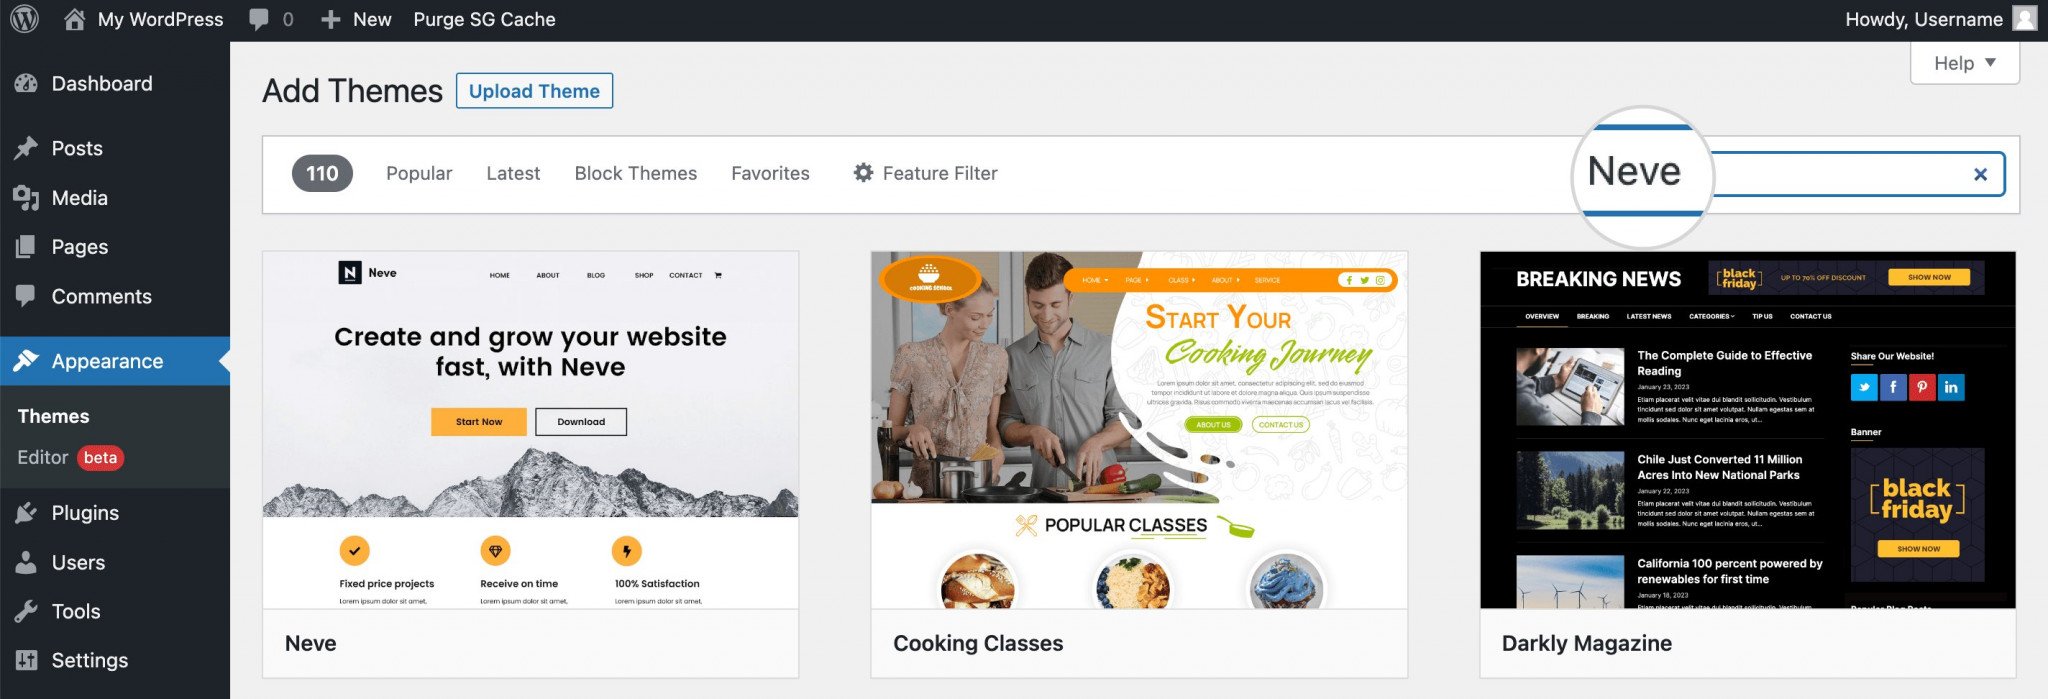
If you already have a specific theme in mind, simply type its name into the search bar located on the right side of the screen. WordPress will then display the theme along with any related variations, making it easy for you to find and install the one you want.
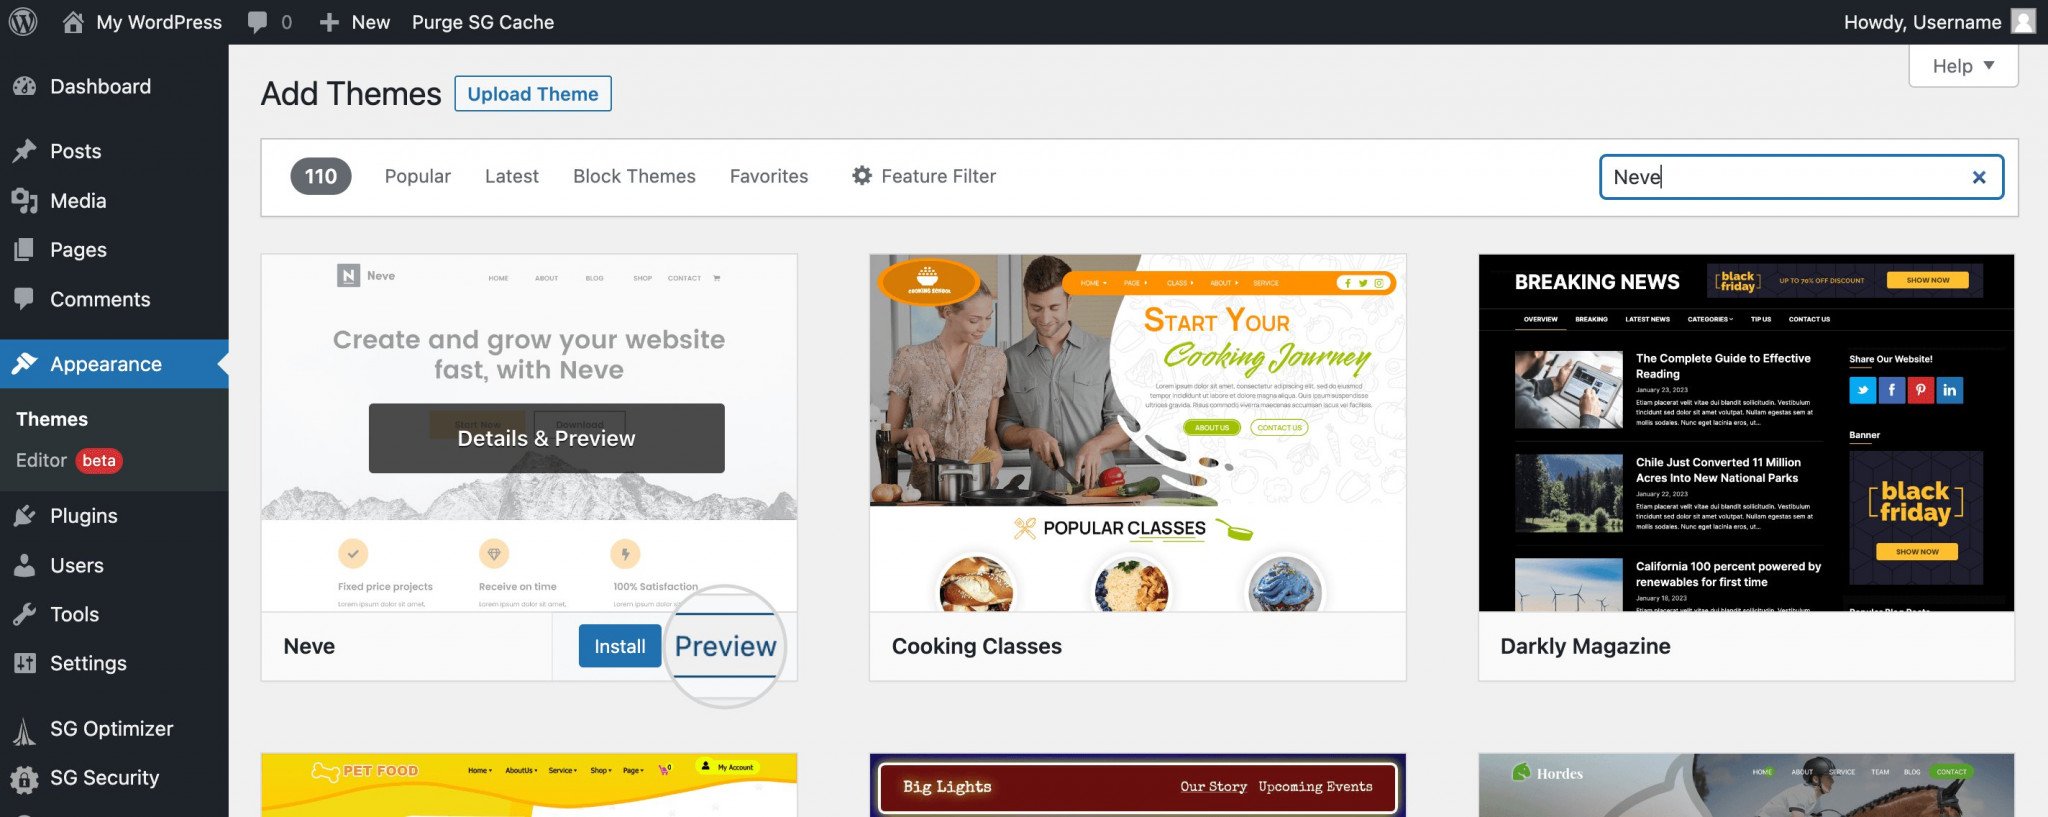
Hover your cursor over the theme to reveal the Preview button. Clicking it will let you see how the theme looks in action, giving you a better sense of its style and helping you decide how it might work with your content and branding.
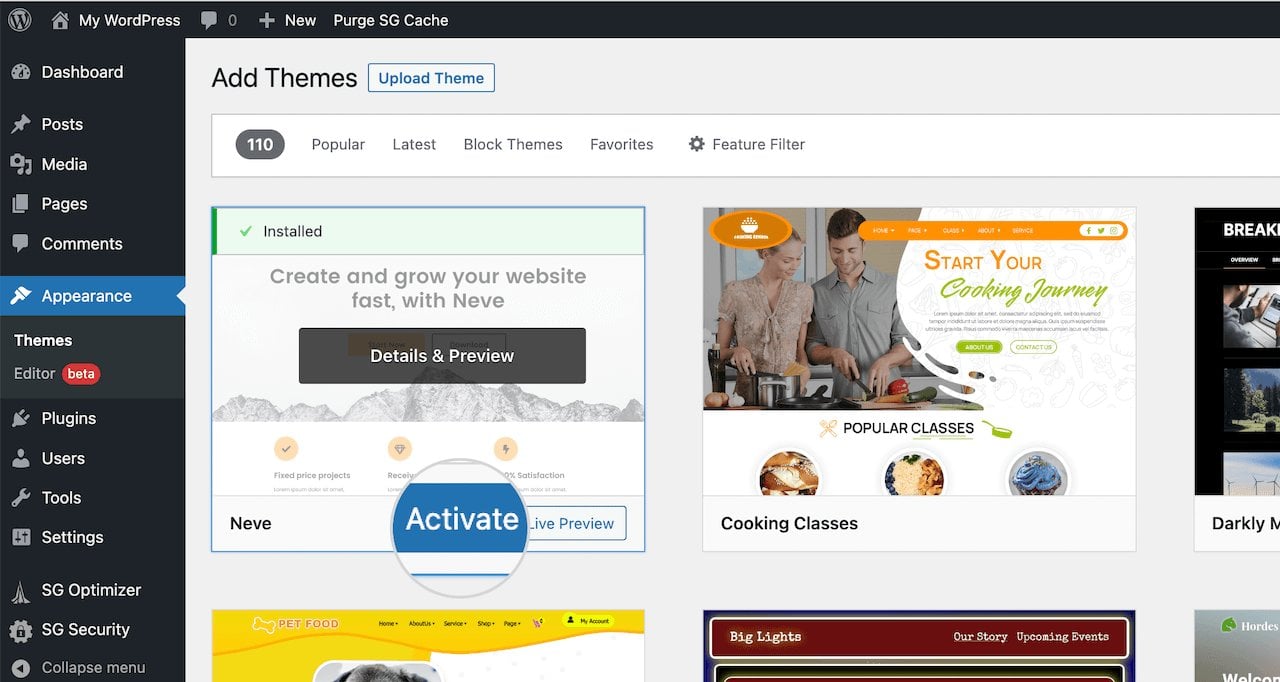
Once you’ve found a theme you like, installing it is easy. Just click the Install button that appears within the theme’s thumbnail.
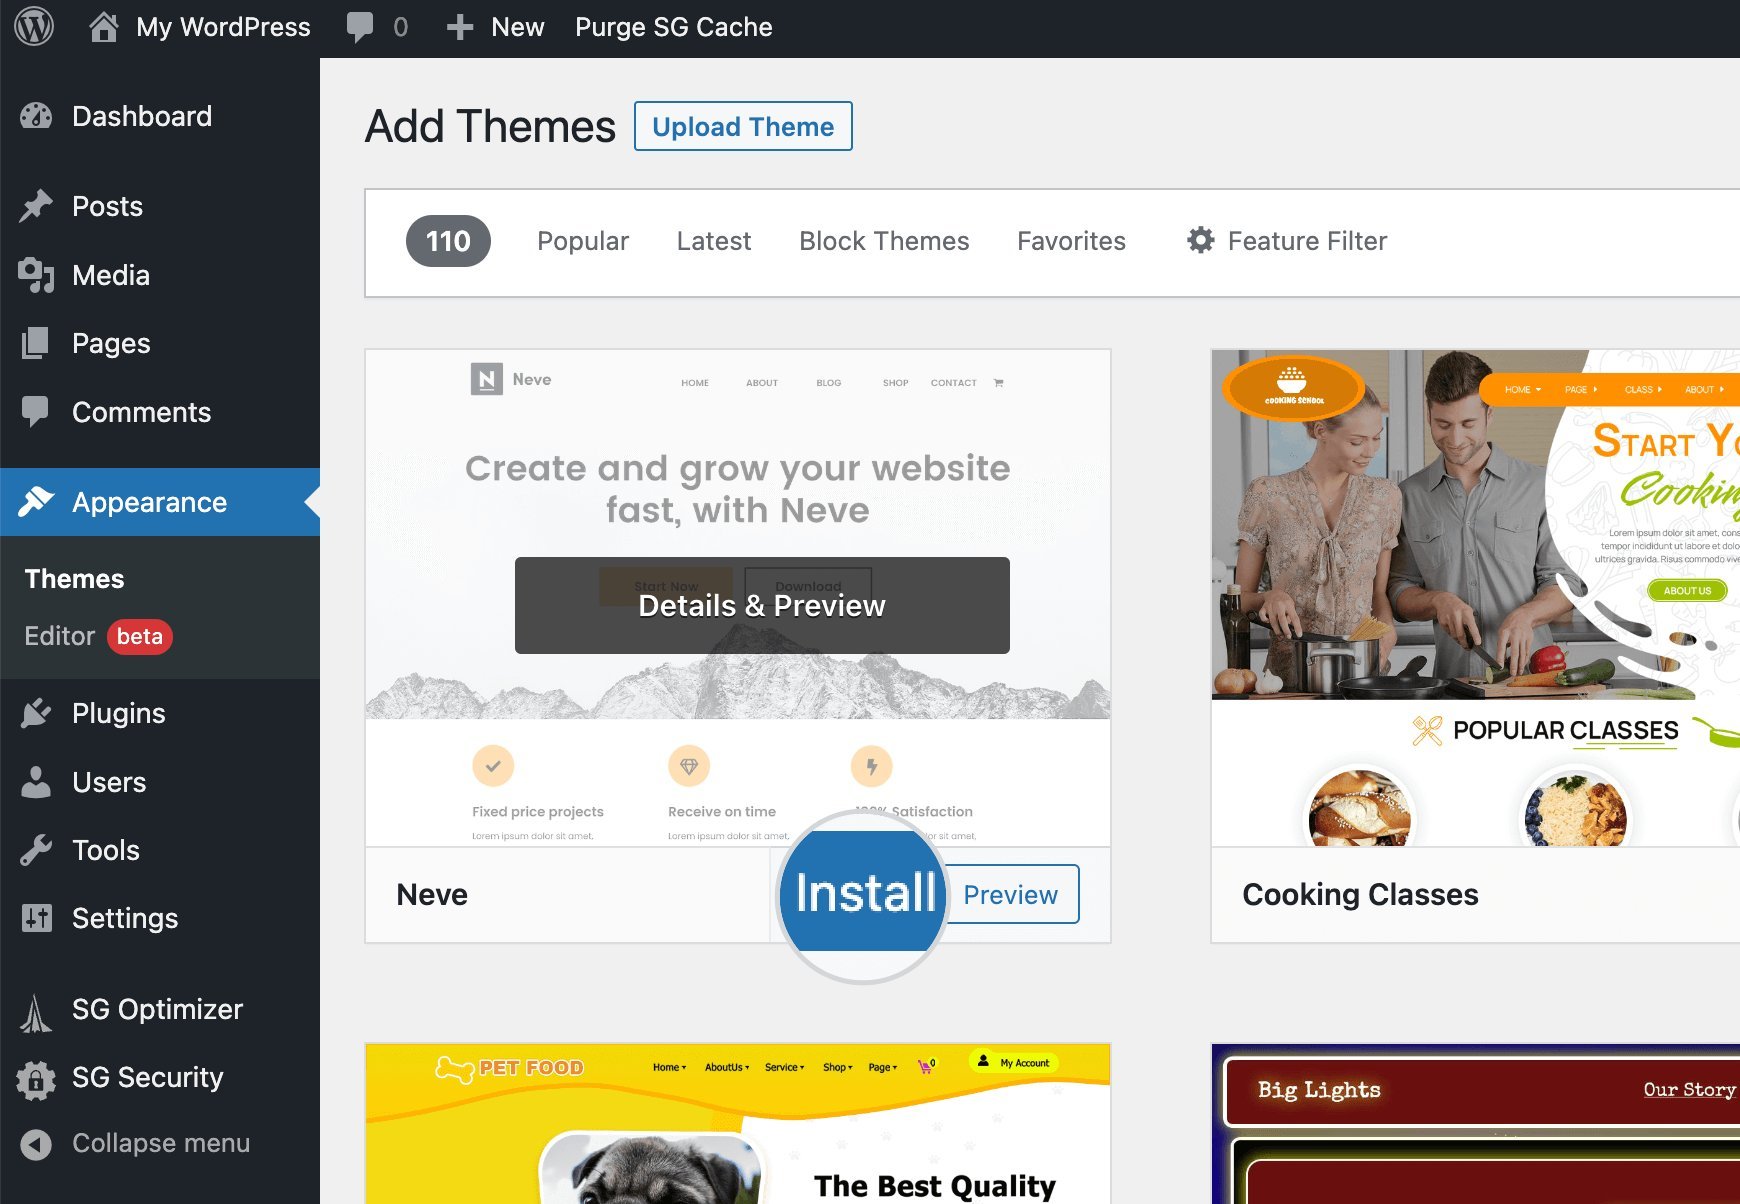
After clicking “Install”, WordPress will take a few moments to download and set up the theme. Once the installation is complete, a confirmation message will appear. You can then click the Live Preview button to explore how the theme looks and functions before activating it.
The final step in the WordPress theme installation process is to activate the theme you’ve just installed. Simply click the Activate button to apply it to your site.
Once activated, WordPress will automatically replace your current theme with the new one.
And that’s it. Your website now has a fresh new design. Don’t worry if it doesn’t look perfect right away. Most themes come with built-in customization options, allowing you to adjust colors, fonts, layouts, and more to match your style and branding.
Read more to discover other ways to install a WordPress theme effectively.
Step 6: Customize Your WordPress Theme
This is the stage where your website begins to reflect your personal style or brand identity. The good news is you don’t need any design background to get started. WordPress makes customization easy through its built-in tools.
Most themes offer a variety of settings that allow you to modify elements like colors, fonts, and layout, all without writing a single line of code.
To begin customizing your theme, follow the steps based on the type of theme you’re using:
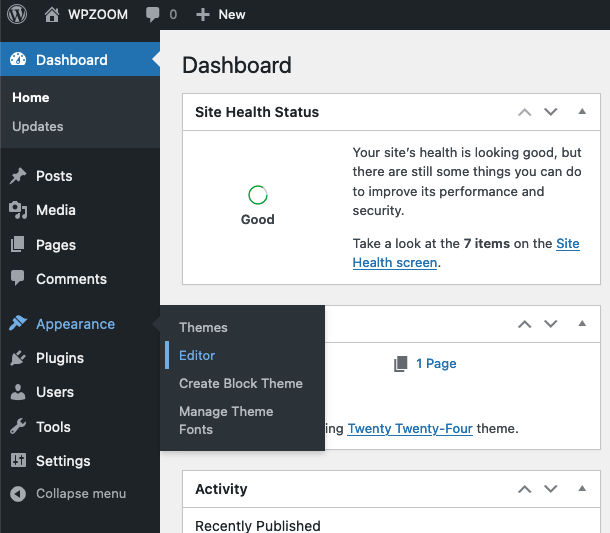
- For standard (classic) themes: Go to Appearance > Customize in your WordPress dashboard. This will open the WordPress Customizer, where you can adjust the look of your site with real-time previews. You’ll be able to modify colors, typography, headers, footers, and more.
- For block-based (Full Site Editing) themes: Navigate to Appearance > Editor. This takes you to the Site Editor, where you can design and customize your website’s entire layout, including individual templates and reusable blocks, directly from the front end.
Here are some key areas you can customize to tailor your WordPress site to your brand and goals:
- Site Identity: This section lets you upload a logo, set your site title and tagline, and add a favicon—the small icon that appears in browser tabs.
- Colors: Most themes allow you to personalize your site’s color palette. Choose colors that align with your brand to create a consistent and professional appearance.
- Typography: Depending on the theme, you can modify font styles for headings and body text. Selecting the right fonts enhances readability and gives your site a polished look.
- Menus: Customize your site’s navigation structure under Appearance > Menus. You can create menus for your header, footer, or sidebar and decide which pages, links, or categories to include.
- Widgets: Widgets add extra functionality to your site, such as displaying recent posts, social media feeds, or a search bar. You can place and organize widgets in designated areas like the sidebar or footer by going to Appearance > Widgets.
Step 7: Install Essential Plugins
Now that your site is starting to take shape with a fresh theme, it’s time to add some plugins. Think of plugins as apps for your website. They add new features and functionality to make your site even more powerful and user-friendly.
The WordPress Plugin Directory offers thousands of free plugins, covering a wide range of use cases. For more advanced features and dedicated support, you can also explore premium plugins from third-party developers.
Let’s go over how to add a plugin.
The most straightforward method to add a WordPress plugin is through the admin dashboard. First, log in to your WordPress site and go to Plugins > Add New.
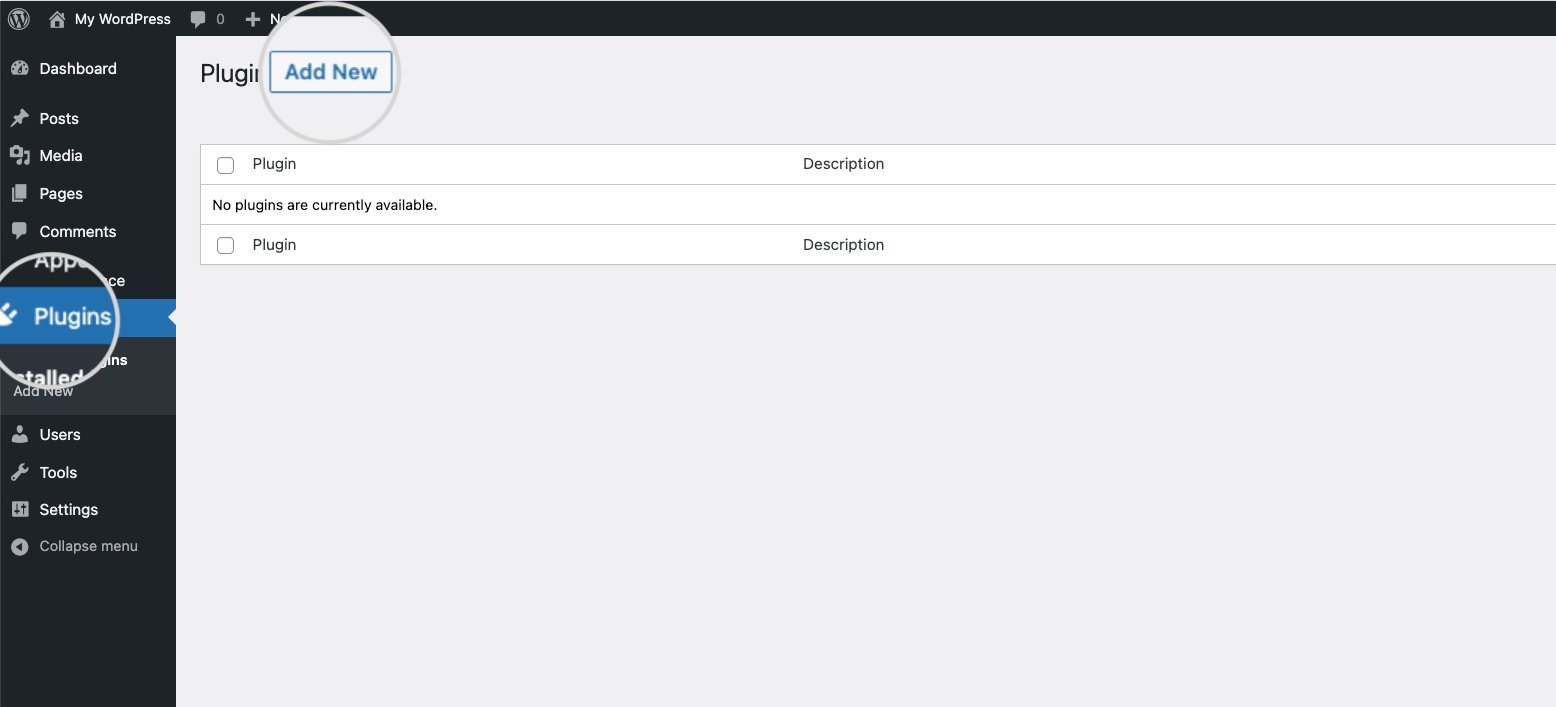
On this page, you can quickly explore the WordPress Plugin Directory and install plugins with just one click. Use the search bar in the top right corner to find plugins by keyword, author, or tag.
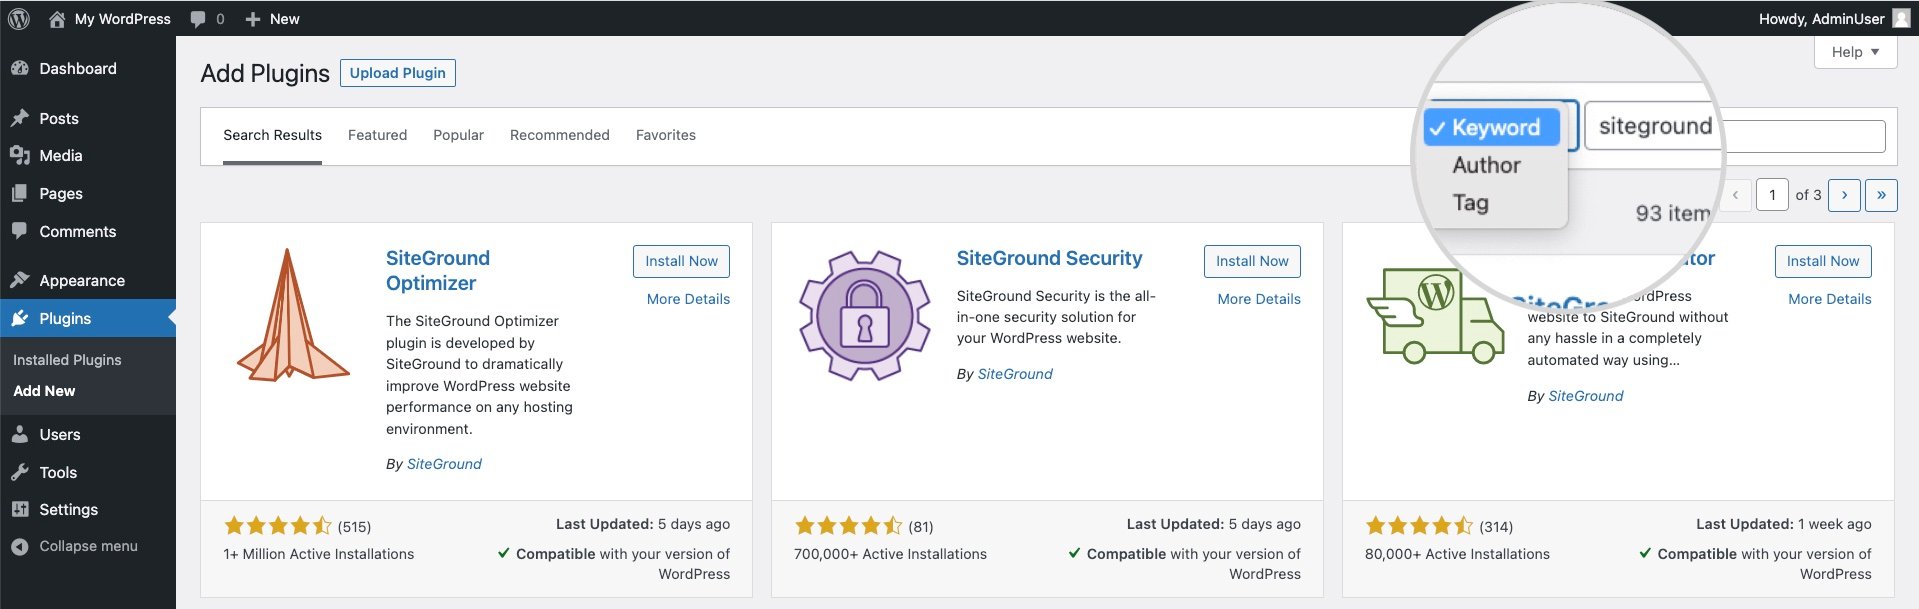
You can also browse plugin collections by selecting tabs like Featured, Popular, Recommended, or Favorites, depending on what you’re looking for.
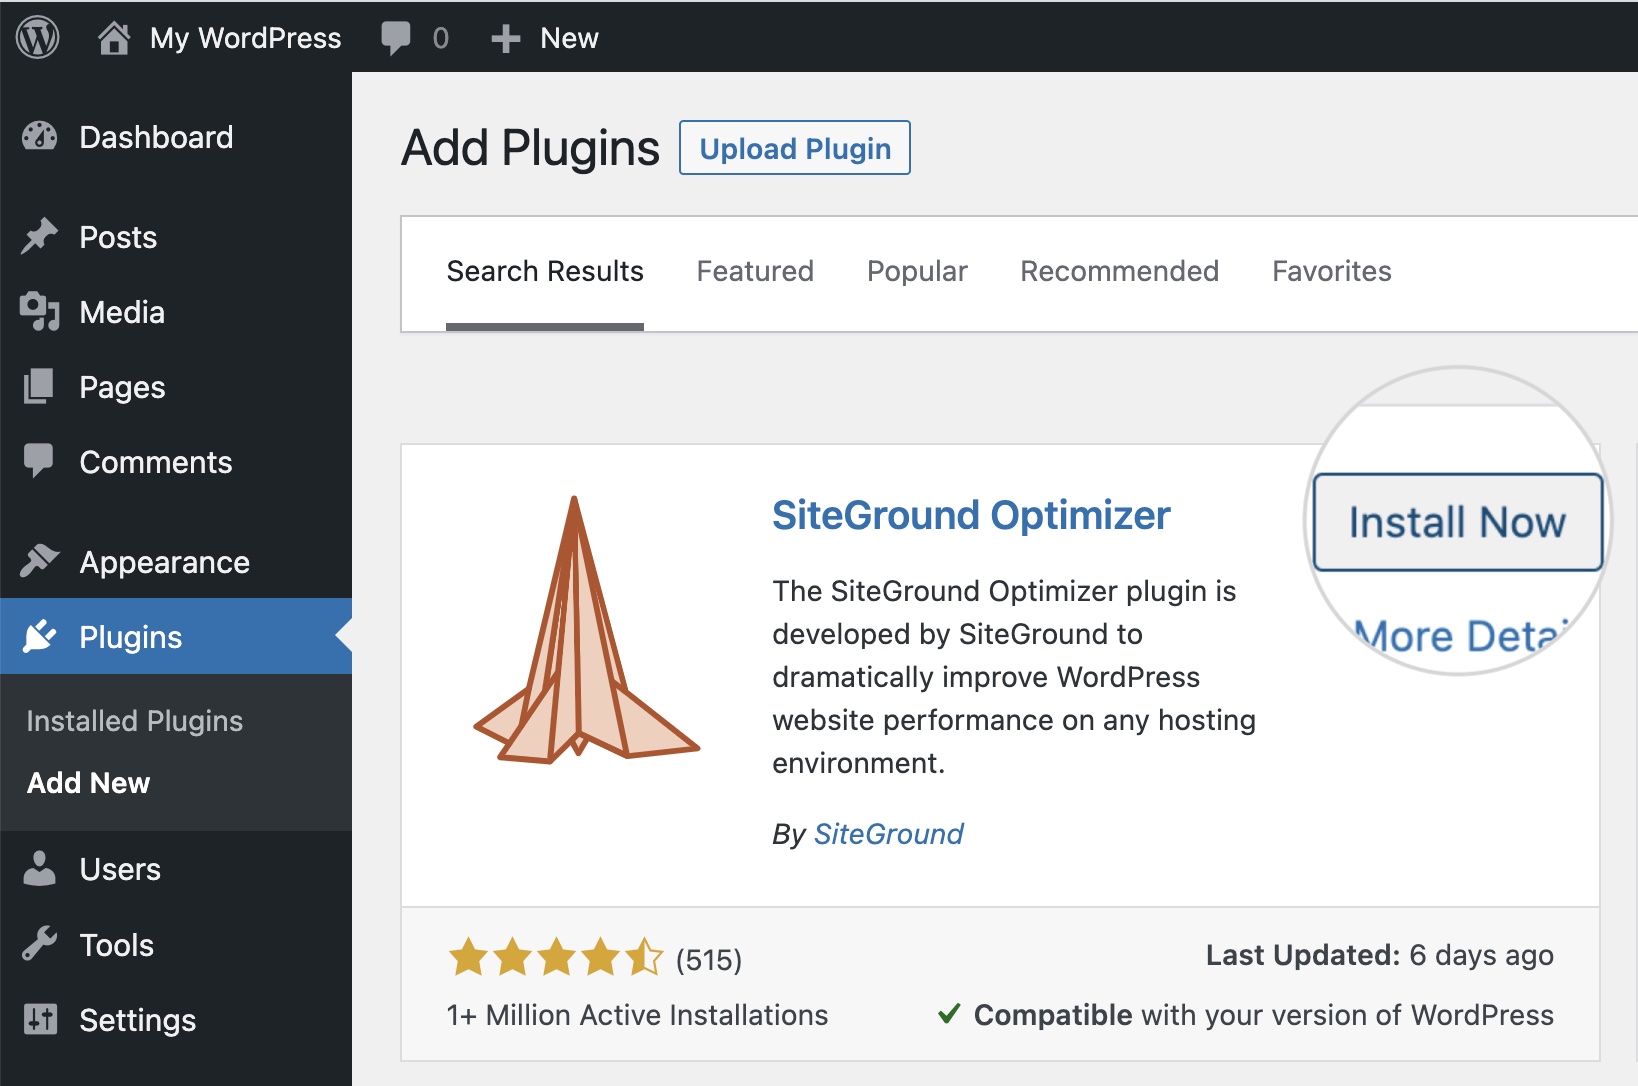
Once you’ve found a plugin you want to use, simply click “Install Now”. WordPress will automatically download and set it up for you.
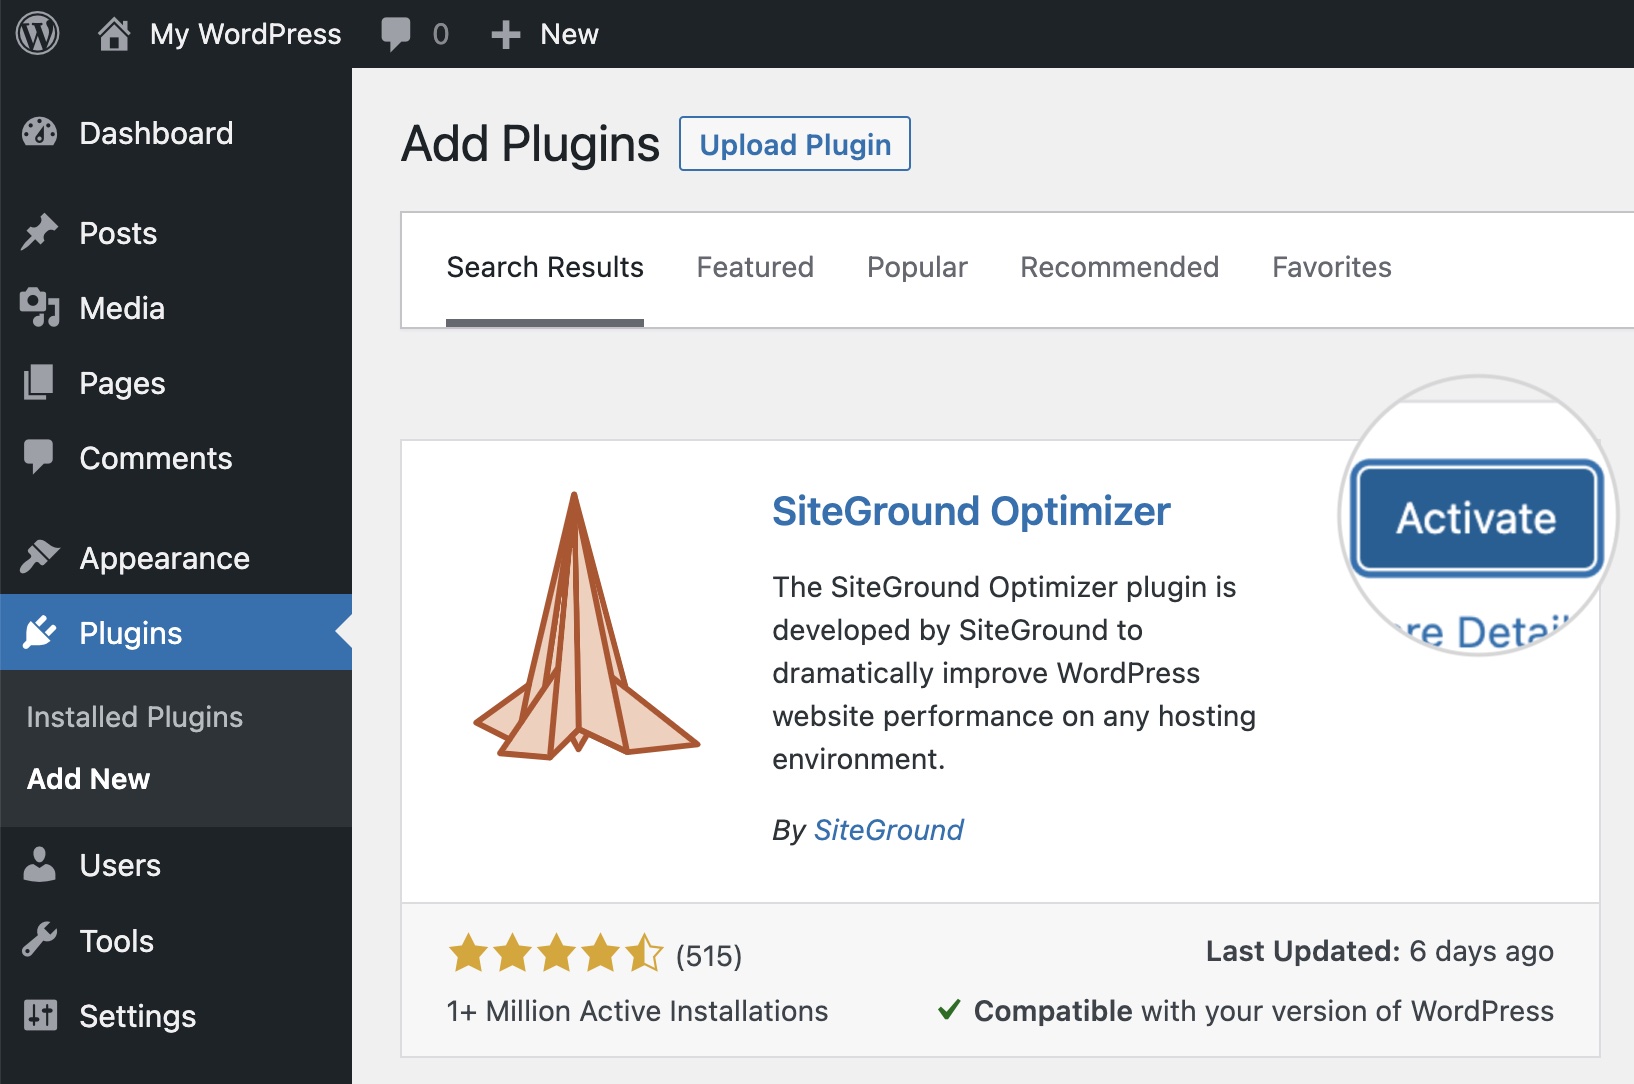
After the installation finishes, the Install Now button will change to Activate. Click it to enable the plugin on your website.
Step 8: Add Content to Your Website
Content is the core of your website—it’s what attracts and retains visitors. Whether you’re publishing blog articles, showcasing portfolio pieces, or writing product descriptions, compelling content is key to keeping your audience engaged.
WordPress lets you create two main content types: pages and posts, each serving a distinct purpose.
- Pages: These are for timeless content like your Home, About, or Contact page. They’re static and not part of your blog feed.
- Posts: These are used for time-based updates such as blog articles or news. They appear in reverse chronological order and can be organized with categories and tags.
Creating Key Pages
- Home Page: This is your site’s front door. Make it clear and compelling. Introduce who you are, what you offer, and how visitors can benefit.
- About Page: Share your story to build trust. Explain your background, mission, or what inspired your project.
- Contact Page: Make it easy for visitors to get in touch. Include a simple contact form, email, or other relevant details.
- Blog Page: Planning to publish articles? This is where they’ll live. Even if you’re not blogging yet, it’s a great way to share updates and insights in the future.
How to Add Content
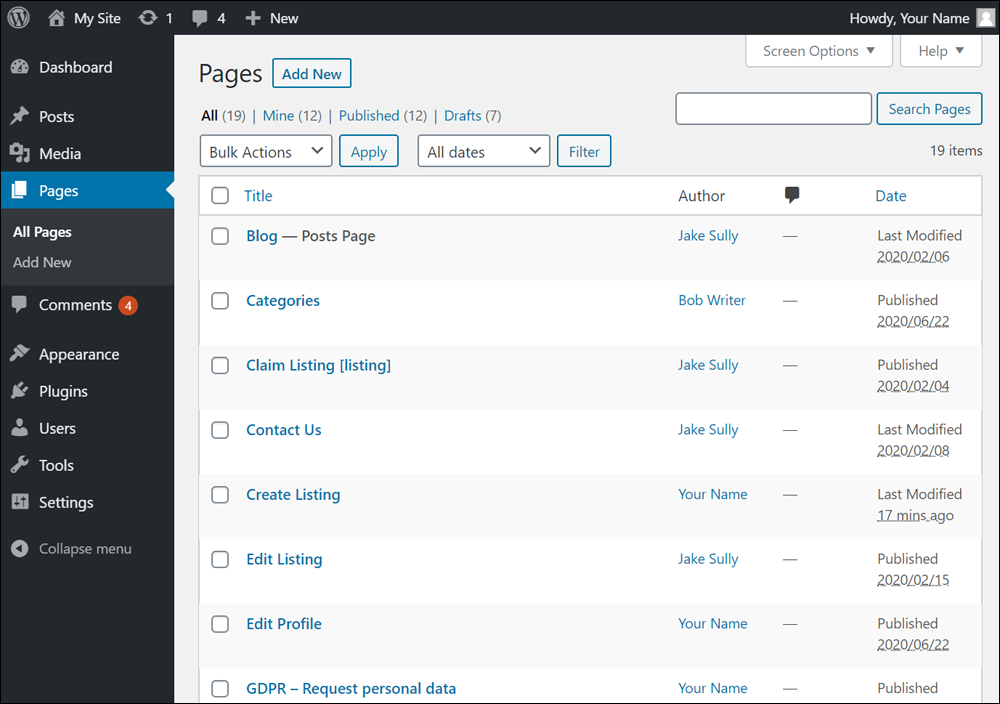
- Go to Pages > Add New in your WordPress dashboard to create a new page.
- If you’re adding a blog post, navigate to Posts > Add New instead.
- Write your content clearly, use headings to break it up, and include images to make it more engaging.
Step 9: Optimize Your WordPress Website for SEO
You’ve put in all this hard work, and now it’s time to make sure people can actually find your website. This is where SEO, or Search Engine Optimization, comes into play. It helps your site rank higher on search engines like Google, increasing your chances of reaching a wider audience.
Here’s how to get started with SEO on WordPress:
- Optimize your content: Use the Yoast SEO plugin to fine-tune your titles, meta descriptions, and body text with your target keywords. This helps search engines understand and rank your content effectively.
- Use clean, keyword-friendly URLs: Go to your permalink settings and choose a structure that uses words instead of numbers (e.g., yourdomain.com/baking-tips instead of yourdomain.com/?p=123).
- Add internal links: Link to other relevant pages or posts on your site to help users navigate and encourage search engines to crawl more of your content.
- Publish content people want to share: Focus on valuable, helpful content like how-to articles, guides, or infographics—things your audience will want to share and link to.
SEO might seem overwhelming at first, but the good news is WordPress handles much of the groundwork for you. Just focus on creating valuable, high-quality content and your rankings will naturally improve over time.
Step 10: Set Up Website Security
Your WordPress website is coming together beautifully, but there’s one last thing we need to talk about: security. Keeping your website secure is crucial because, let’s face it, hackers are out there, and you want to protect your hard work.
Here’s how to keep your WordPress site secure:
- Set up SSL: If your host hasn’t done this by default, make sure your site has an SSL certificate. This encrypts user data and switches your site to “HTTPS” for a secure connection. Most hosting providers include this for free.
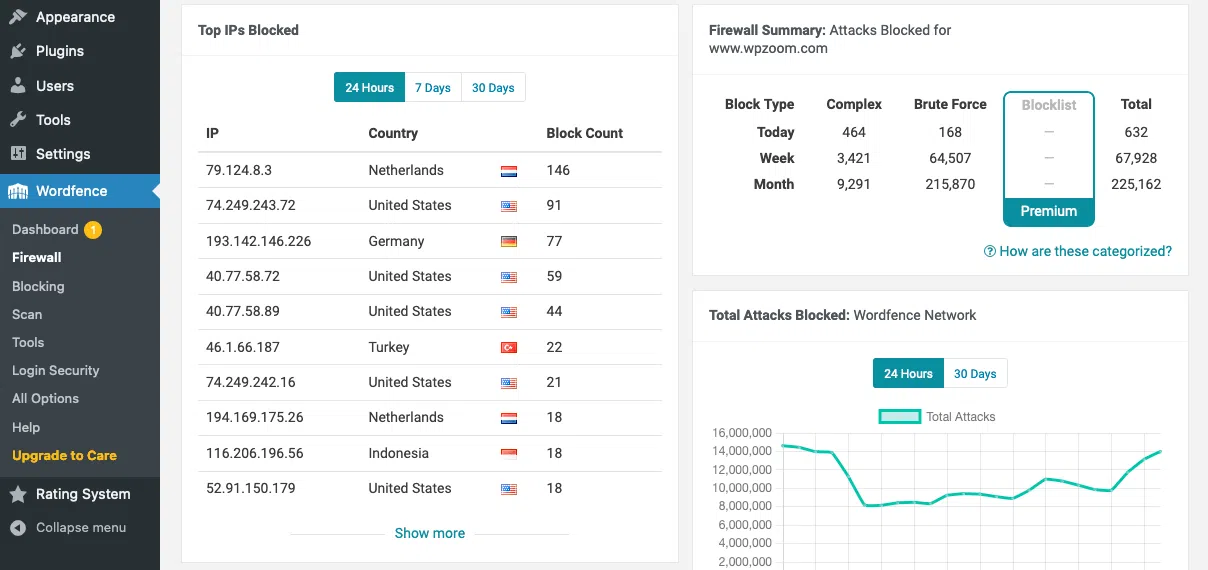
- Install a security plugin: Use plugins like Wordfence or Sucuri to protect your site with a firewall, block harmful traffic, and scan for malware.
- Back up your site regularly: Use tools like UpdraftPlus to create automatic backups. If anything ever goes wrong, you’ll be able to restore your site quickly.
By putting these basic security steps in place, you lower the risk of cyber threats and help keep your site secure and running smoothly.
Step 11: Launch Your WordPress Website
You’ve made it! After all your effort, your website is nearly ready to go live.
- Before launching, use this quick checklist:
- Is all your content complete and error-free?
- Does the design reflect your brand?
- Are all the links working properly?
- Have you tested the site on different browsers (Chrome, Firefox, Safari) and devices (desktop, tablet, mobile)?
If everything checks out, hit that launch button! Share your site with friends, family, and on social media. And remember—this is just the beginning. You’ll keep refining and growing your website over time.
Step 12: Maintain and Update Your WordPress Website
Your website is now live, but your job isn’t done yet. Like any ongoing project, a WordPress site needs regular care to stay secure, fast, and effective.
Here’s how to maintain it:
- Keep everything updated: WordPress core, themes, and plugins receive regular updates. Stay on top of them to avoid security issues and take advantage of new features.
- Track performance: Use tools like Google Analytics to see how visitors are interacting with your site. Identify slow pages or high bounce rates and optimize where needed.
- Always back up your site: It can’t be stressed enough. Set up automatic backups. If something ever goes wrong, you’ll be glad you did.
By following these simple steps, your WordPress site will stay healthy and continue to grow with your audience.
Frequently Asked Questions
1. Can I create a WordPress website for free?
You can build a completely free website using WordPress.com, but it comes with limited customization and monetization options. A better approach is to choose an affordable web hosting plan and domain name for WordPress.org. This way, you’ll have full control over your site and can install free plugins and themes to customize it as you like.
2. How much does it cost to start a WordPress site?
Starting a WordPress site can cost anywhere from $50 to $3,000 per year, depending on your goals. Basic expenses include web hosting and a domain name. Additional costs may come from premium plugins, themes, hiring a developer, or investing in extra security features.
3. Can I make a WordPress website without hosting?
Yes, it’s possible to create a WordPress website without hosting by building it locally using free tools like LocalWP. Once your site is ready, you can migrate it to a live hosting provider.
4. Can I build a WordPress website without coding knowledge?
Yes. WordPress is beginner-friendly and doesn’t require any coding. You can use themes and plugins to design your site easily.
Conclusion
Building a WordPress website may seem overwhelming at first, but with the right guidance, it’s a straightforward and rewarding process. From choosing a theme and installing essential plugins to adding great content and optimizing for SEO, each step brings your site closer to going live.
At Arestós, we help individuals, startups, and businesses build fast, secure, and scalable WordPress websites that reflect their brand and engage their audience. Whether you’re starting from scratch or need help polishing an existing site, our team is here to guide you every step of the way.
Contact us now to get expert support for your WordPress project and turn your website idea into a powerful online presence.
Subscribe to our newsletter!
Get updated to
the lastest IT trends
Related Posts
Update the latest technology trends for your business