Back to featured insights
Step-by-Step Guide: Installing and Customizing Creative WordPress Themes
Are you ready to take your website to the next level with a visually captivating and engaging design? Creative WordPress themes are the answer! In this step-by-step guide, we will walk you through the process of installing and customizing creative WordPress themes to transform your website into a stunning digital masterpiece.
Table of Content
Share
Looking to build a standout website without technical skills? Creative WordPress themes make it easy to create a stylish, modern site that fits your vision.
This guide will walk you through the full process of installing and customizing a creative theme, even if you’re just getting started.
Take a look at the main sections below to help you navigate through the process of working with a creative WordPress theme:
- What is a WordPress theme?
- How to choose a WordPress theme?
- What you need to do before installing a WordPress theme
- How to Install a WordPress Theme
- How to customize a creative WordPress theme
- Frequently Asked Questions
What is a WordPress theme?
A WordPress theme is a set of files that defines the appearance and structure of your website. It controls elements like layout, colors, fonts, and page templates using code files such as PHP, CSS, and JavaScript.
When a theme is activated, it applies a consistent design across your site. WordPress uses different theme templates depending on the type of content being viewed, like single.php for blog posts.
Most themes also offer built-in customization options, allowing you to adjust design settings without coding, often through the WordPress Customizer. Some advanced themes include page builders or extra features to help users create unique layouts more easily.
How to choose a WordPress theme?
Choosing the right theme is foundational to your website’s success. To avoid getting lost in thousands of options, focus on these key factors when selecting a WordPress Theme:
- Design & Brand Alignment: Ensure the theme’s style (e.g., minimalist, bold) aligns with your brand’s personality. A great creative theme should communicate your message, not just look visually appealing.
- Responsiveness & Mobile-First: Your website must look and function perfectly on all devices. Always test the theme’s live demo on your smartphone and tablet to confirm its responsiveness.
- Features & Included Plugins: List your must-have features (portfolio, e-commerce, etc.). Check for bundled premium plugins like page builders or sliders, as this can save you a lot of money.
- Performance & Speed: A beautiful but slow website will lose visitors. Use tools like GTmetrix or PageSpeed Insights to test the theme demo’s loading speed before you buy.
- Ratings, Reviews & Popularity: Look for themes with high ratings, a significant number of sales, and recent positive reviews. Crucially, read the negative comments to understand potential drawbacks.
- Support & Documentation: Reliable support and clear documentation are essential. Verify that the author offers support (ticket system, forum) and provides detailed guides or video tutorials.
- Regular Updates & Active Development: An outdated theme is a security risk. Check the “Last Updated” date before purchasing. Frequent updates ensure compatibility with WordPress, fix bugs and improve security.
- SEO Friendliness: A great design needs to be discoverable on search engines. Choose themes advertised as “SEO-Friendly,” which typically means they have clean code and are compatible with major SEO plugins.
What you need to do before installing a WordPress theme
Before installing a new WordPress theme, it’s important to take a few precautionary steps to protect your website:
- Back up your site: This ensures that if anything goes wrong, you can restore your content and settings without data loss.
- Use a staging environment: Test the new theme on a staging site, which is a clone of your live site, so changes won’t disrupt the user experience.
- Save existing custom code and tracking scripts: Keep a copy of any customizations or analytics code to easily reapply them after switching themes.
- Update WordPress and plugins: Make sure everything is up to date to prevent compatibility issues with the new theme.
How to Install a WordPress Theme
There are three primary methods to install a WordPress theme, and each one is suited for a different scenario. Whether you’re using a free theme from the WordPress repository, uploading a premium theme, or installing via FTP, the process is straightforward.
Let’s explore each method step by step.
Installing a theme via the WordPress Theme Repository
The most straightforward way to install a theme is by using the WordPress Theme Directory. All themes available here are free and come directly from the official WordPress repository, ensuring they meet the platform’s coding standards.
In this part, we’ll walk you through how to find and install a free theme from the directory, let’s get started.
First, log in to your WordPress Dashboard. This is the control panel where you can manage your entire site, including adding content, installing plugins, and customizing themes.
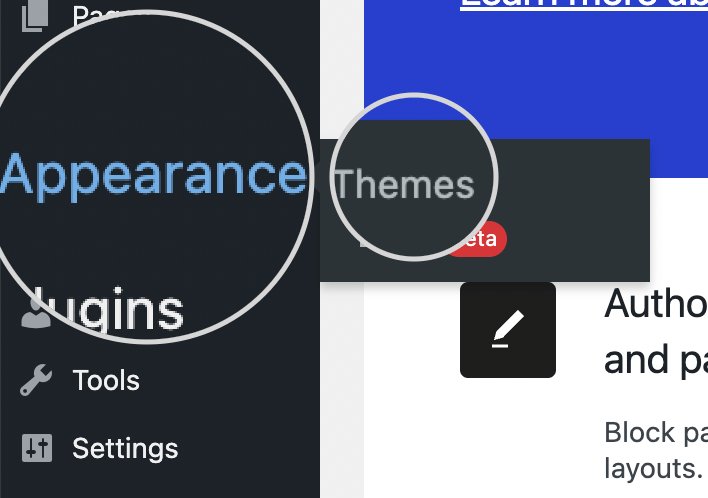
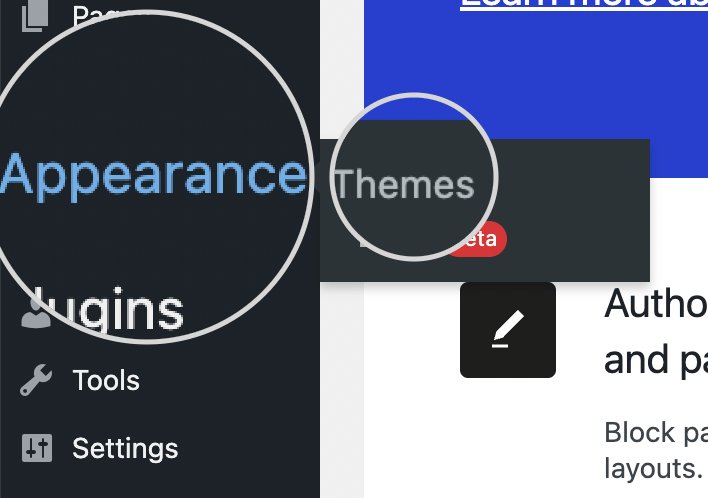
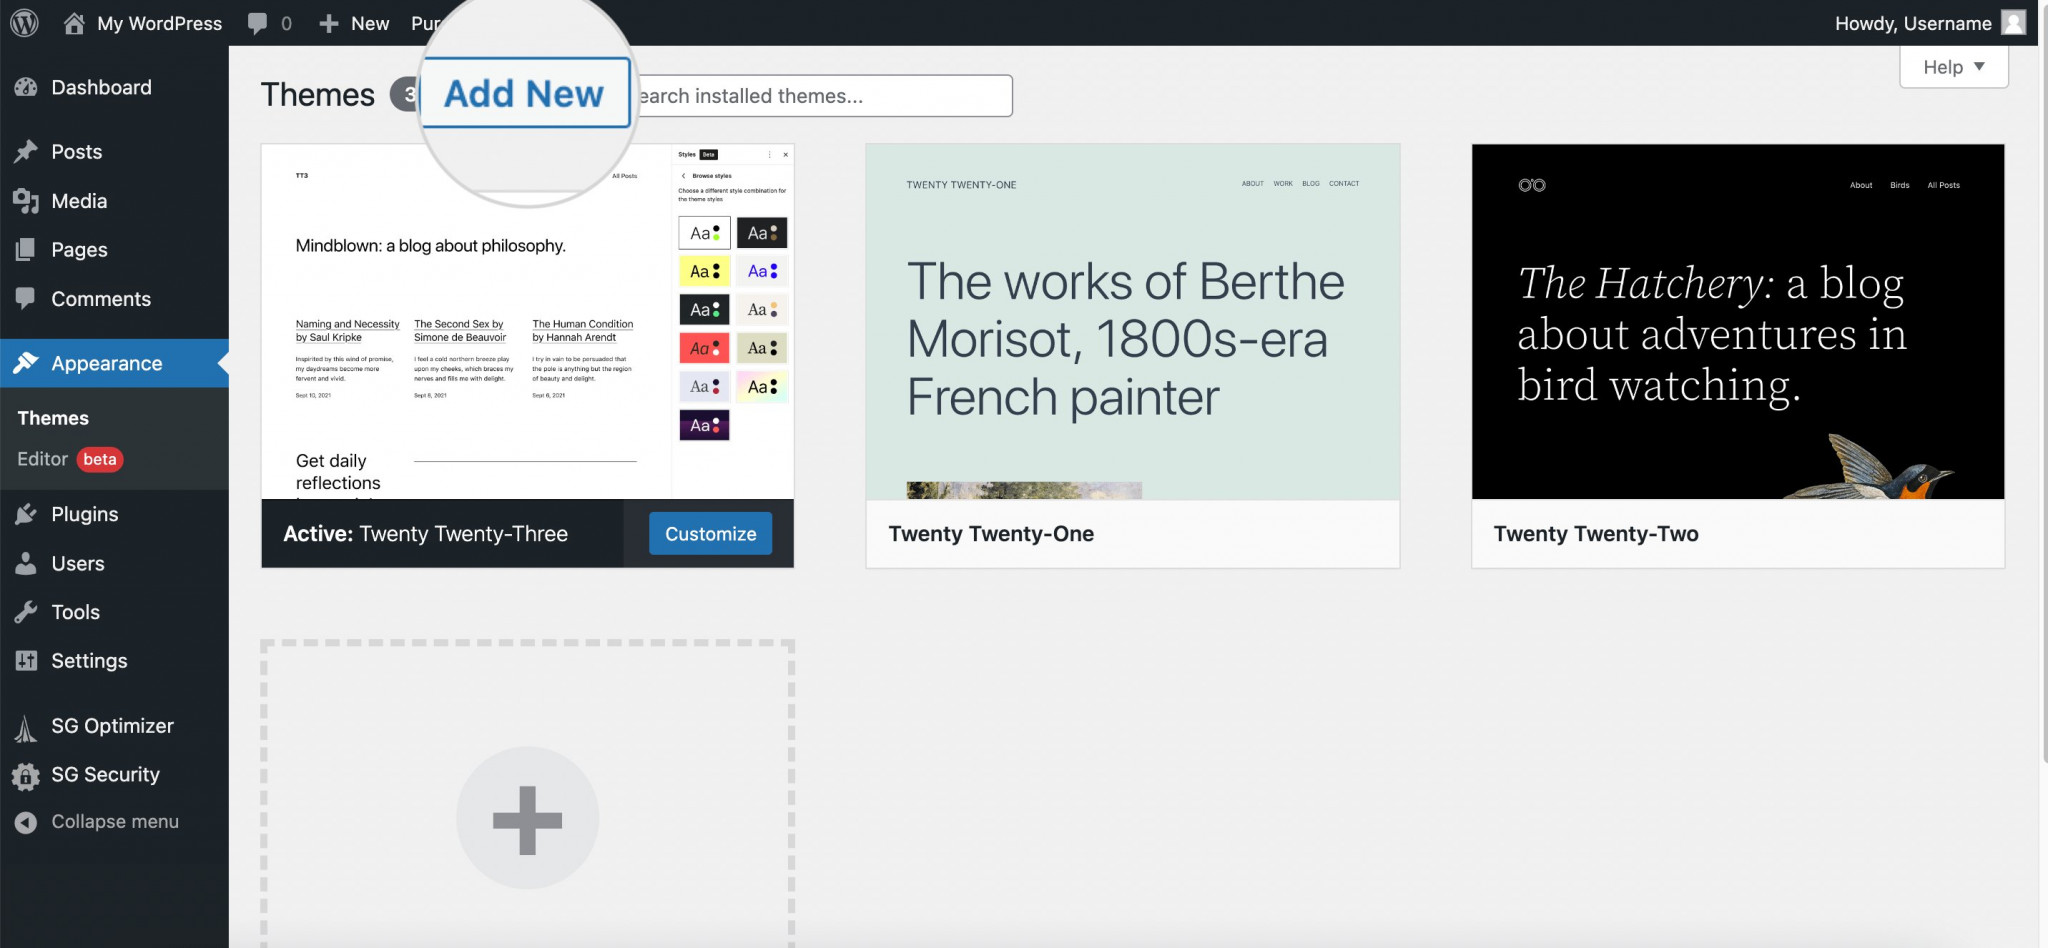
Once you’re in the Dashboard, click on “Appearance”, then select “Themes” from the sidebar.
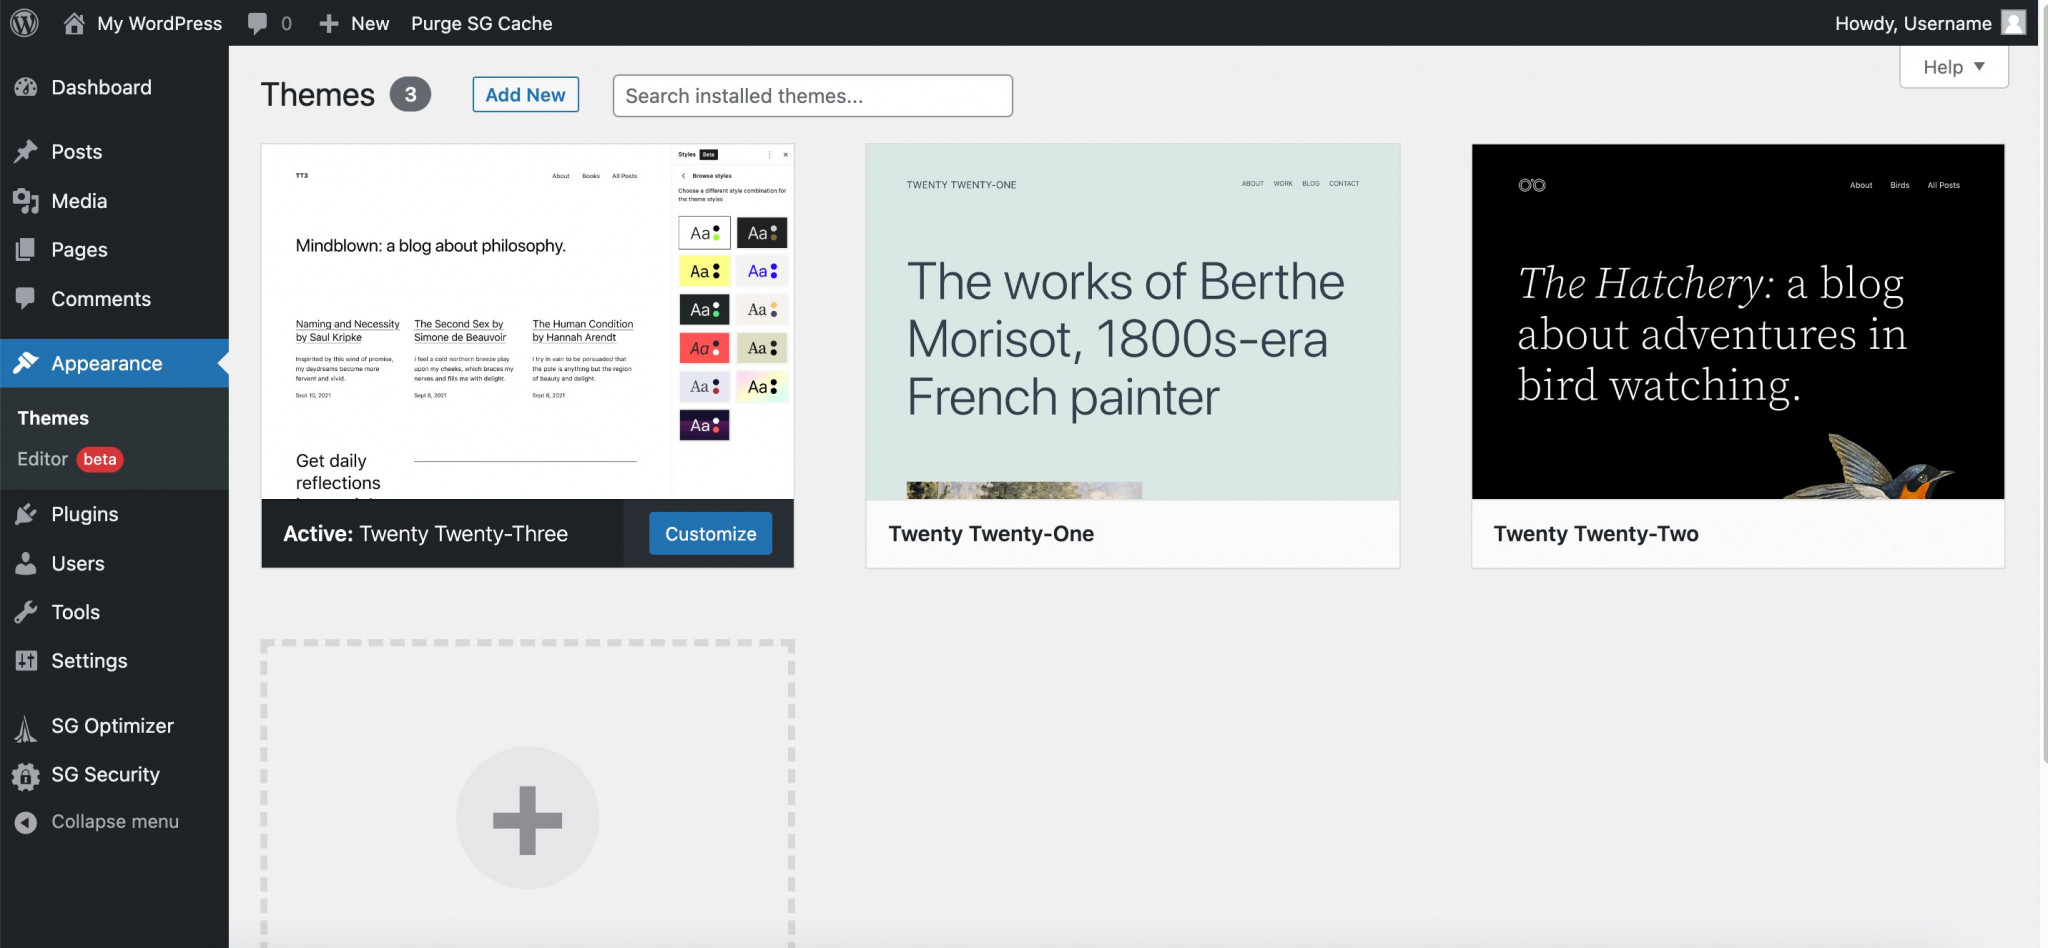
This section displays all available themes on your site, including the default ones provided by WordPress and any themes you’ve added before.
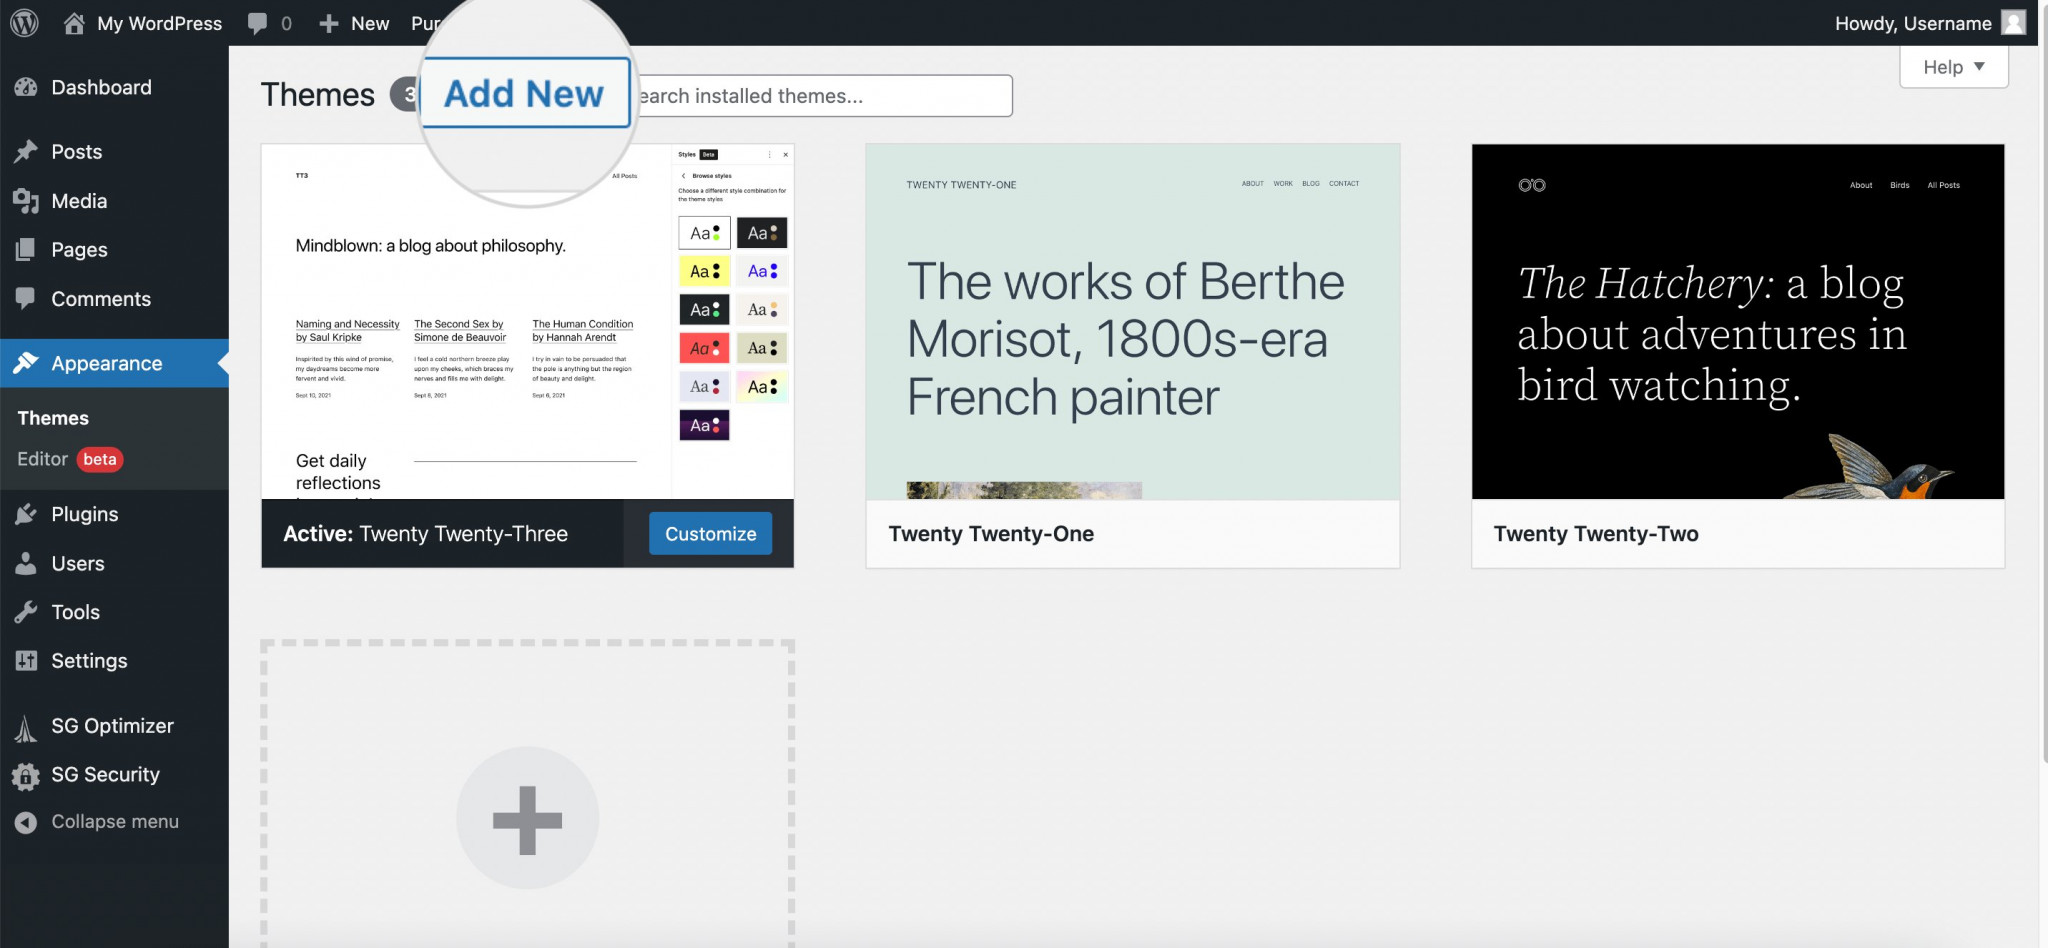
To add a new theme, simply click the “Add New” button located near the top center of the screen.
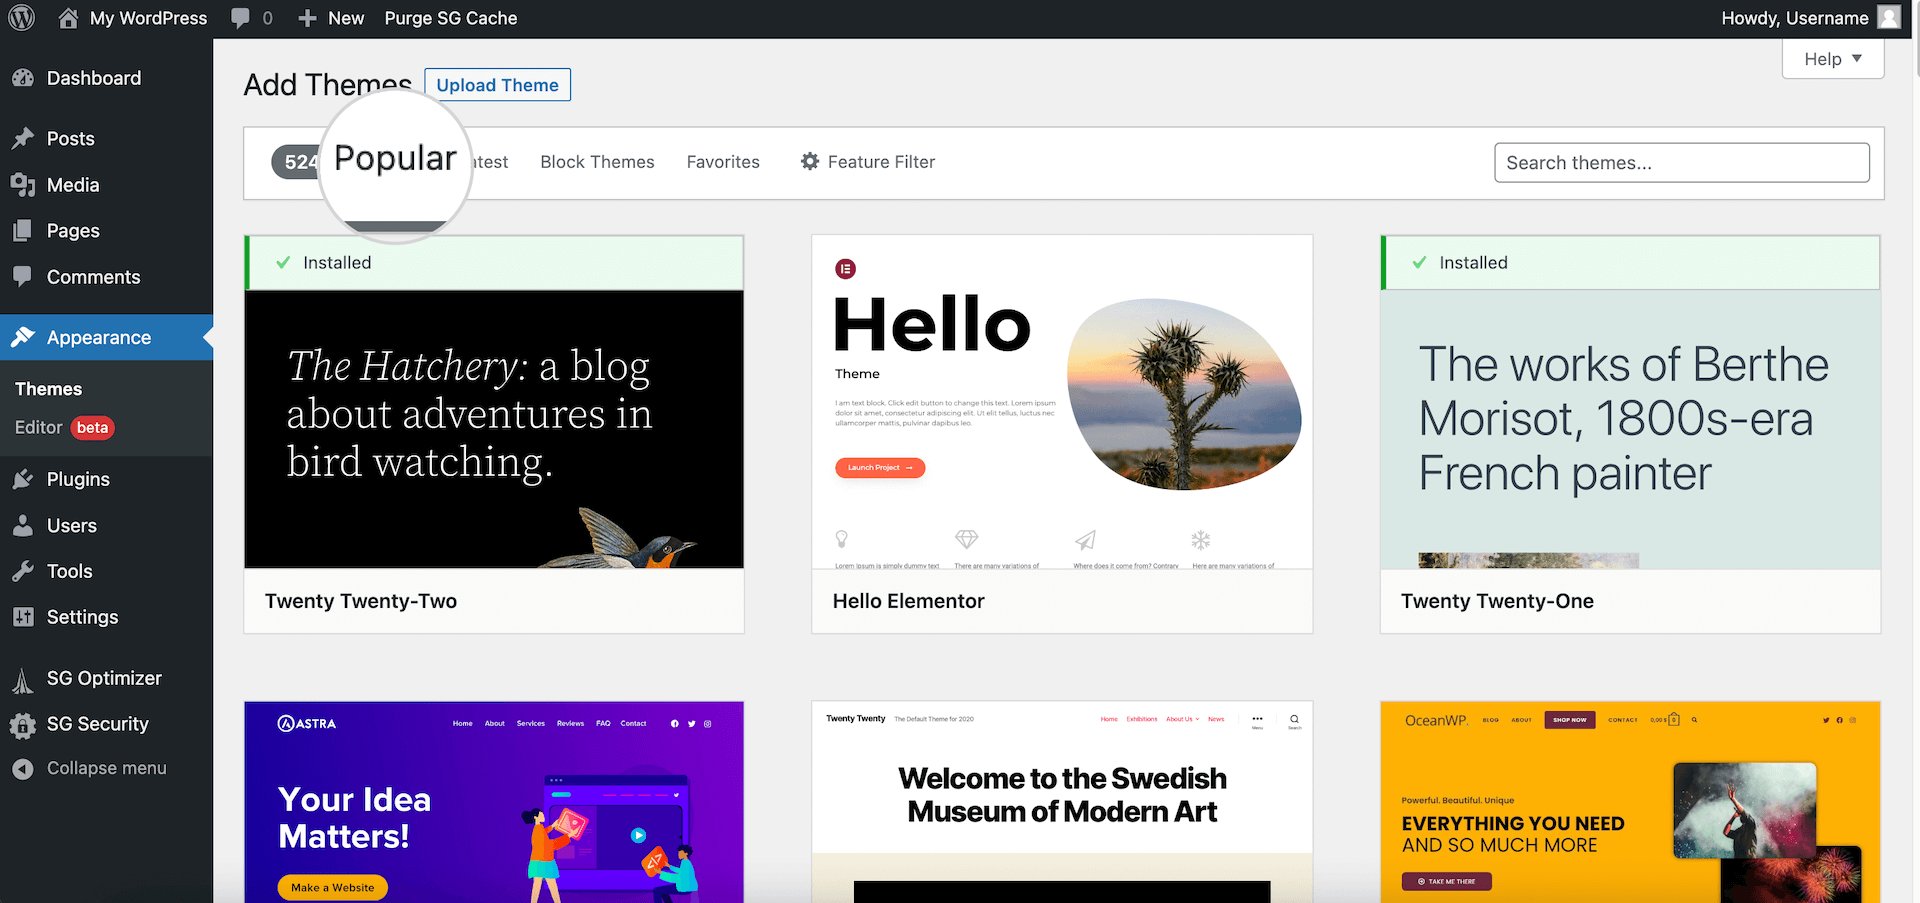
Clicking the “Add New” button will take you to a screen showcasing popular themes. You can scroll through the selection and pick one that best suits your style or project needs.
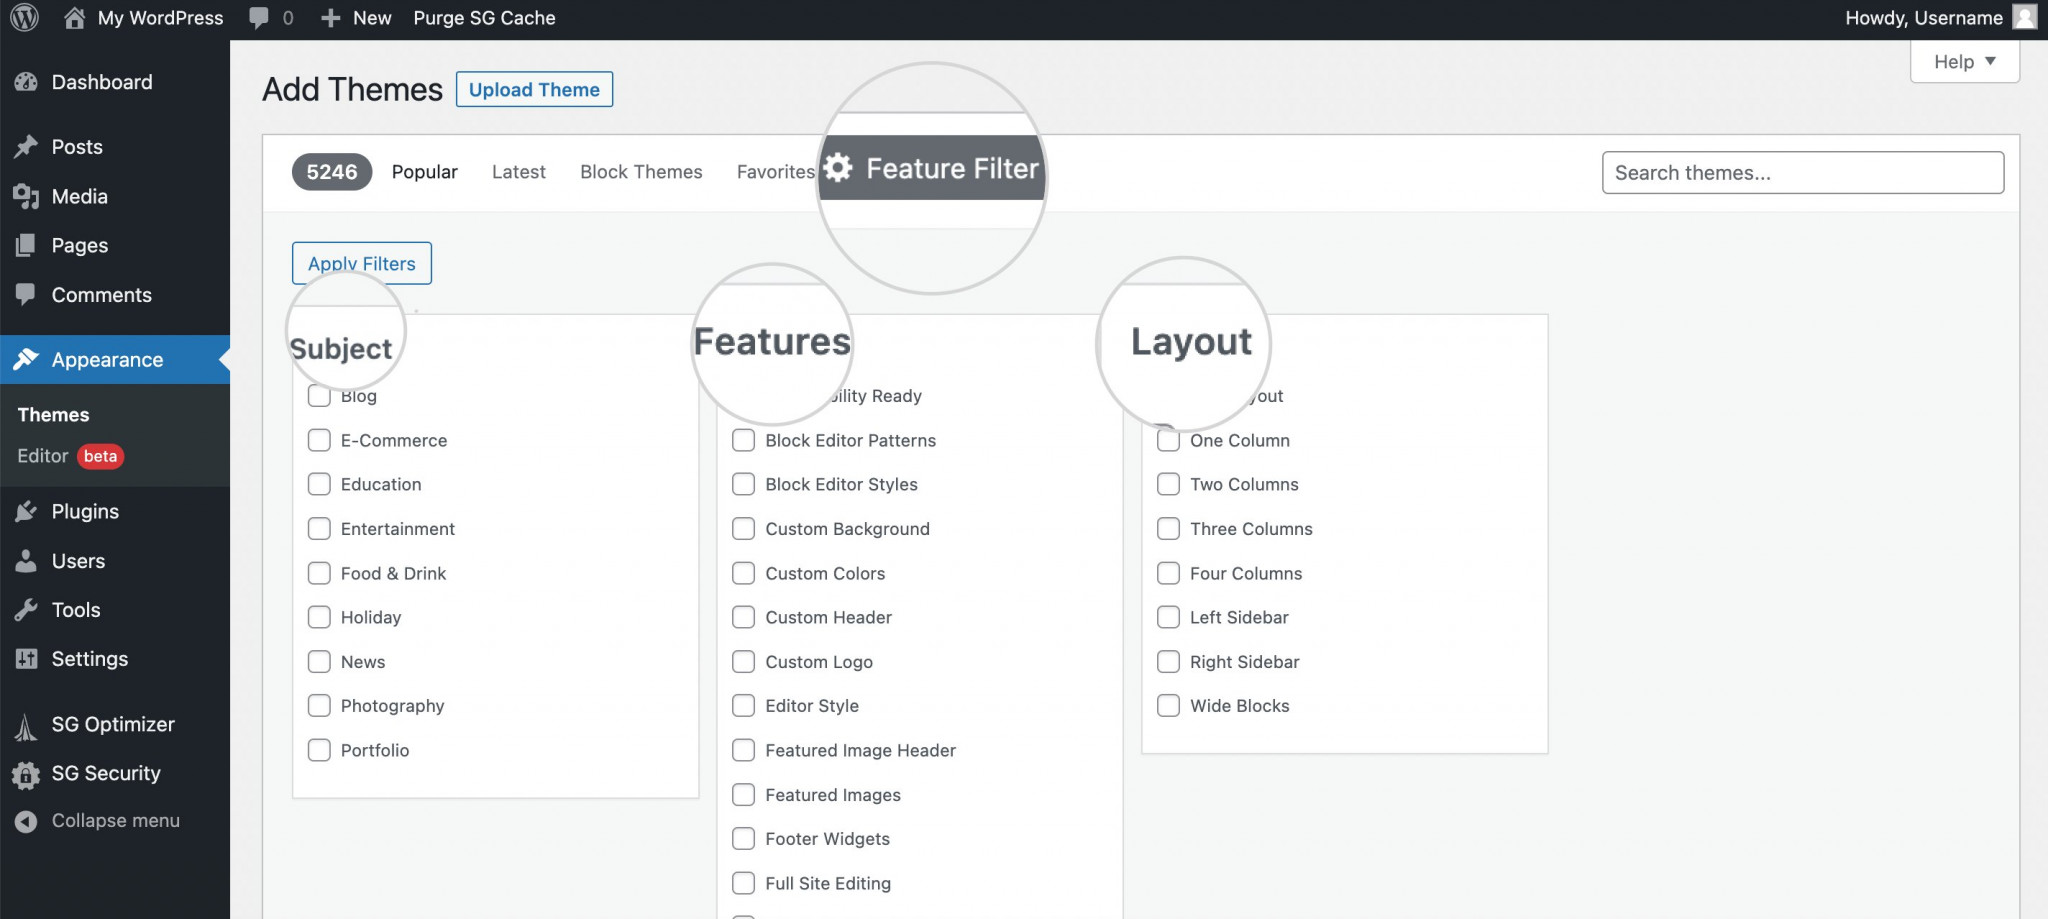
Alternatively, use the “Feature Filter” at the top of the screen to refine your search. You can filter themes based on your site’s topic, the features you need, and the layout style you prefer.
Using the filter, you can define the purpose of your website or the industry your business belongs to. WordPress will then display themes that match those categories.
You can also select specific features you’re looking for, such as responsive design, custom headers, or eCommerce support. In the Layout section, you can choose whether the theme should have one or multiple columns, and where the sidebar should appear.
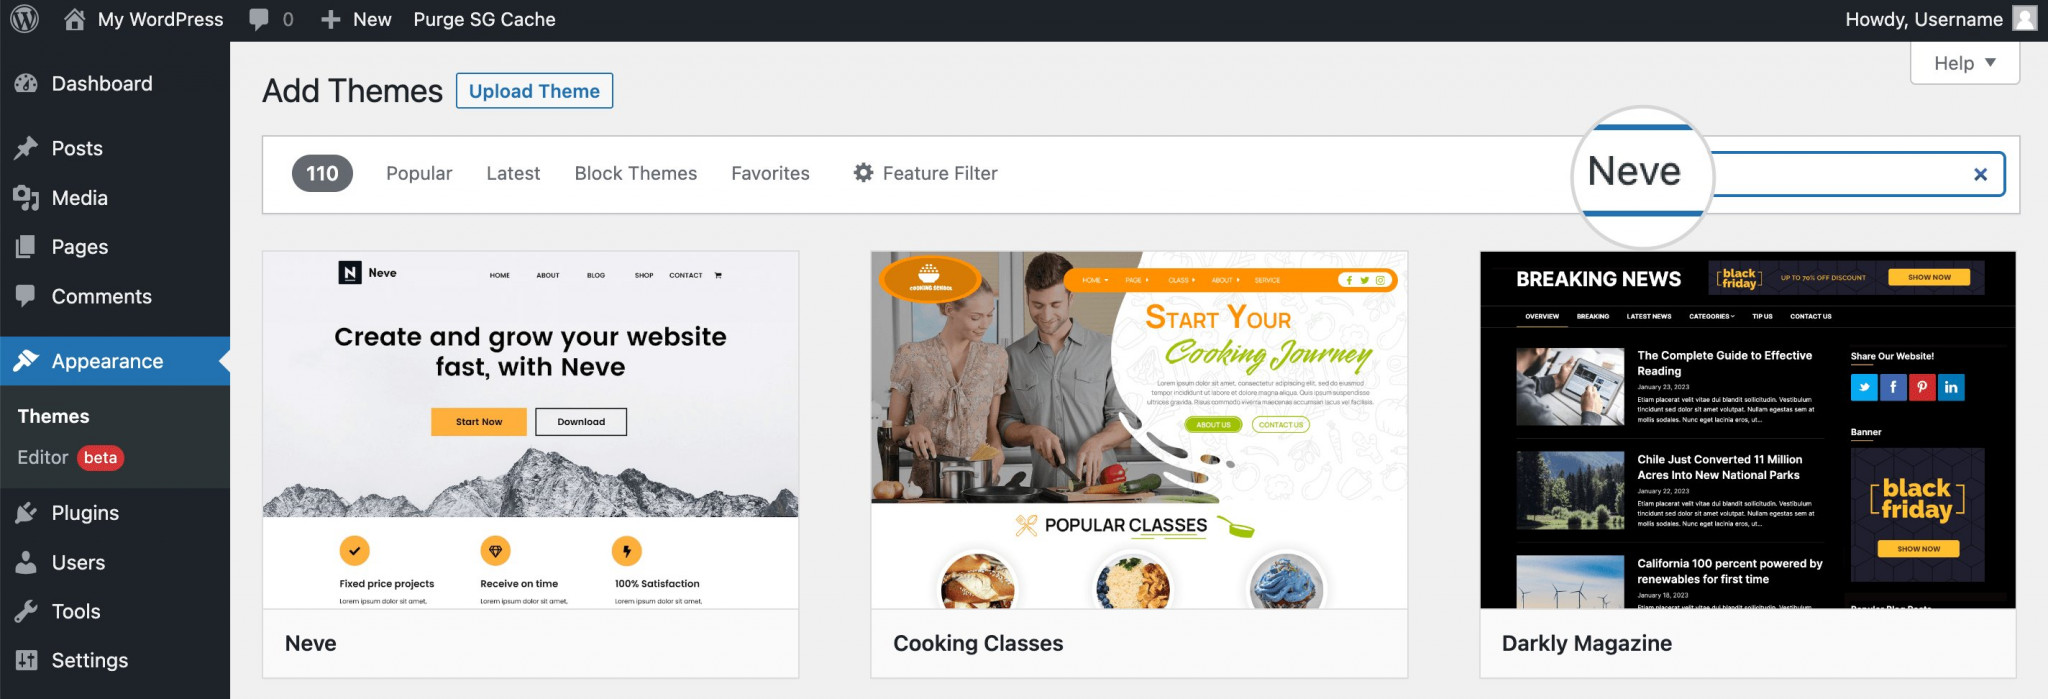
If you already have a particular theme in mind, simply type its name into the Search bar on the right side of the screen. WordPress will then show all available versions of that theme based on your search.
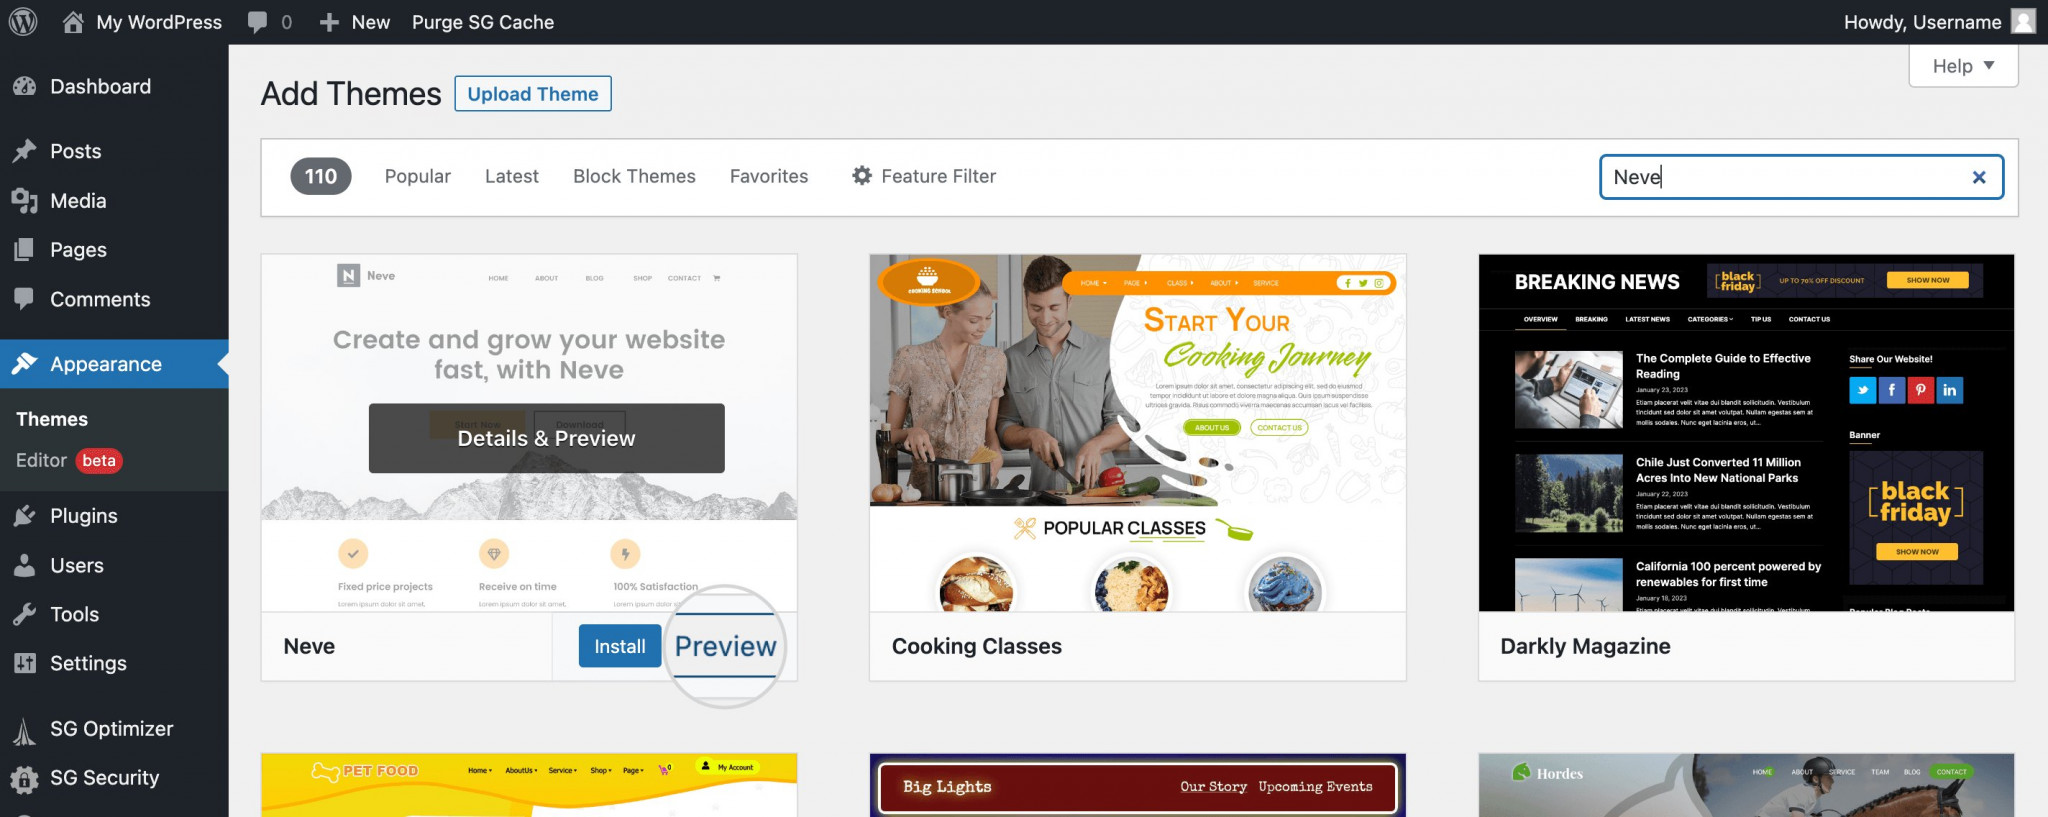
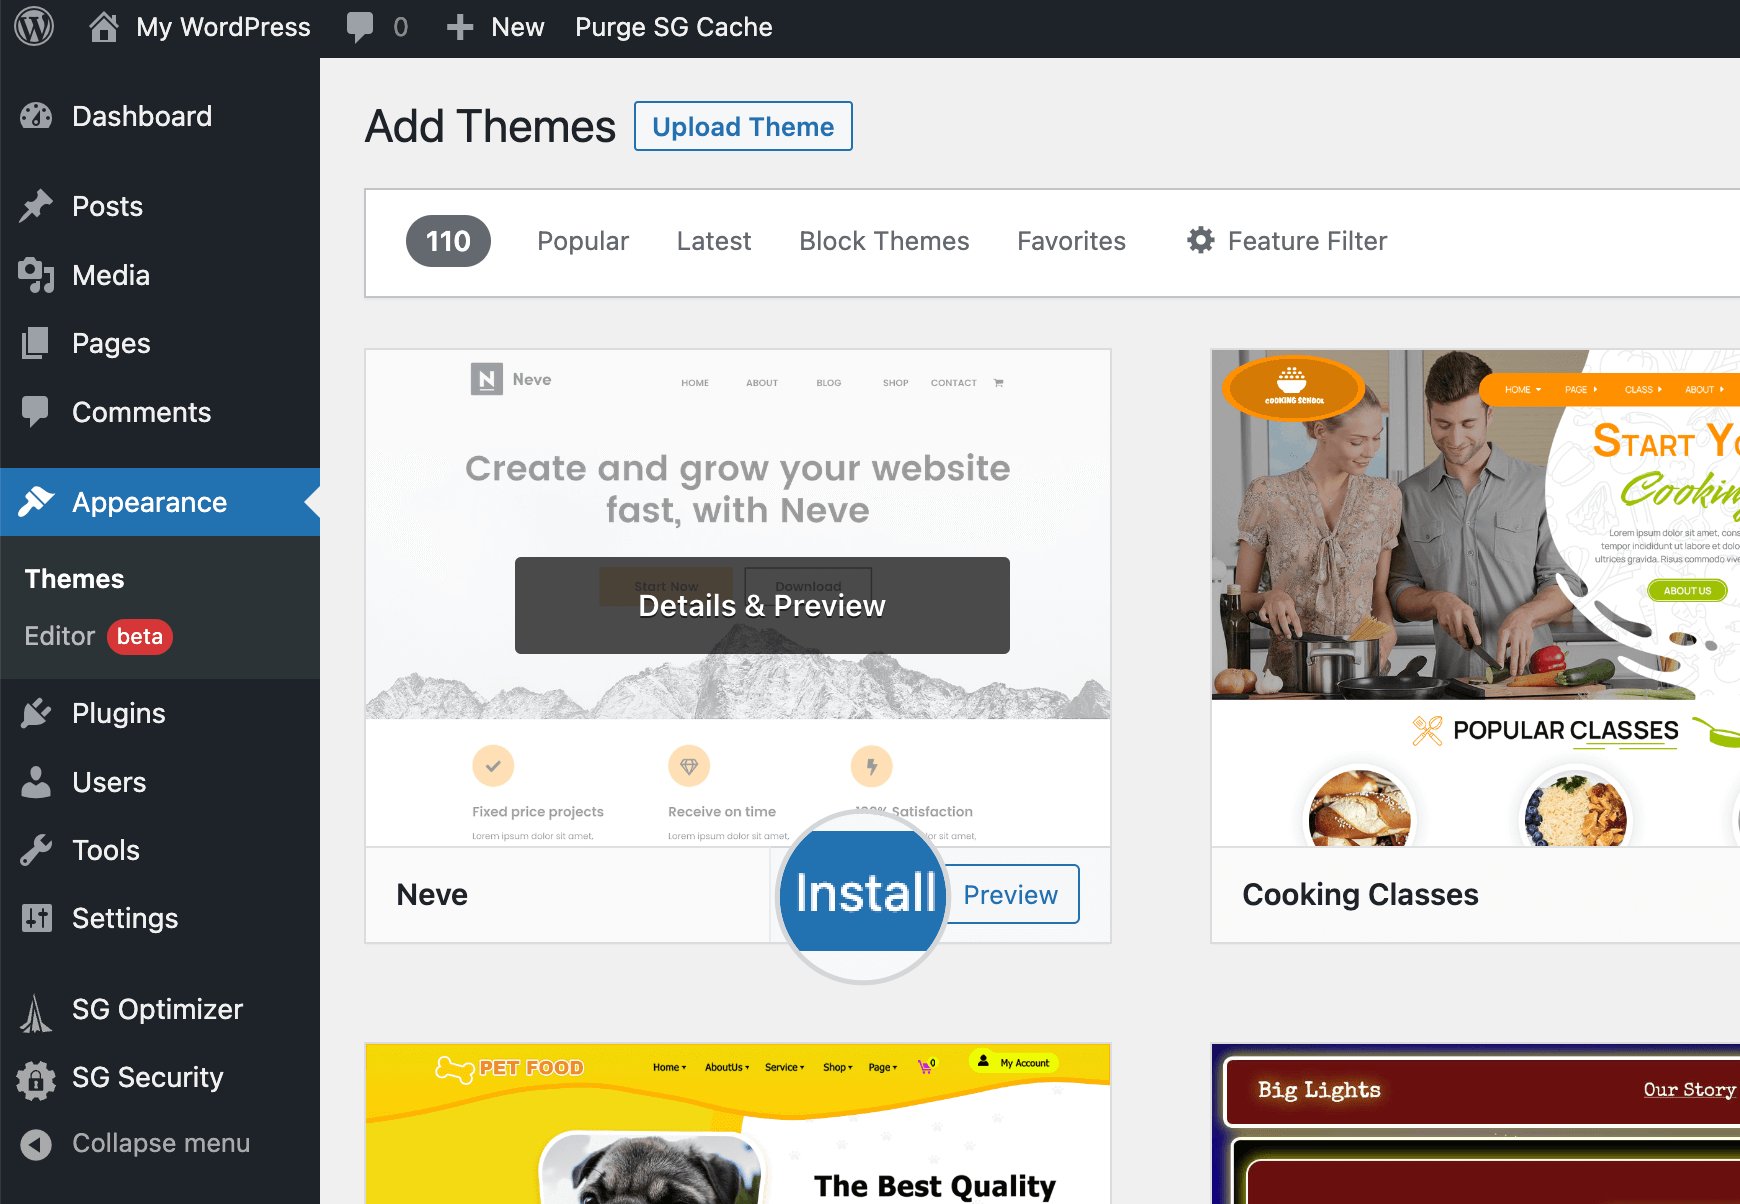
Hover over any theme to reveal the “Preview” button, which lets you see how the theme looks in action. This gives you a better sense of its design and layout, helping you decide whether it fits your content and how you might want to customize it.
Once you find a theme you like, click the “Install” button on its thumbnail to begin the installation process.
Give WordPress a moment to download and install the theme. Once it’s done, you’ll see a confirmation message.
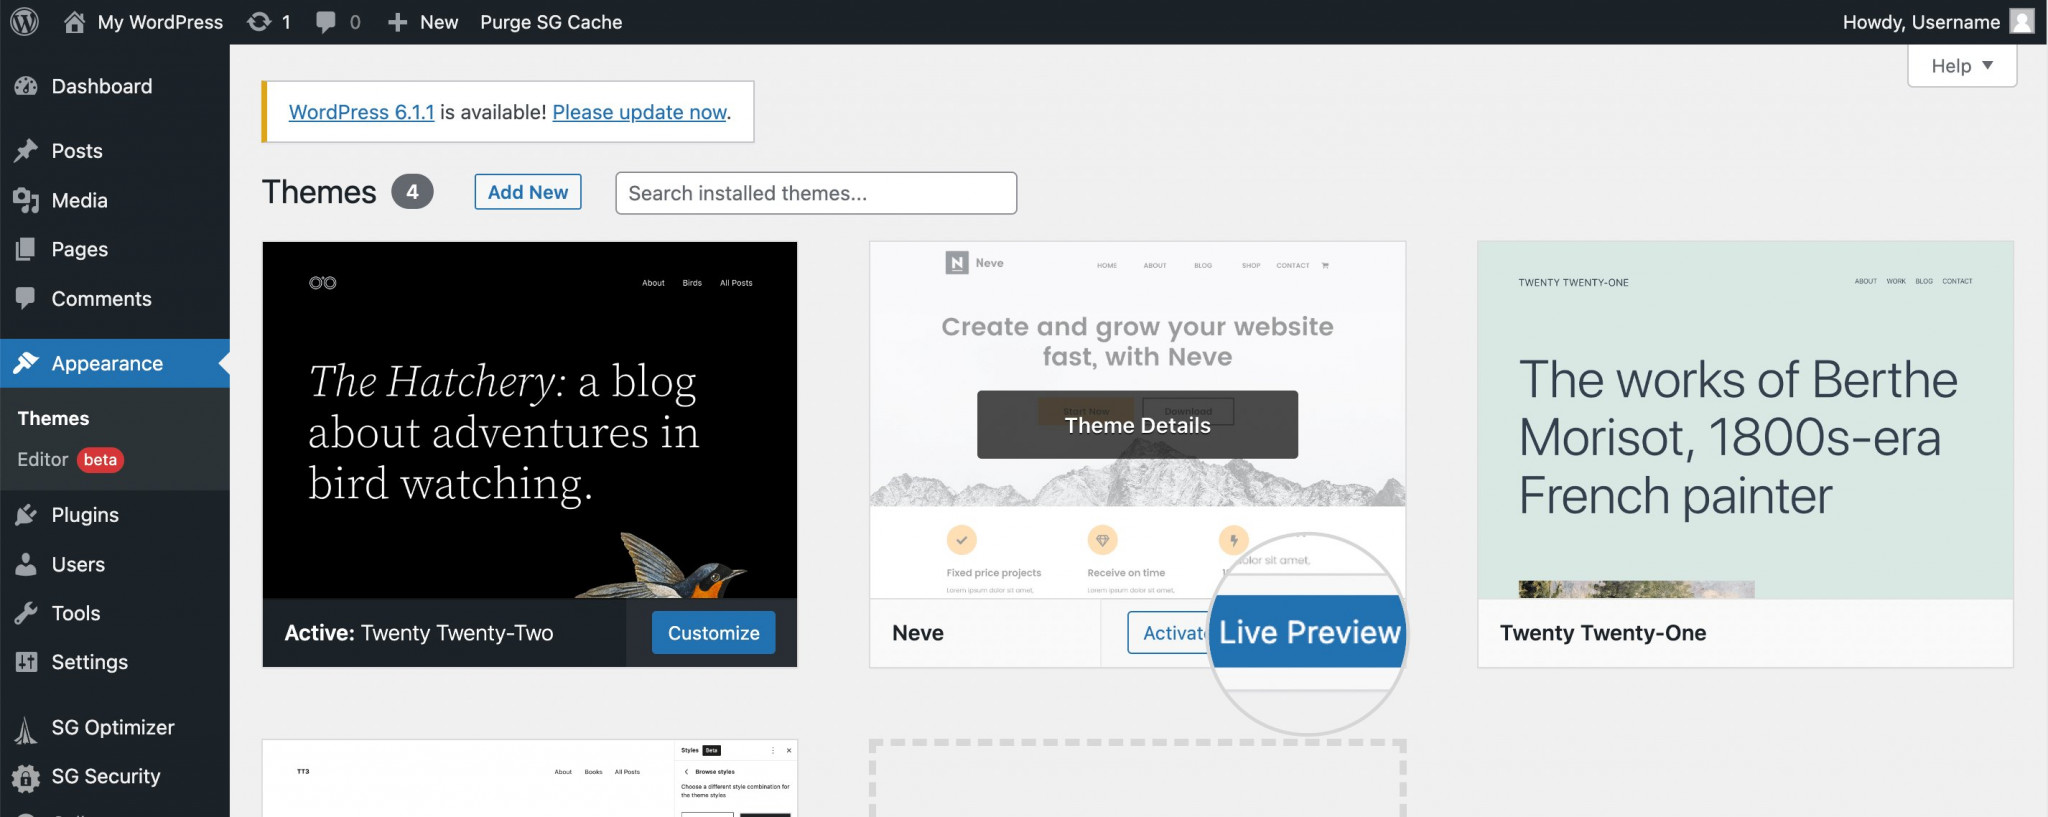
At this point, you can click “Live Preview” to explore how the theme looks and functions on your site before activating it.
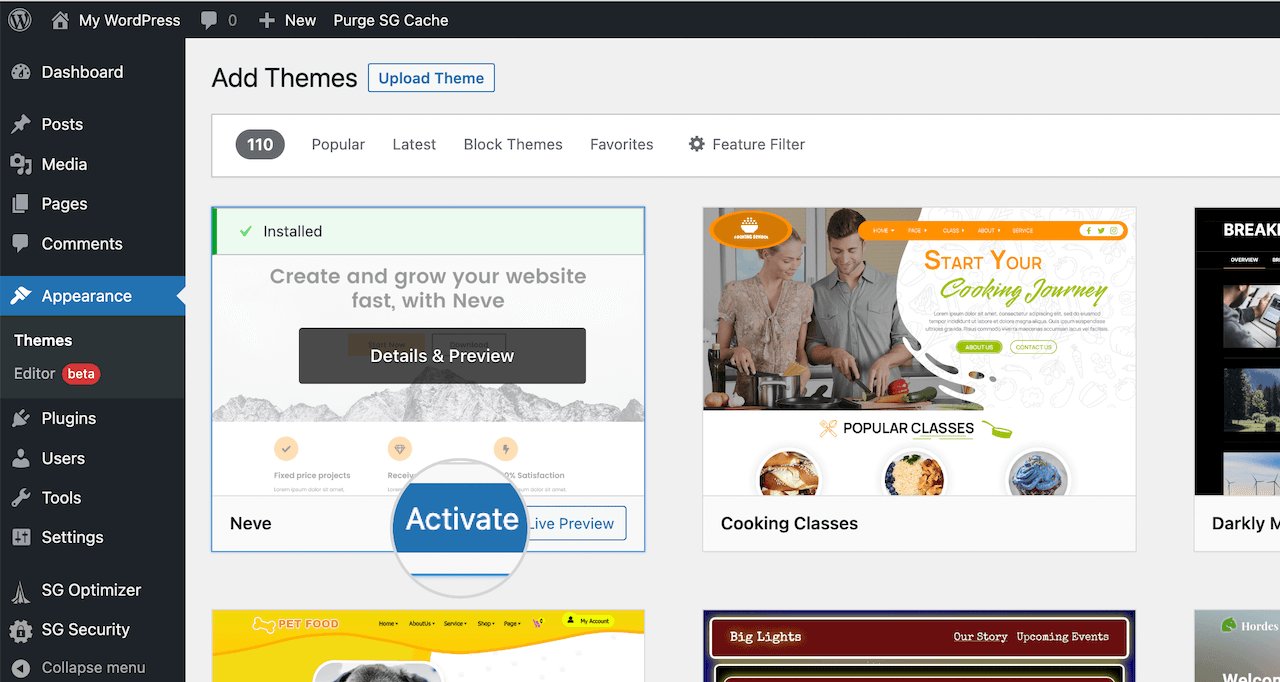
The final step is to activate the theme you’ve just installed. Simply click the “Activate” button to make it live on your website.
WordPress will then apply the new theme, replacing the one that was previously active.
Installing a theme using the upload method in WordPress
The first method we explored only supports free themes listed in the official WordPress.org theme directory. But what if you’ve purchased a premium theme from providers like aThemes, Elegant Themes, or Themify? Or perhaps you’ve had a custom theme designed specifically for your site?
In those cases, you’ll need to upload the theme manually to your WordPress dashboard in order to install it.
In this section, we’ll walk you through how to install a WordPress theme using a ZIP file. Let’s get started.
If you’ve purchased a premium theme, start by downloading the ZIP file from the vendor’s website. This file contains all the necessary folders and components that make up the theme. Once it’s saved to your computer, you’re ready to move on to the next steps.
To begin, log in to your WordPress Dashboard and go to Appearance > Themes.
Once you’re in the Themes section, click the “Add New” button to start the installation process.
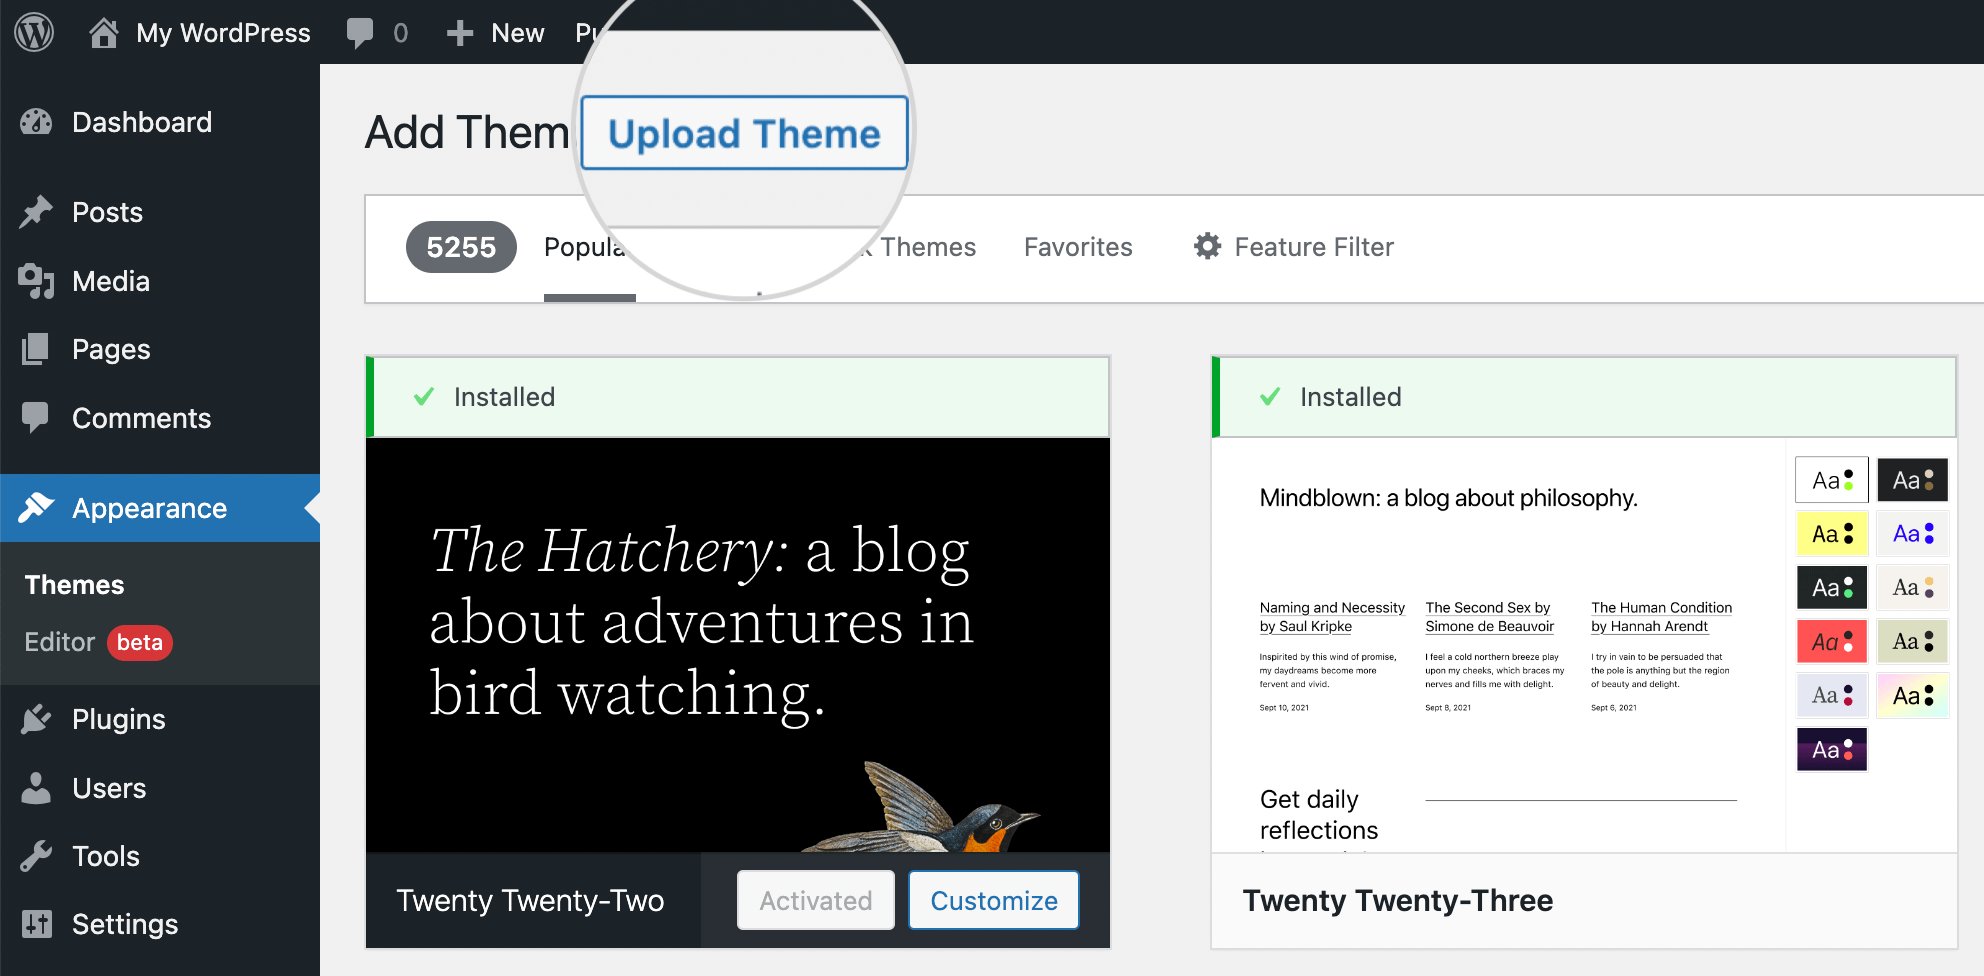
Next, click the “Upload Theme” button to open the upload dialog, where you can choose a file from your computer.
Click the “Choose File” button to browse your computer and select the theme’s ZIP file.
After selecting the file, click the “Install Now” button to begin the installation.
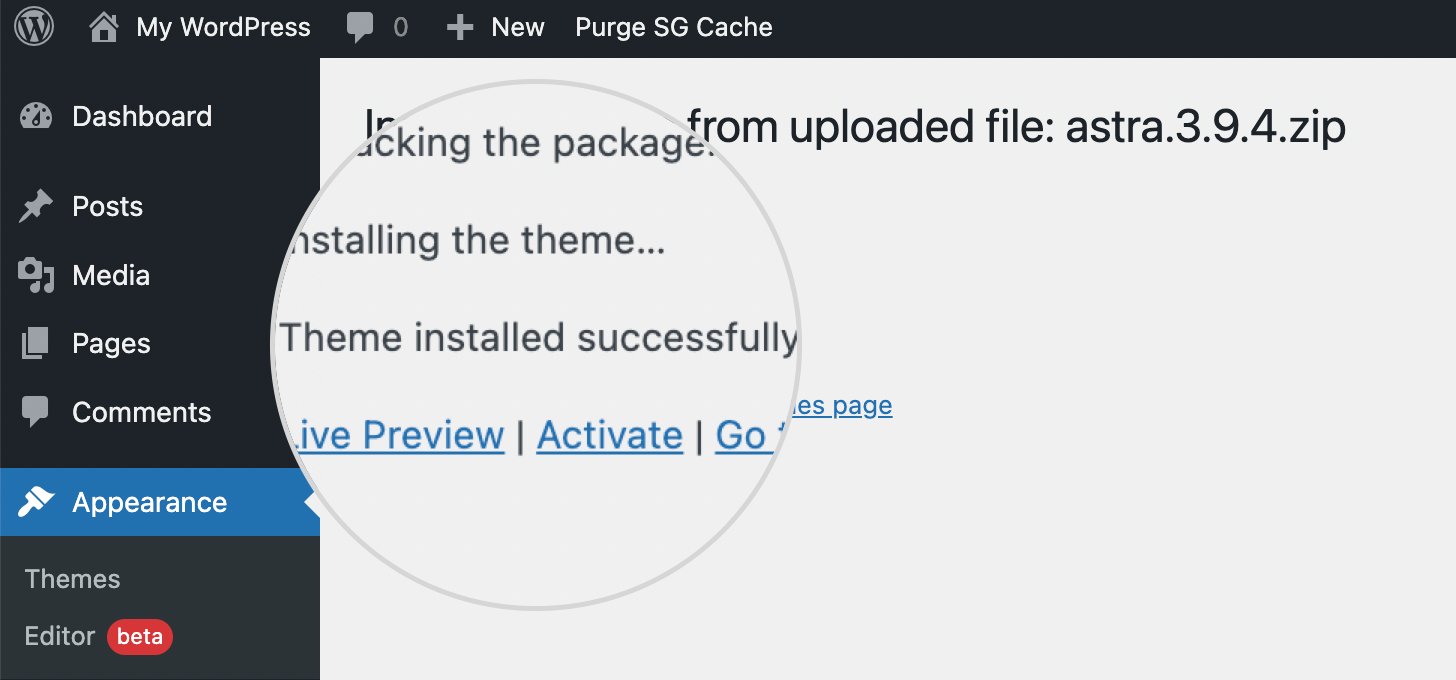
Once the installation is complete, WordPress will display a success message. Below it, you’ll see the “Activate” button, which you can click to apply the new theme to your site.
Installing a WordPress theme using FTP
If you have some technical experience or are working with a large theme file, installing a WordPress theme manually via FTP is a reliable alternative. This approach gives you more control by allowing you to upload the theme files directly to your web server using an FTP client.
Here’s a step-by-step guide to help you through the process:
To get started, you’ll need an FTP client like FileZilla. If you haven’t already, download and install it on your computer.
If you haven’t downloaded the theme ZIP file yet, go ahead and do that now. In this example, we’ll be using the Astra theme. Once the file is downloaded, unzip it—you’ll get a folder typically named after the theme itself. For easy access during the installation, save the folder somewhere convenient, like your Desktop.
Next, open your FTP client, such as FileZilla, and connect to your web server using the FTP credentials provided by your hosting provider. These usually include the hostname, username, password, and port number. In FileZilla, you’ll see input fields at the top for each of these details, simply enter the information and click “Quickconnect” to establish the connection.
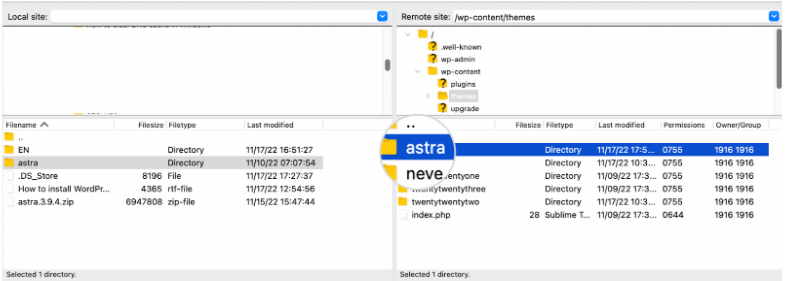
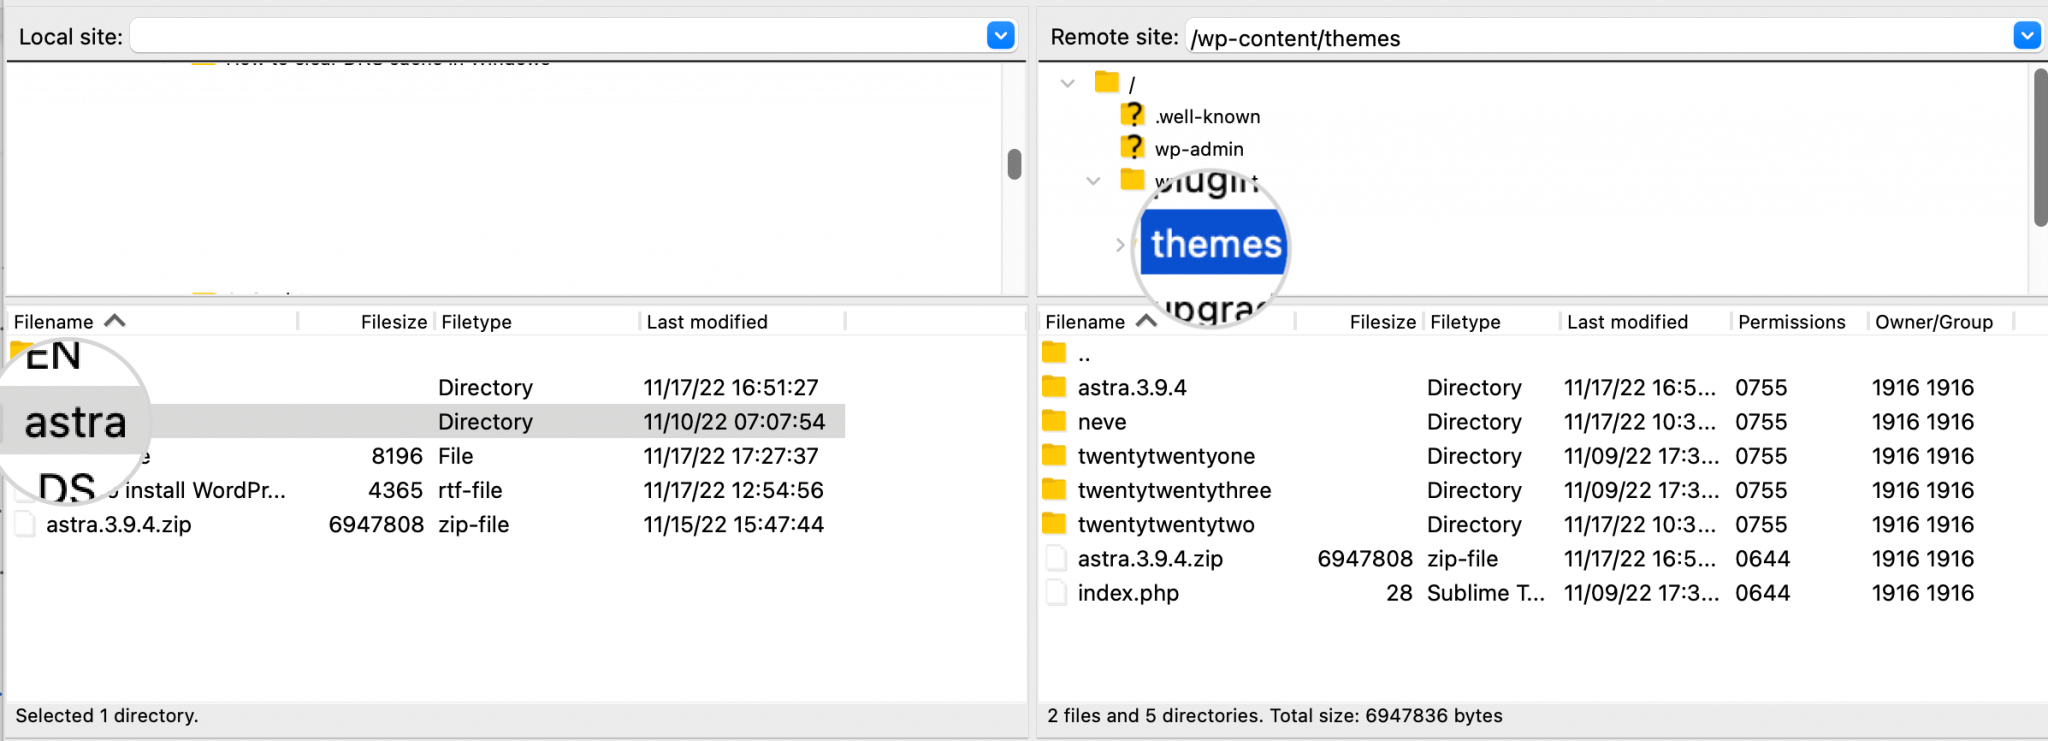
Once the FTP connection is established, you’ll see your site’s root directory on the right side of the FileZilla interface. Click the arrow next to the “/” directory to expand the folder structure and view all your site’s files. From there, navigate to the wp-content > themes folder—this is where all your theme files are stored.
Now that you’ve opened the themes folder, it’s time to upload the astra theme folder. On the left side of the FileZilla interface, locate the extracted astra folder on your computer. Then simply drag and drop it into the themes folder on the right side, which represents your website’s server.
You can monitor the upload progress at the bottom panel of the FileZilla interface. Once the transfer is complete, the theme folder will appear in the themes directory on the right side, alongside your other site files.
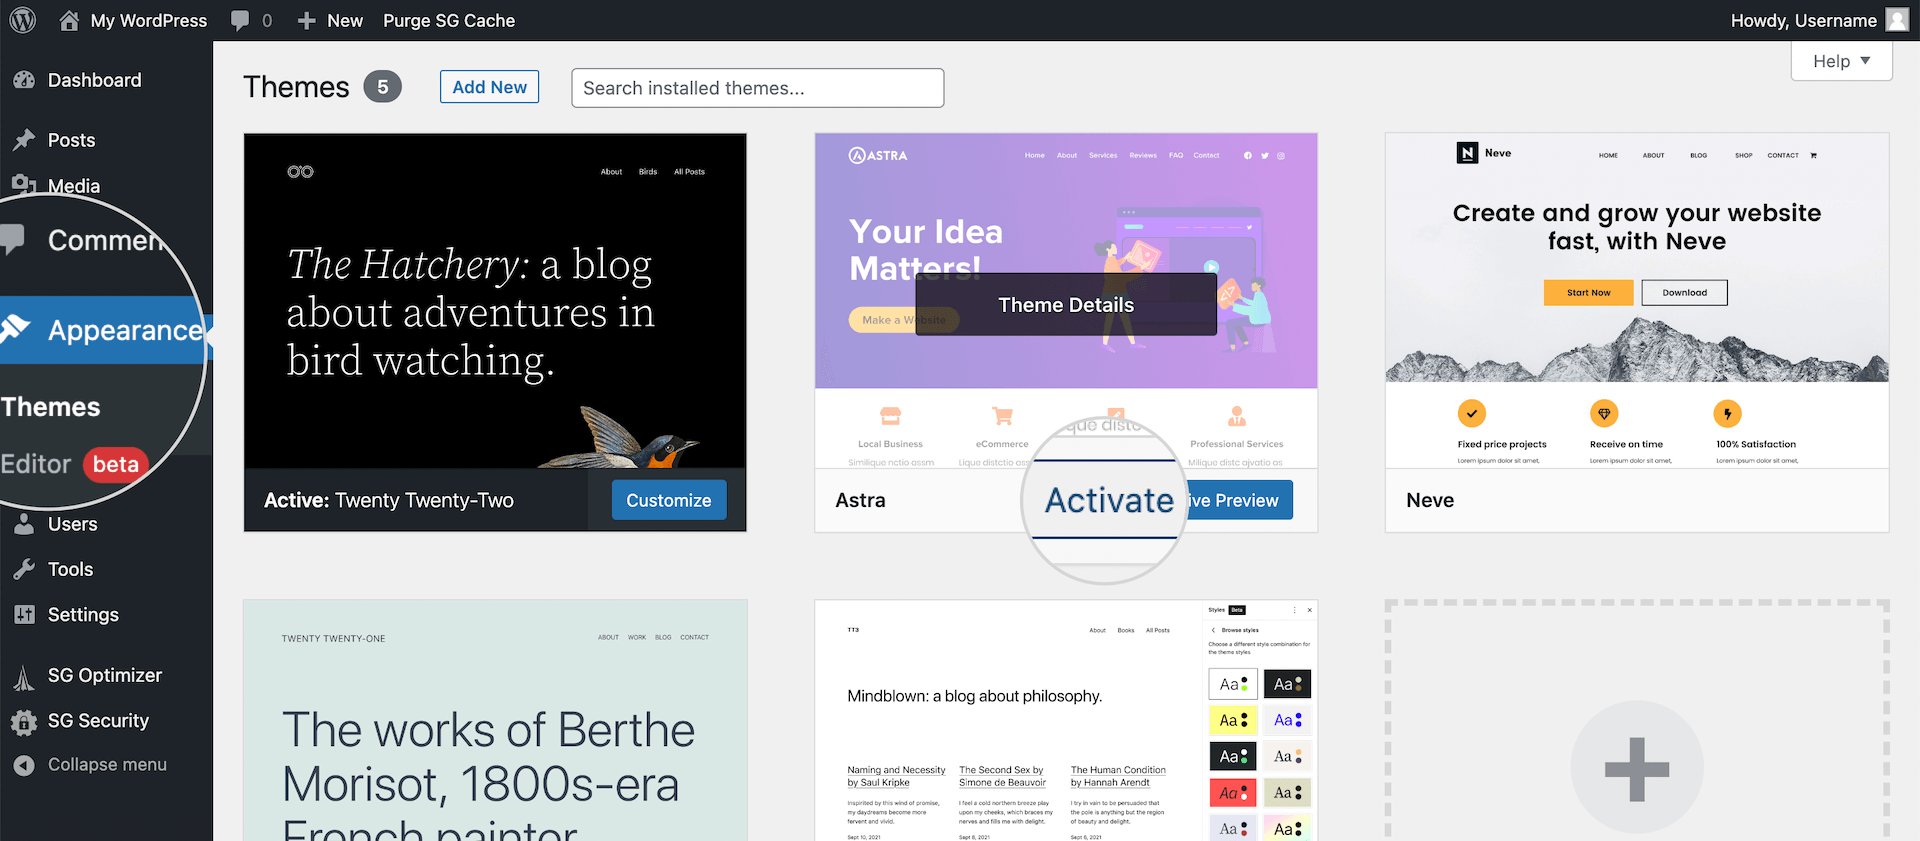
The final step in manually installing a WordPress theme is activating it through your Dashboard. Log in to your WordPress admin area and go to Appearance > Themes. You’ll see the Astra theme listed among your installed themes. Hover over its thumbnail and click the “Activate” button to apply it to your site.
How to customize a creative WordPress theme
In this section, you’ll learn how to personalize your WordPress site using different customization methods. We’ll walk you through various tools and options available to modify your theme effectively—so let’s get started.
Edit your WordPress theme with the Full Site editor
Full Site Editing (FSE) is a feature introduced as part of the Gutenberg project, allowing you to use blocks not just for posts and pages, but across your entire website layout. To use FSE, your site must be running WordPress version 5.9 or higher and using a theme that supports block-based editing.
In this guide, we’ll demonstrate using the Twenty Twenty-Two theme, which is fully compatible with FSE and was released alongside its beta version.
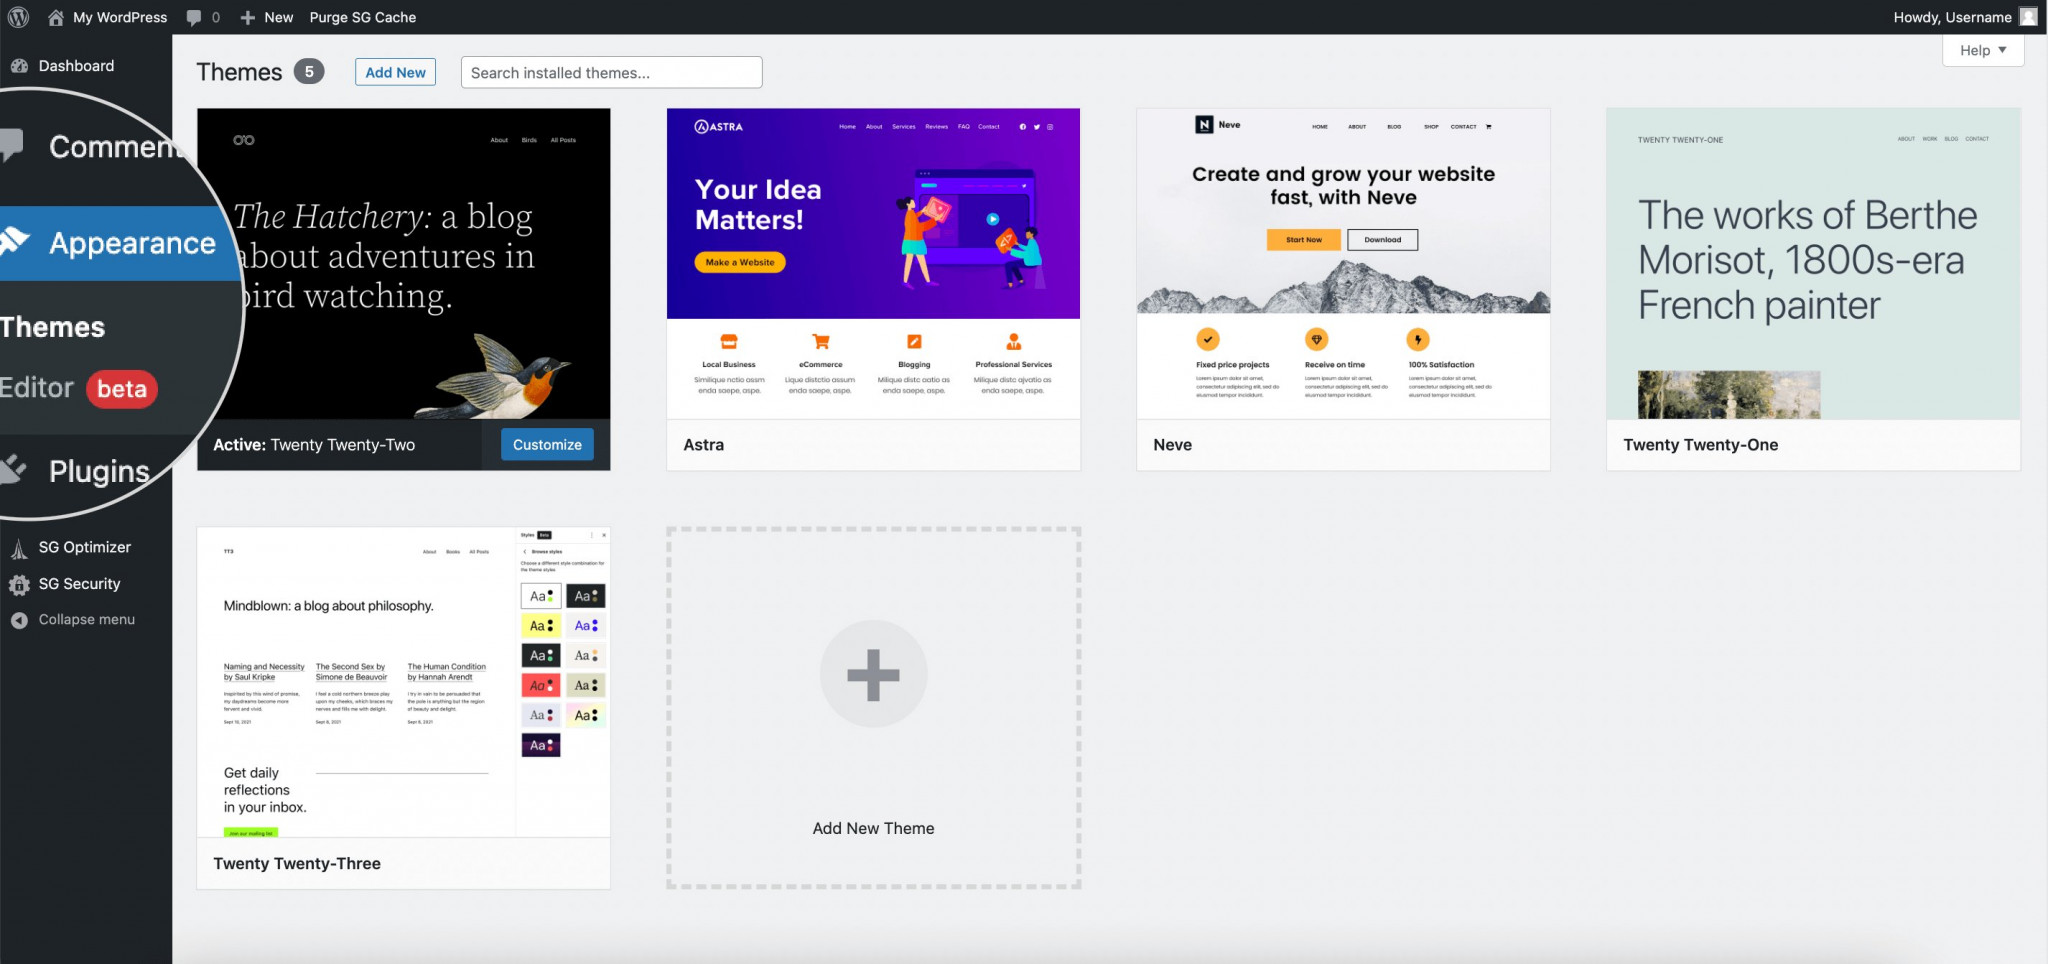
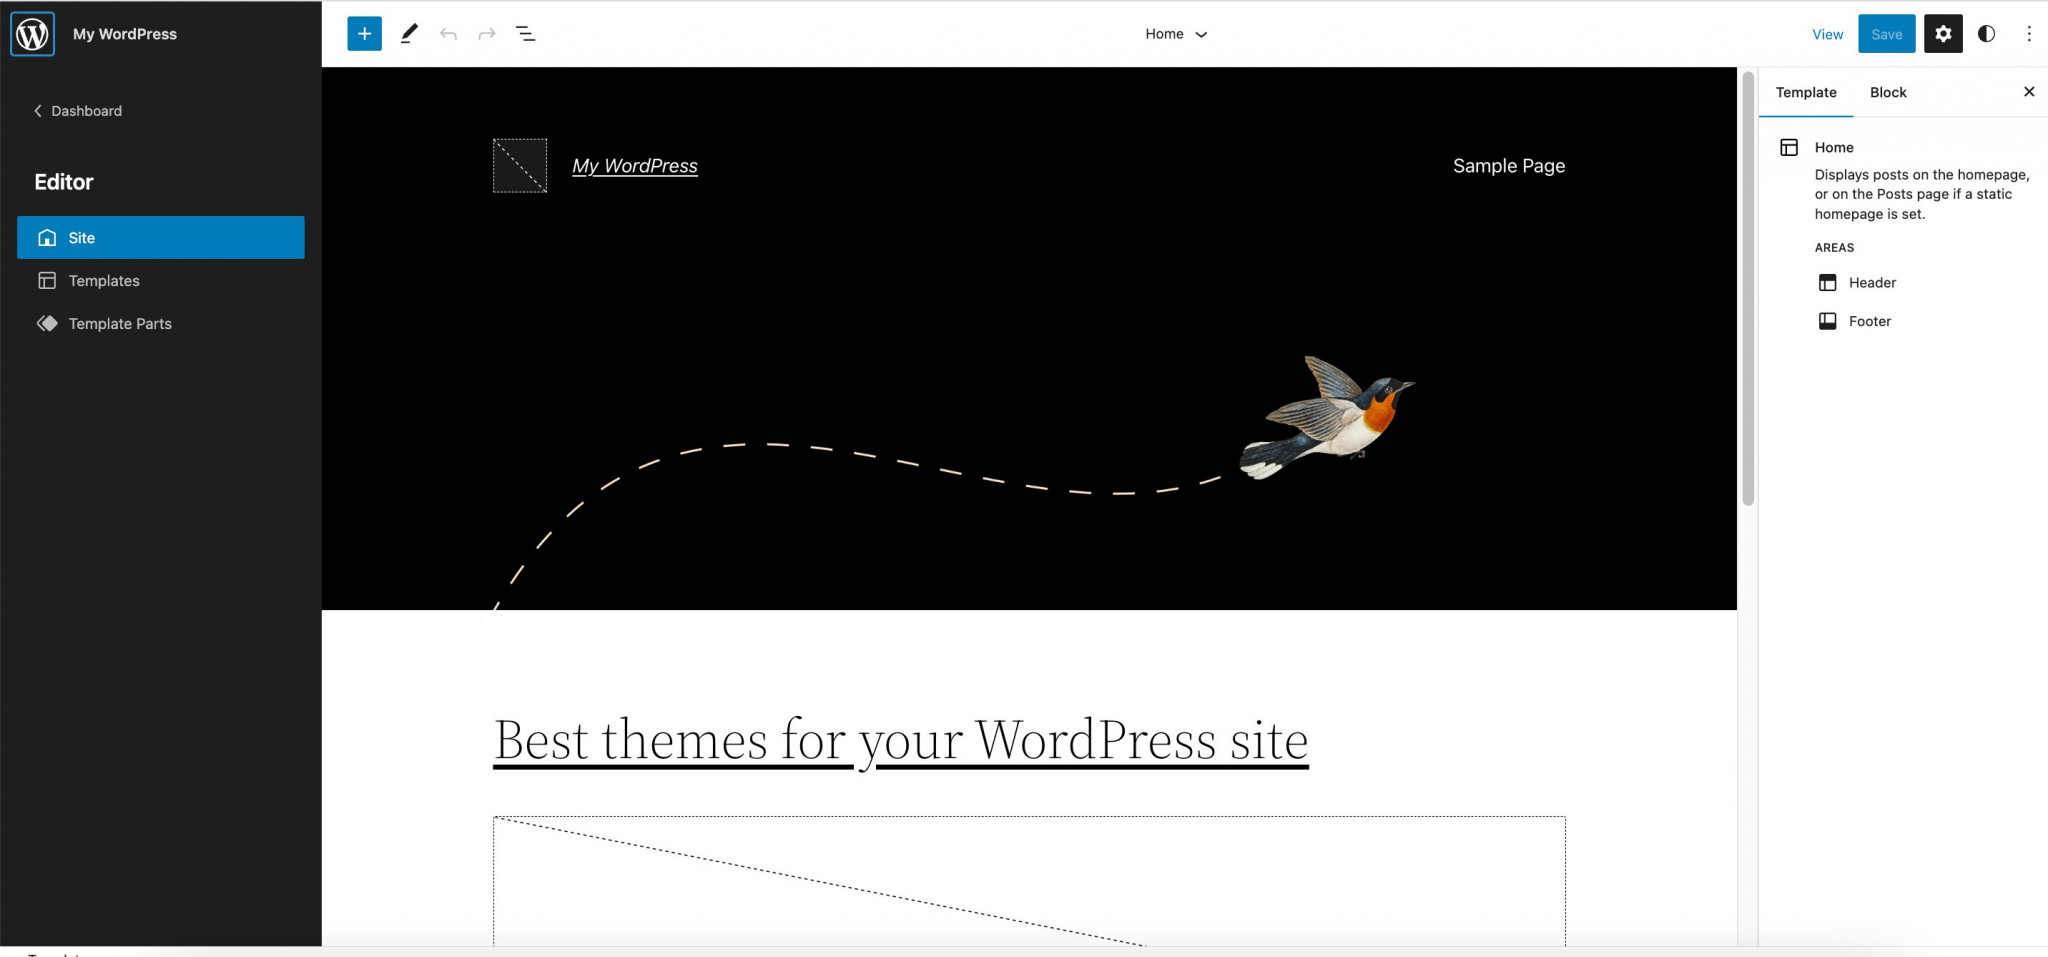
To get started, log in to your WordPress Dashboard and go to Appearance > Editor to open the Full Site Editor.
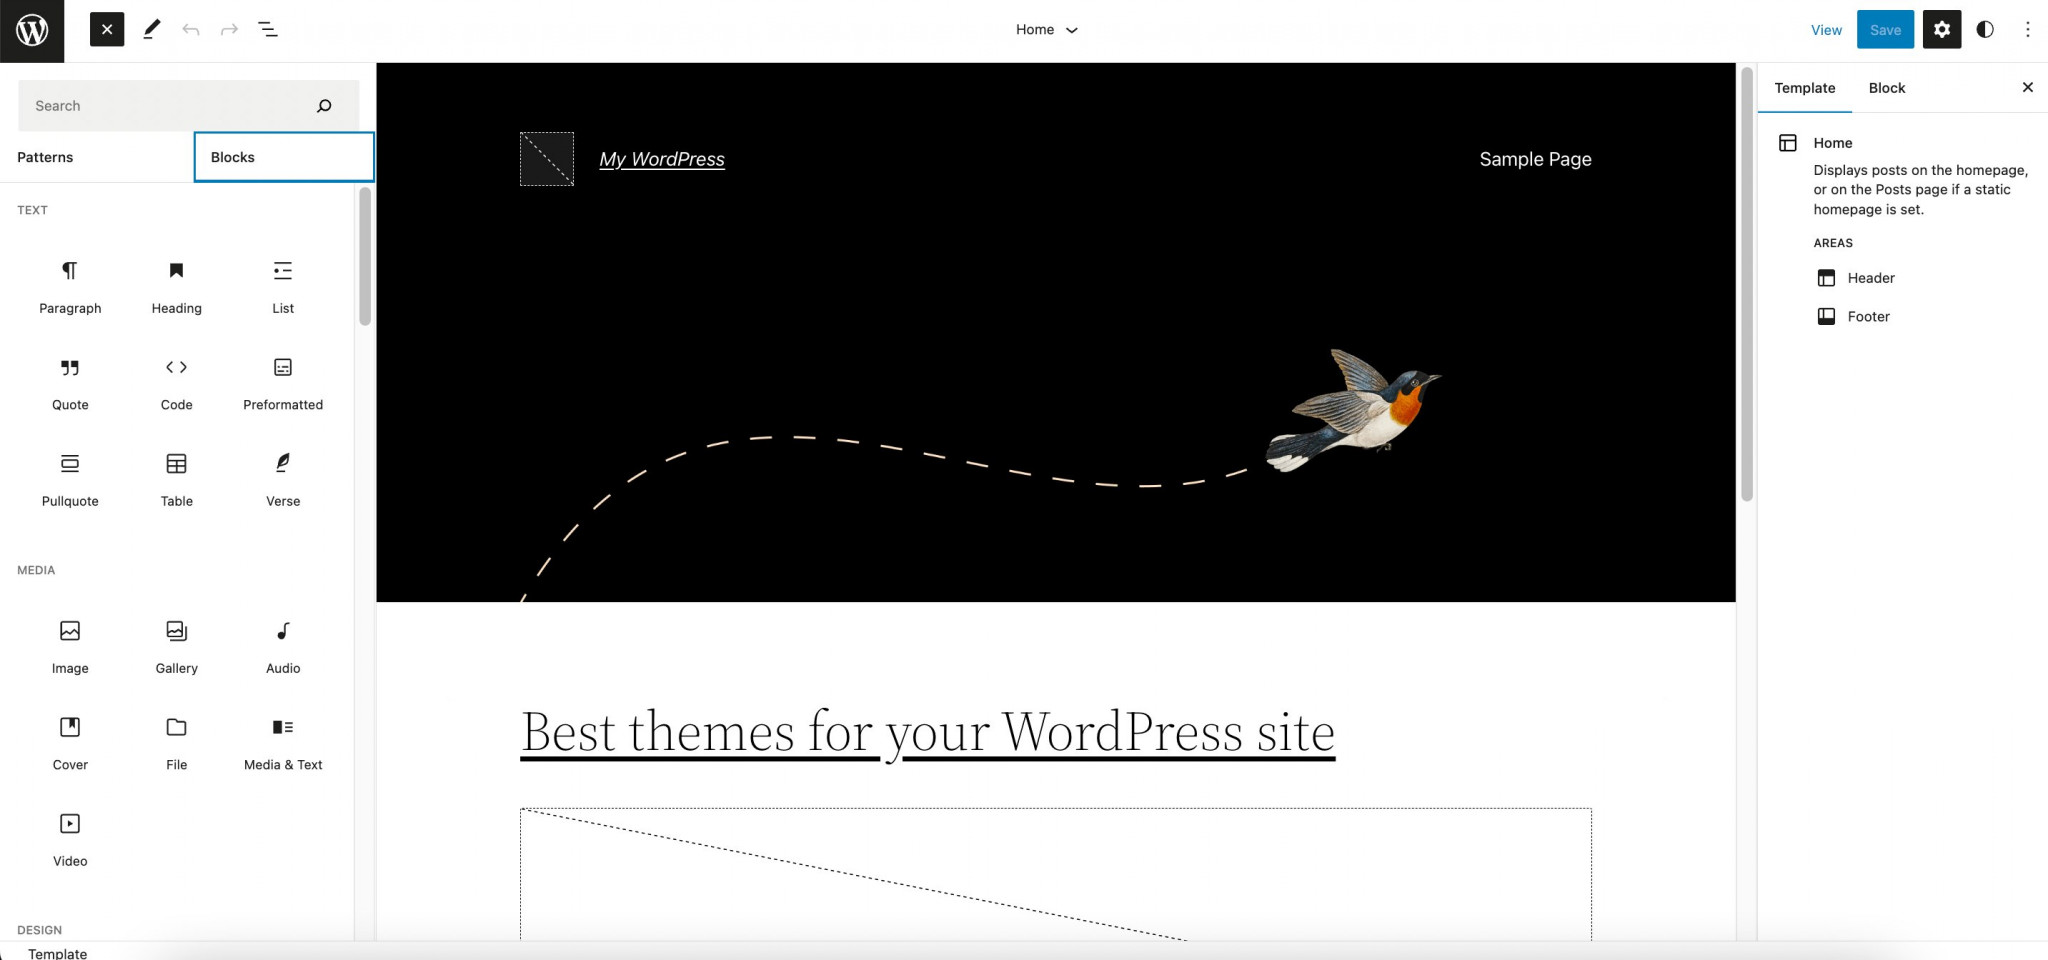
Once the Full Site Editor loads, you’ll be able to customize your entire site layout using blocks. Every part of your page, from headers to footers, is treated as a block element, making it easy to edit and maintain design consistency. You can also create reusable blocks to streamline your workflow across multiple pages.
The Full Site Editor introduces several core concepts, which we’ll briefly cover next.
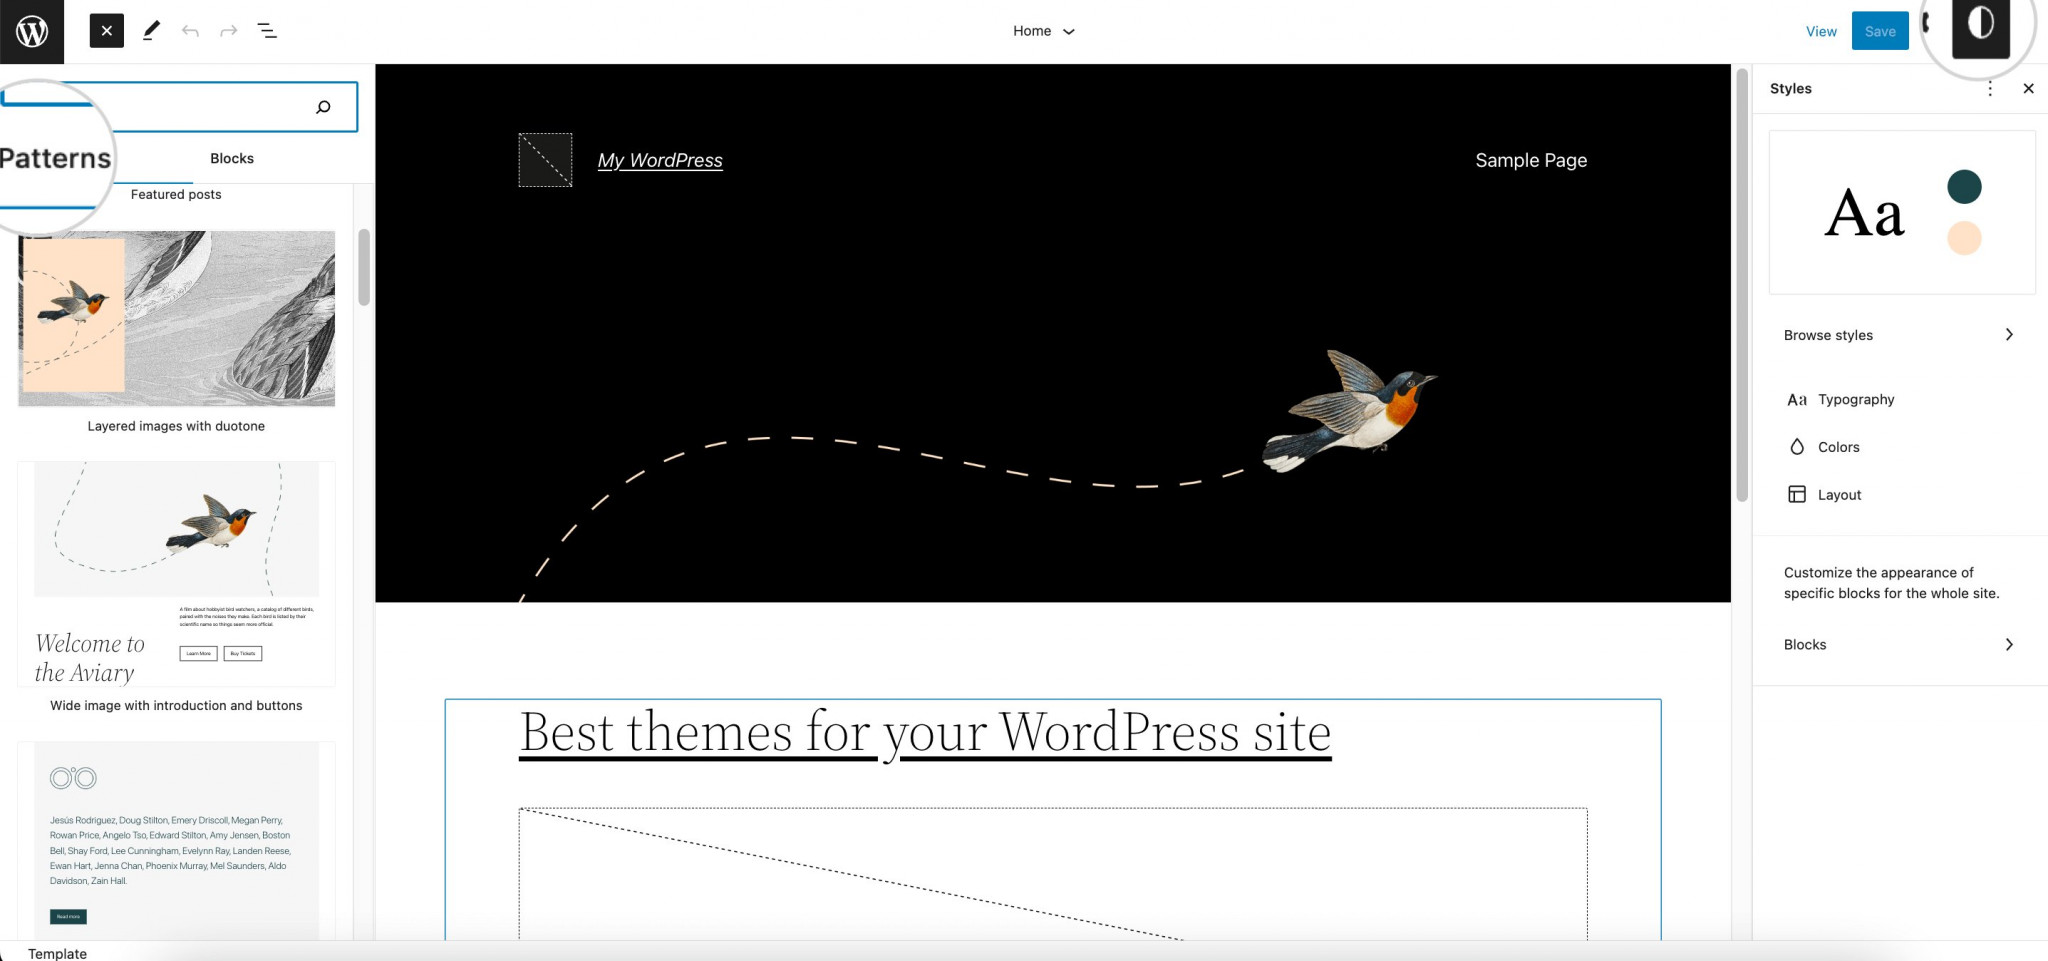
To build your layout, click the “+” button in the upper-left corner of the screen to browse available blocks. You can add text, site titles, logos, images, videos, and other widgets, then drag and drop them into place to create your desired layout.
Additionally, under the Block Patterns tab, you’ll find pre-designed block combinations that help you quickly add visually appealing sections to your pages.
To customize colors, layout, and typography, click the black-and-white circle icon in the top-right corner to open the Styles menu.
To manage templates, click the WordPress logo in the top-left corner. This opens the template panel where you can create, edit, preview, or delete templates. By default, the editor loads your site’s Home page template.
Keep in mind that you can build an entire page using a single template or by combining template parts with block patterns for added flexibility.
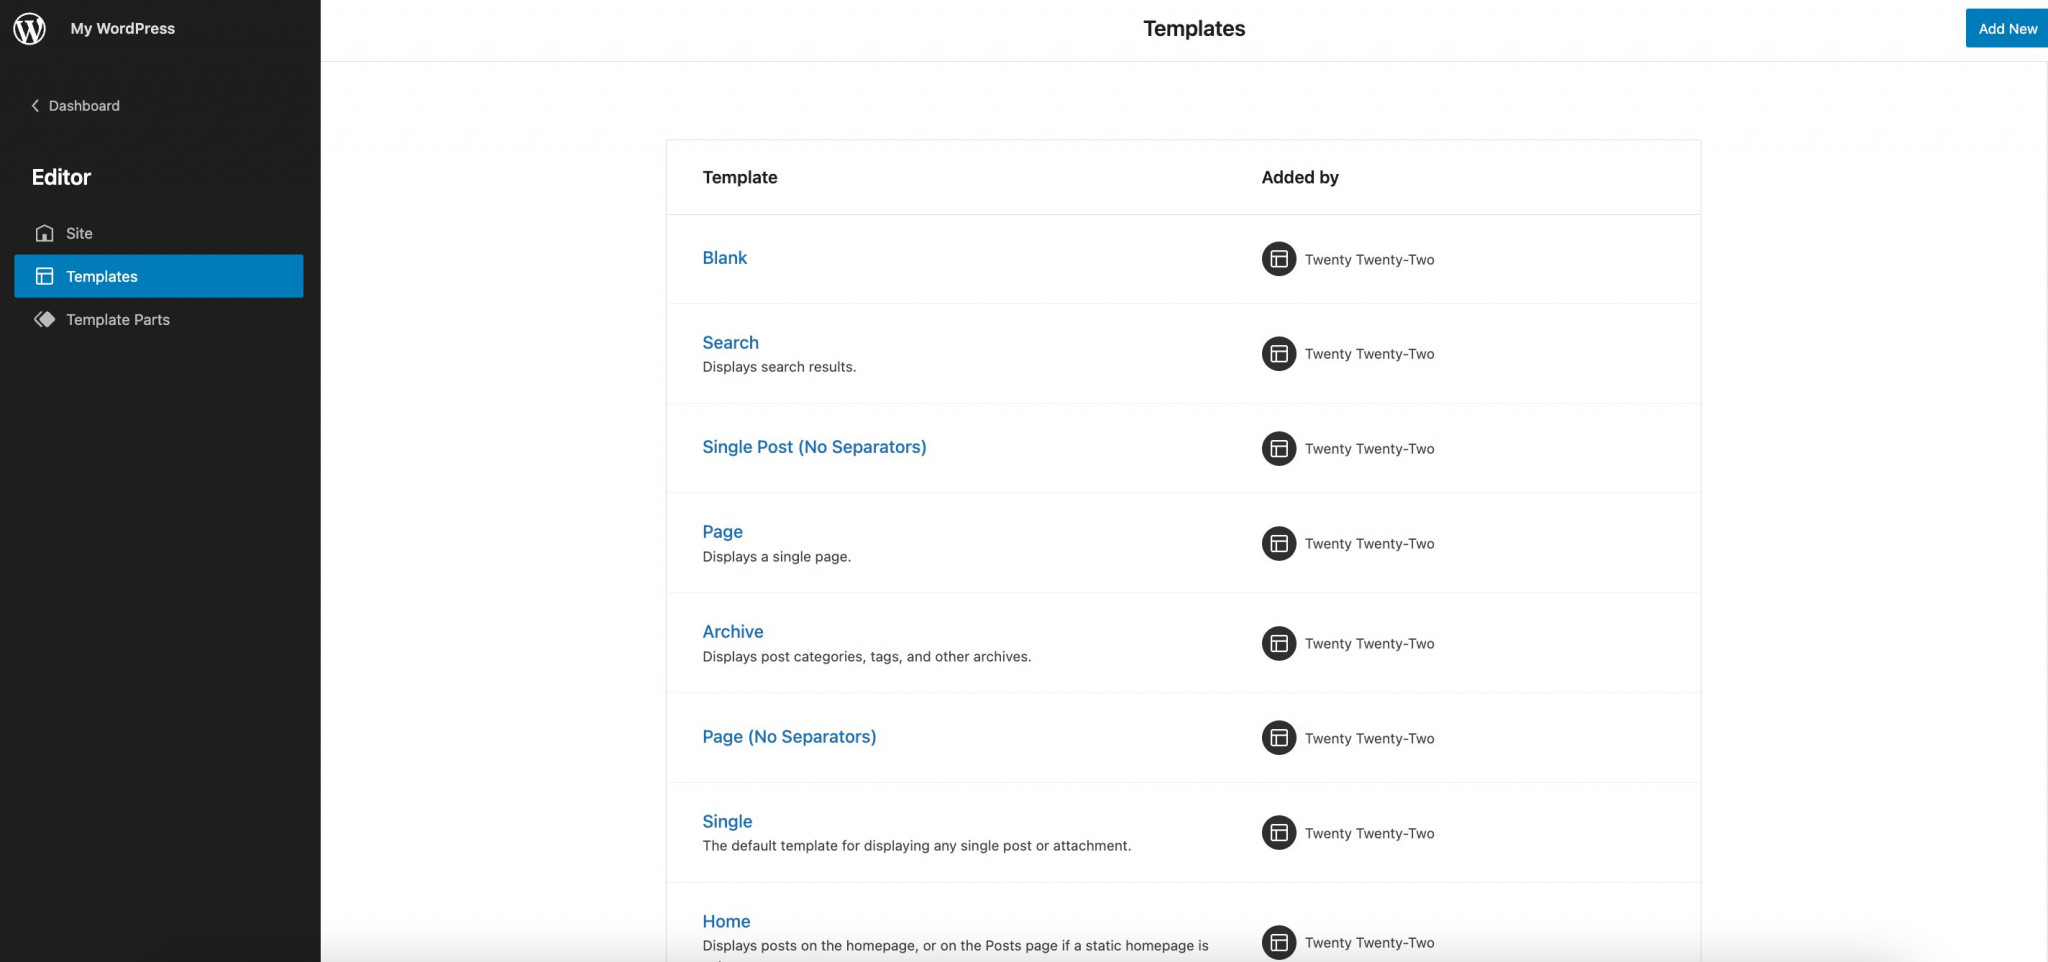
To access and manage templates, open the Templates section from the left sidebar of the Site Editor. Here, you can create or edit templates for different content types, such as posts, pages, or even special pages like the 404 Error Page. For example, you might redesign the 404 page to better match your site’s branding, or create a custom Contact Page complete with a form and personalized layout.
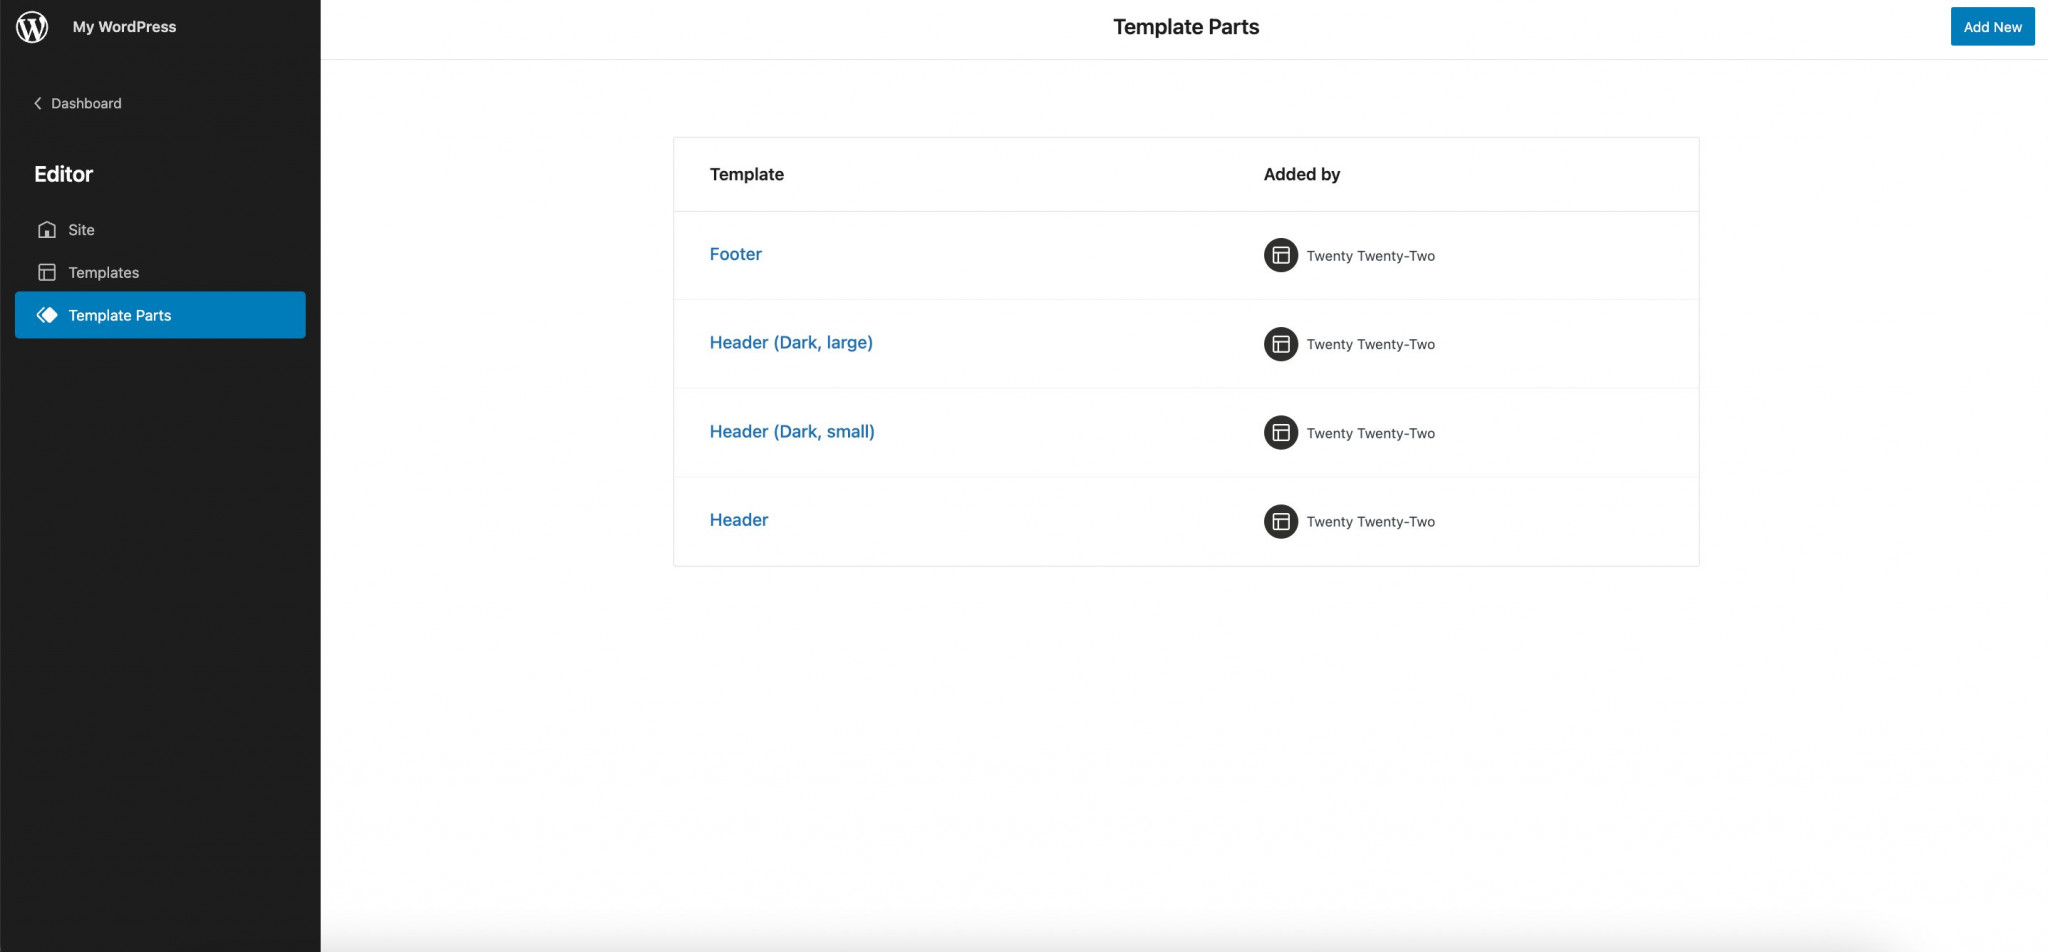
To create reusable layout elements within templates, go to the Template Parts editor. There, you can customize key structural areas of your site, such as the header and footer.
Because the Full Site Editor is entirely block-based, the traditional Theme Customizer and Widgets menus are hidden by default. They only appear under the Appearance menu if a plugin or theme specifically requires them.
Overall, the block editor marks a major step forward in WordPress customization. It empowers even beginners to build visually impressive websites—no coding is needed. While block-based themes are still gaining traction, more developers are beginning to adopt and support this modern approach.
Use the Theme Customizer to edit your WordPress theme
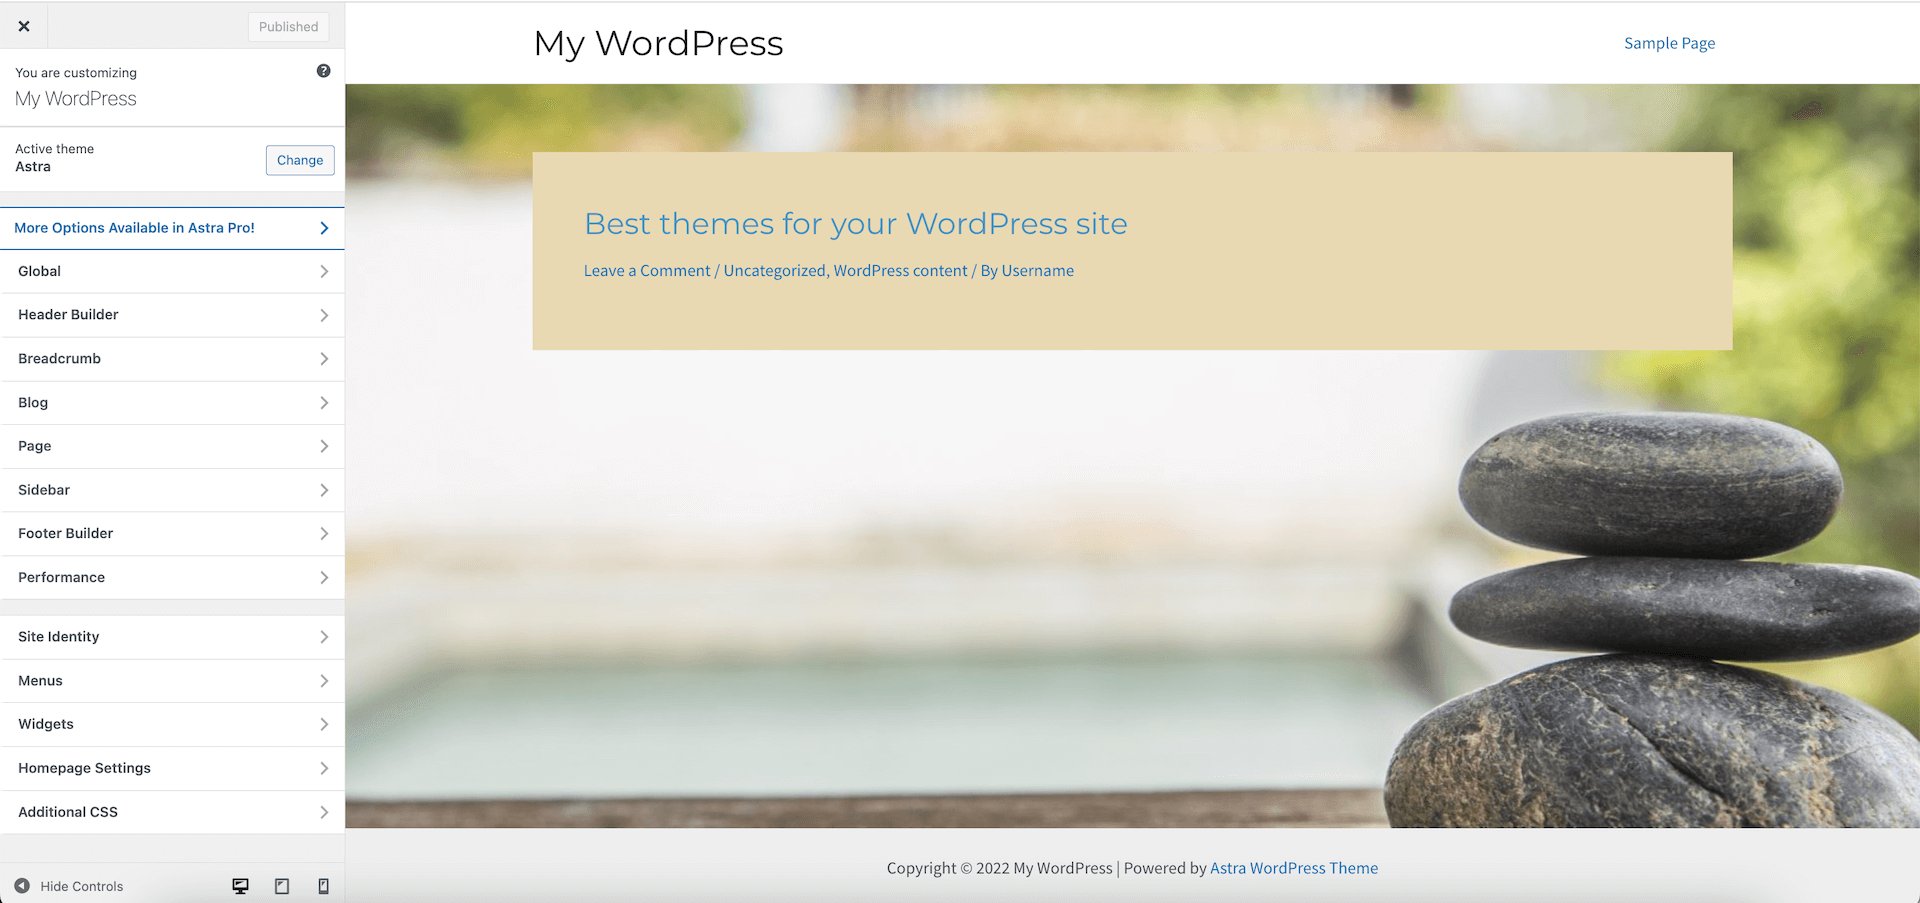
To customize classic themes like Astra, which don’t yet support the Full Site Editor, you can use the WordPress Theme Customizer—a legacy tool that lets you make real-time changes to your site. The options available in the Customizer vary depending on the theme you’re using but typically include settings for layout, colors, typography, menus, and more.
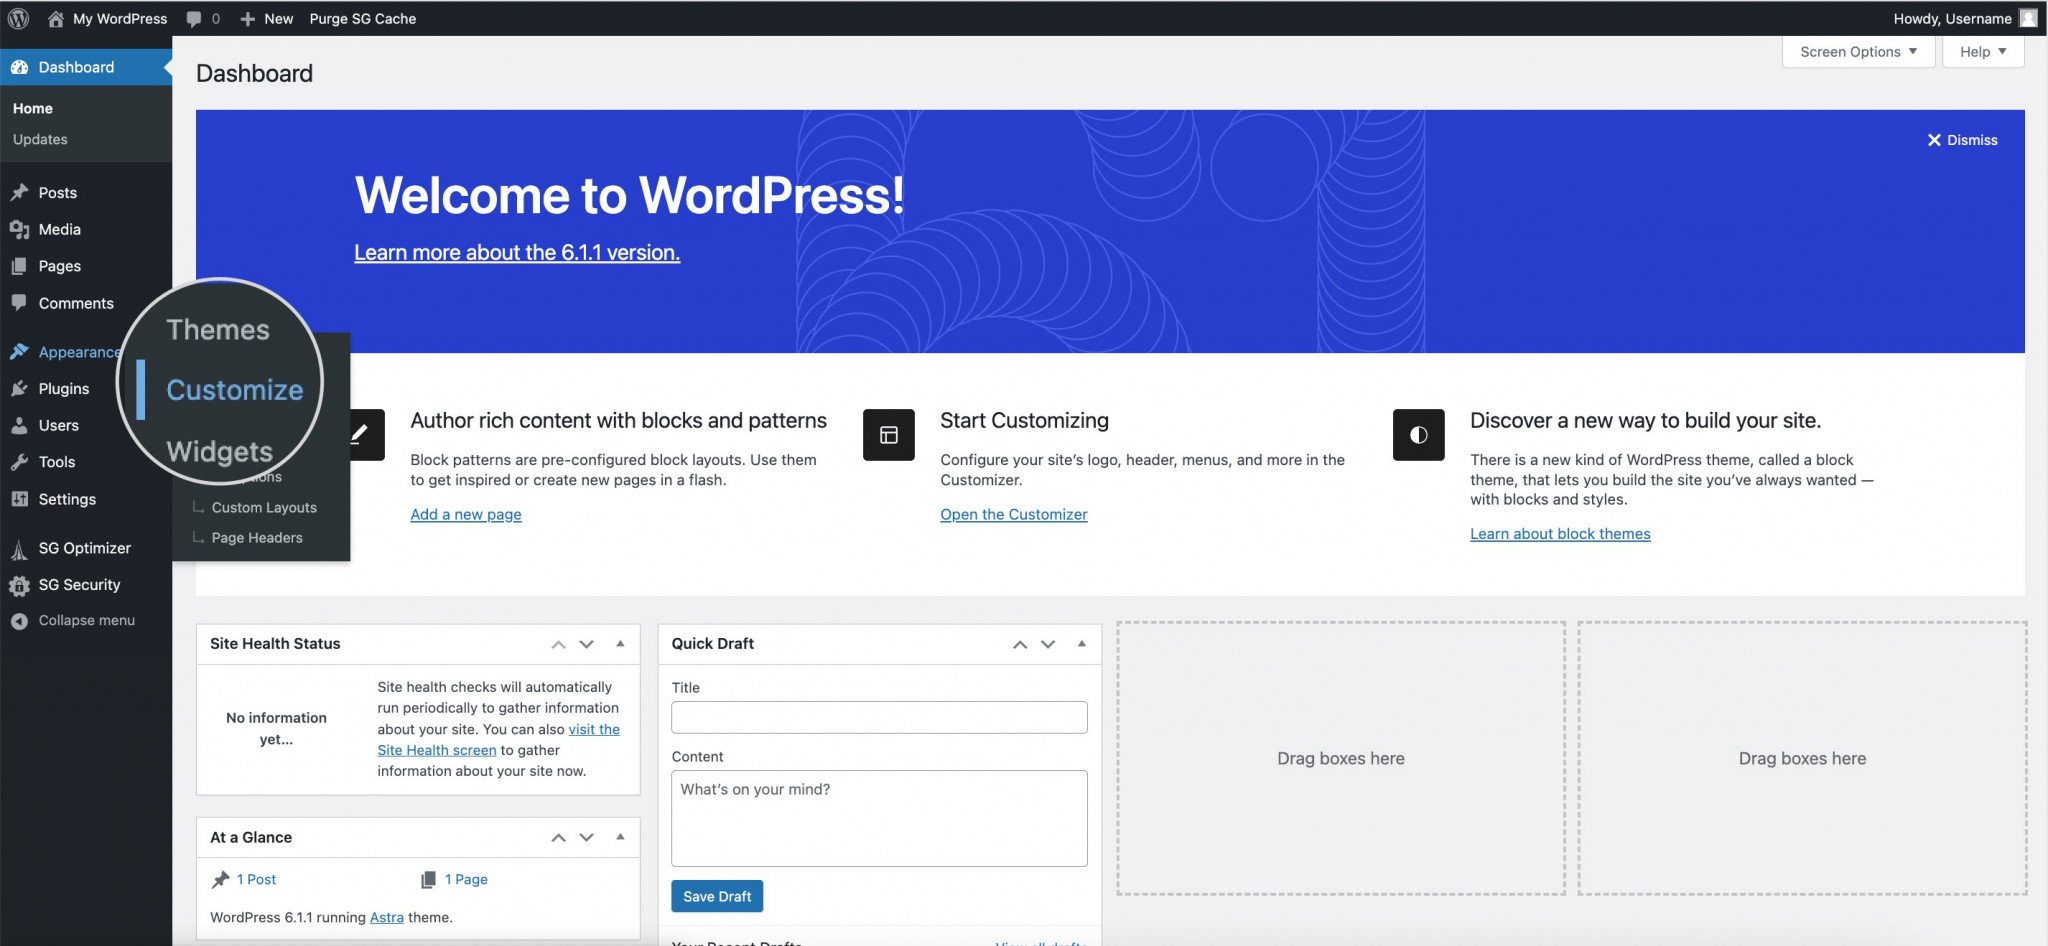
You can access the Customizer by going to Appearance > Customize, or by clicking the Customize button directly on the active theme thumbnail under Appearance > Themes.
This will open the Customizer interface, where you can make changes to your theme and see the results in real-time. A variety of customization options will appear in the left sidebar, allowing you to adjust different aspects of your site’s design and layout.
From the left sidebar, you can access and adjust all the customization features your theme offers. Common options found in most classic WordPress themes include homepage settings, color schemes, and background images or colors.
Customize your WordPress theme with a Page Builder/Framework
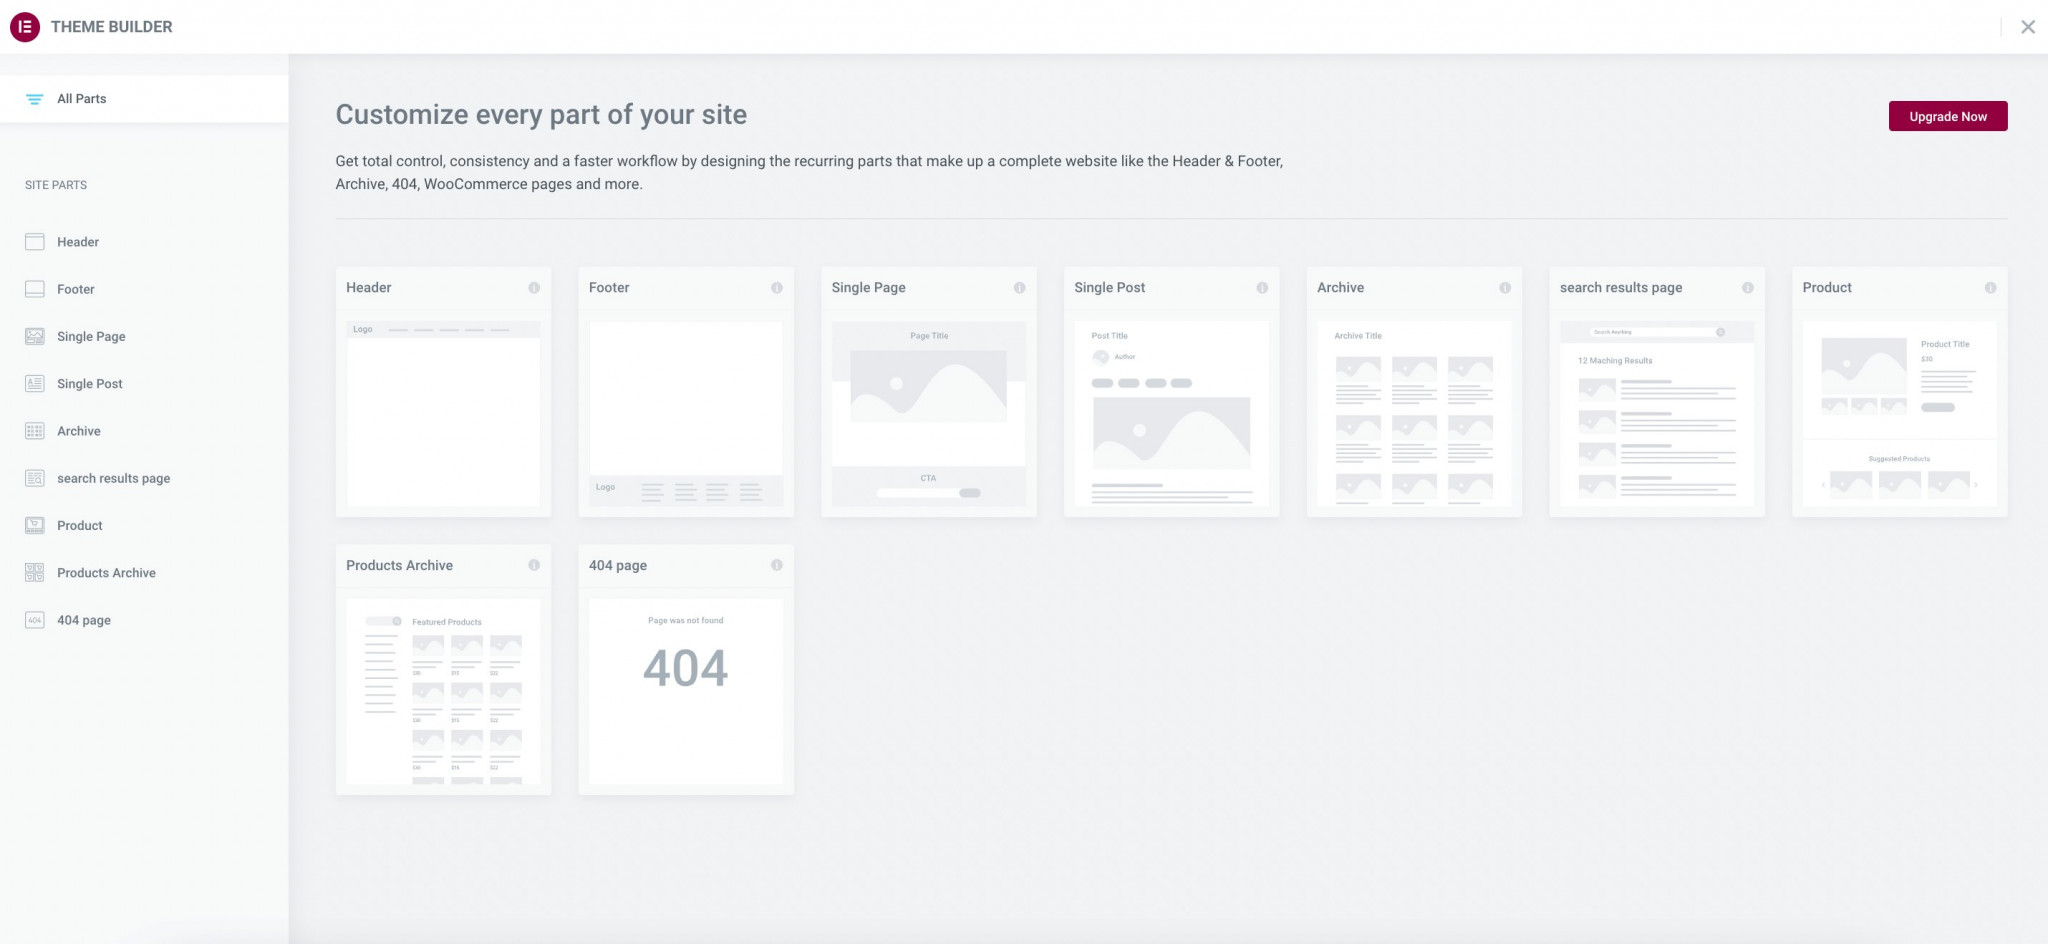
WordPress offers great flexibility when it comes to theme customization, especially with the help of page builder plugins. One of the most popular and beginner-friendly options is Elementor—a visual, drag-and-drop editor that makes it easy to design stunning websites without any coding knowledge.
Elementor provides full control over individual elements on your site and comes with more than 40 built-in widgets and design tools. You can also speed up the design process by using pre-built templates and professionally designed website kits.
For advanced customization, Elementor Pro unlocks the ability to edit core theme parts such as the Header, Footer, Single Post, and Archive Pages, giving you greater creative freedom.
Elementor is fully compatible with Gutenberg, mobile responsive by default, and packed with tools that help you design visually impressive websites with ease.
Another well-known website-building solution is Divi by Elegant Themes. Unlike Elementor, Divi is both a theme and a visual builder bundled into one package. It features a real-time visual editor, access to over 800 pre-designed layouts, and even includes built-in A/B split testing, a unique feature for optimizing design performance.
This premium theme features a true WYSIWYG builder, allowing you to design every page element directly on the screen and see your edits in real-time.
Divi lets you craft custom layouts that you can save, export, and reuse across multiple sites. Its built‑in Color Manager intelligently suggests palettes based on your past choices, ensuring a consistent visual identity. With its flexible, user‑friendly interface and interactive design options, Divi empowers you to build engaging websites that captivate your audience.
Edit a WordPress theme from the Theme File Editor
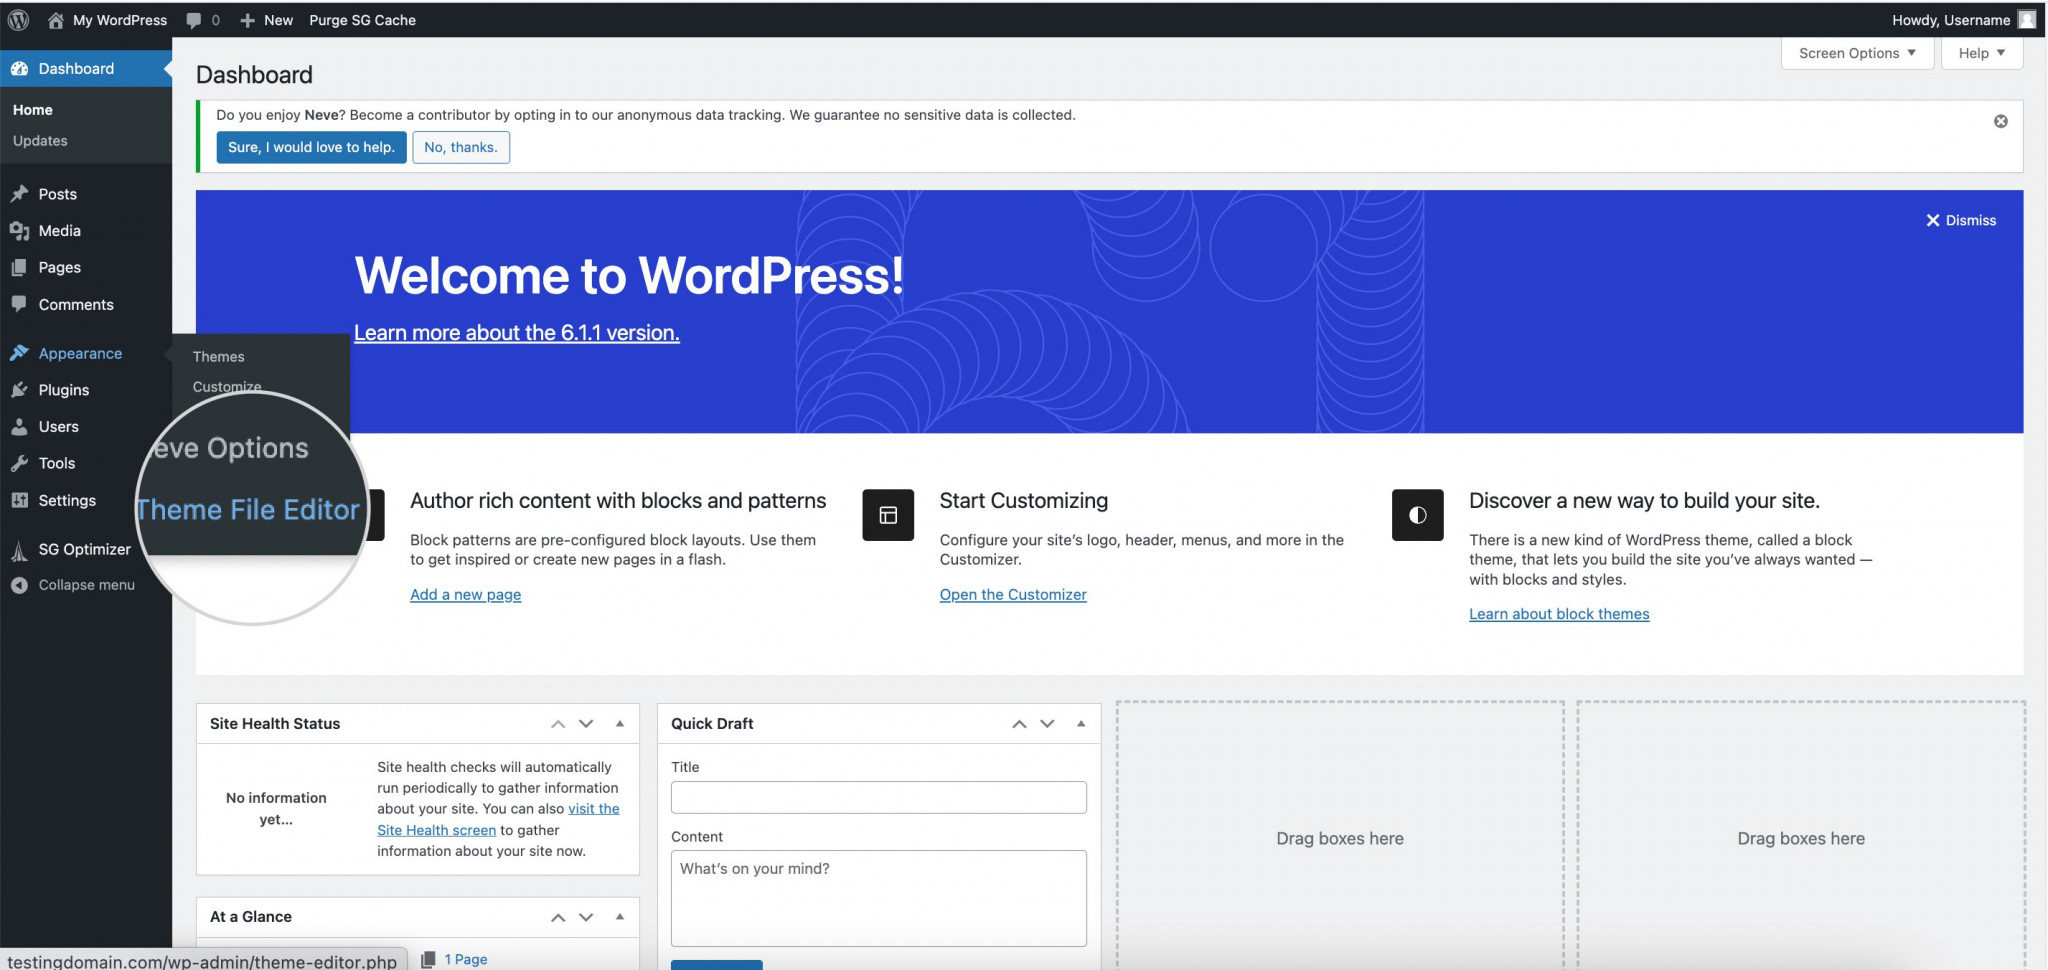
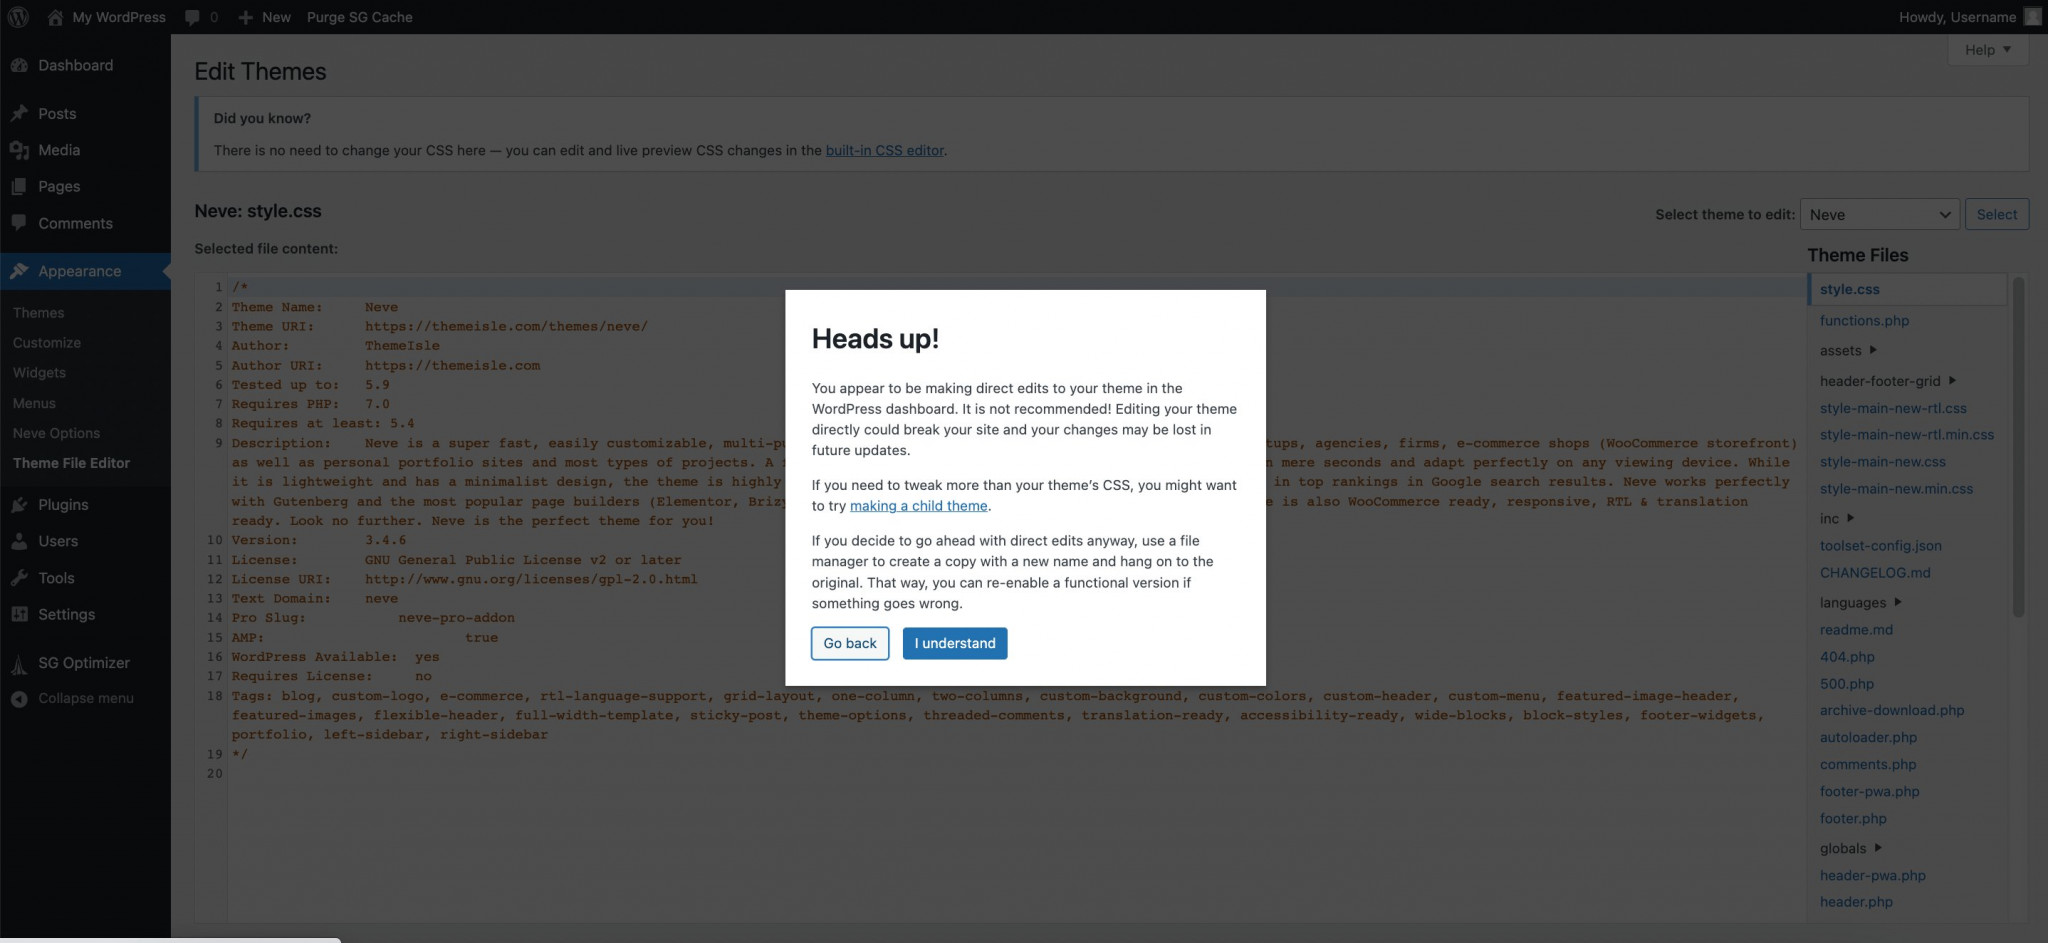
Your WordPress theme files are stored on your web hosting server. You can access and modify them either through your hosting provider’s File Manager or directly within your WordPress Dashboard by going to Appearance > Theme File Editor.
Keep in mind that editing theme files requires some familiarity with PHP and CSS. It’s also important to note that WordPress discourages making direct changes to theme files on a live site, as this can potentially break your site or result in lost modifications during a future theme update.
Even if you’re comfortable working with code, it’s best to avoid making changes directly on your live website, a risky practice often referred to as “cowboy coding.” Instead, consider editing your theme’s code in a staging environment or creating a child theme, which helps preserve your changes during theme updates.
The Theme File Editor in WordPress allows you to modify your theme’s underlying files directly from the admin dashboard. Common files you can edit include style.css (for design and layout), functions.php (for adding custom functionality), and various template files that control how content is displayed. Some custom themes may include additional files depending on their specific features.
Customize your site using a Child theme
Creating a child theme is widely regarded as the best practice when customizing a WordPress theme through code. This method allows you to apply changes safely, without the risk of losing them when the parent theme is updated.
It also reduces the chances of breaking your site, since all modifications are made to the child theme, leaving the original (parent) theme intact.
To create a child theme, start by creating a new folder in the wp-content/themes directory and include two basic files: style.css and functions.php. This setup lets you safely apply custom changes without affecting the parent theme. Even after updates, your modifications remain intact.
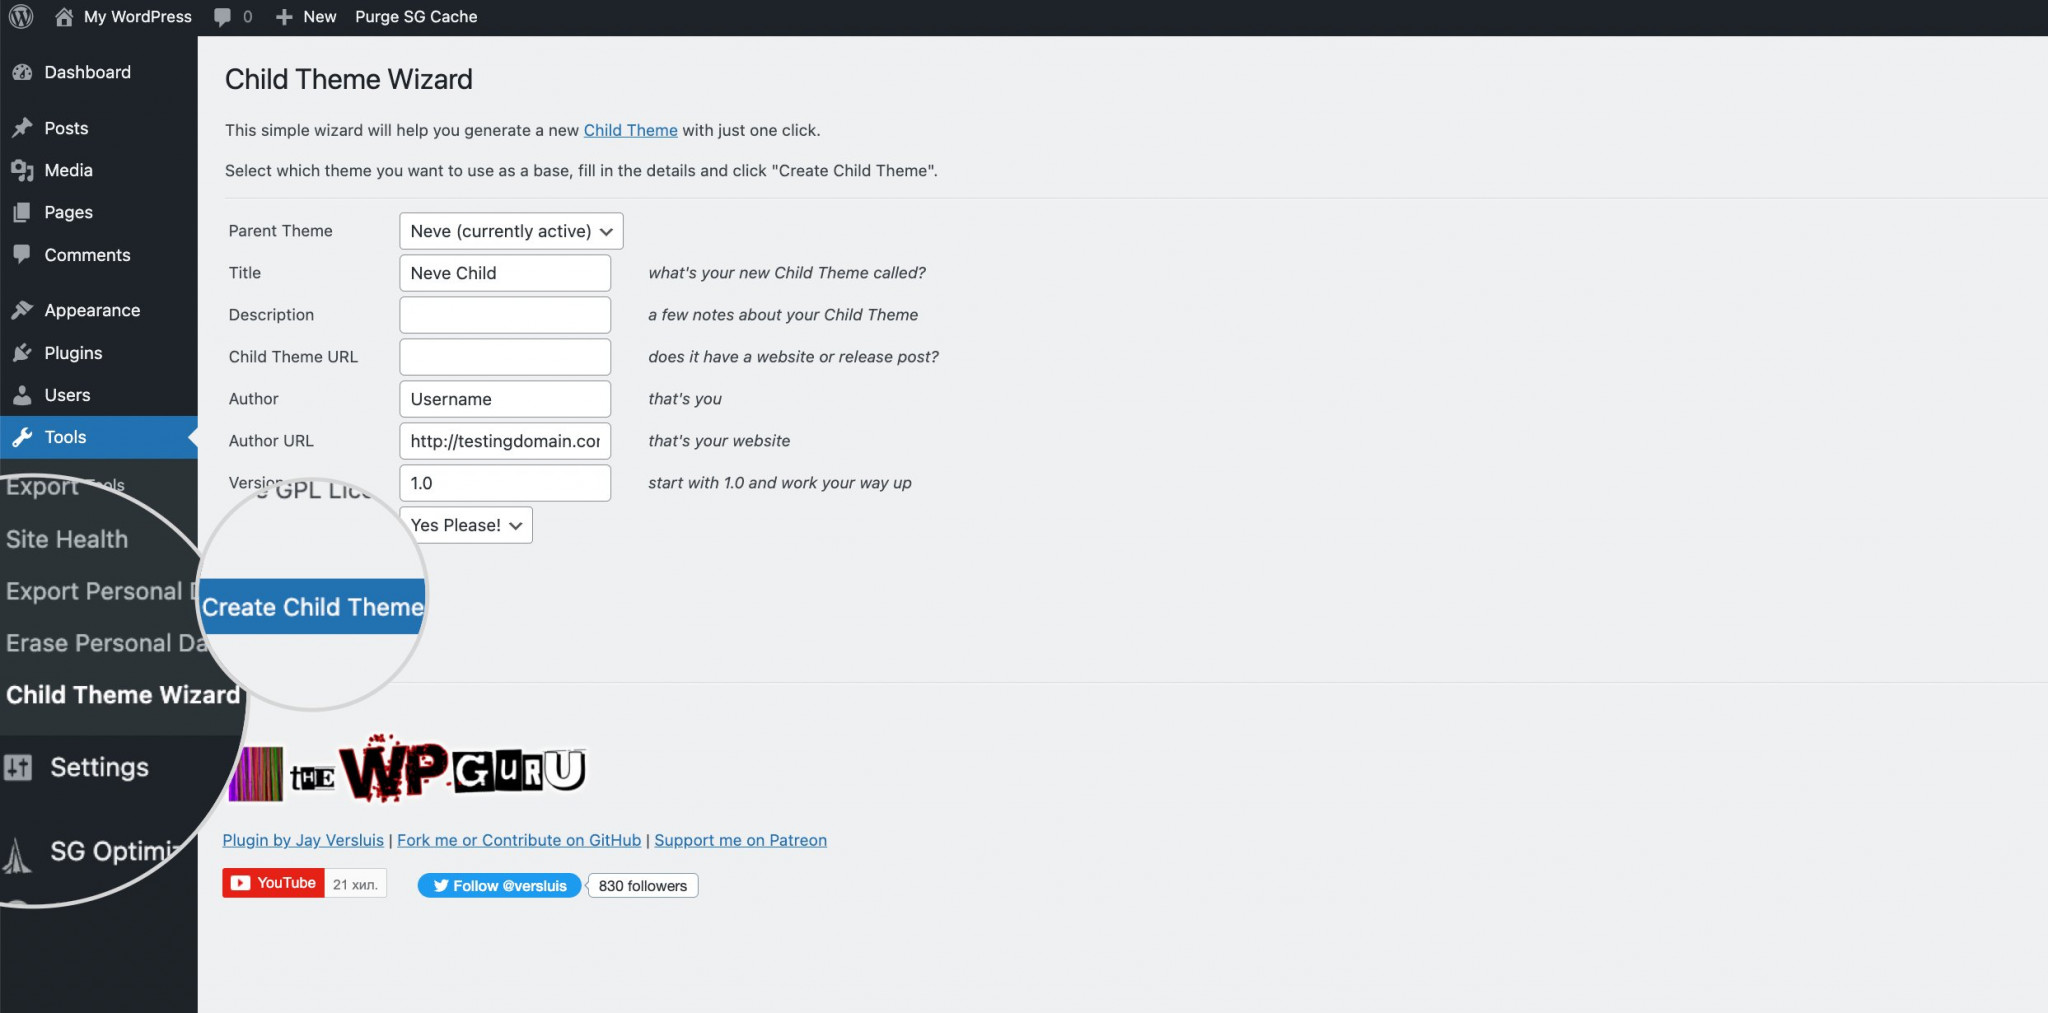
For a quicker approach, use a plugin like Child Theme Wizard. After activation, it appears under Tools in your Dashboard and walks you through the setup without manual coding.
In the plugin interface, choose your desired parent theme from the drop-down list, enter a name for your new child theme, and click the “Create Child Theme” button. Within a few seconds, you’ll receive a confirmation message indicating that the child theme has been successfully created.
Next, navigate to Appearance > Themes and activate your Child theme. You can now begin customizing your WordPress site.
After exploring different ways to install and customize creative WordPress themes, you might still feel uncertain about making the right choices or getting the look you want. If you’re unsure which theme truly fits your brand or how to start tailoring it effectively, Arestós is here to help.
Our dedicated design team will work with you to craft a site that’s not only visually stunning but also aligned with your goals. From theme selection to fine-tuned customization, we’ll turn your ideas into a polished, high-performing website.
Frequently Asked Questions
1. Why should I customize my WordPress theme?
No matter which theme you select, it will apply its default design to your site. However, by customizing it, you can tailor the look and feel of your website to reflect your own style and help it stand out from others using the same theme.
2. What is a creative WordPress theme?
A creative WordPress theme is a visually dynamic and design-focused theme tailored for portfolios, agencies, designers, and other visually-driven websites. It often includes unique layouts, animations, and customization features.
3. Can I install a WordPress theme without coding knowledge?
Yes, you can install and activate WordPress themes directly from your Dashboard without writing any code. WordPress offers both free and premium themes that are beginner-friendly.
4. Can I customize a theme without affecting SEO?
Yes. As long as you don’t change critical elements like URL structure or remove important content, design customizations won’t hurt your SEO. Many well-built, creative themes are SEO-friendly by default.
Conclusion
Installing and customizing creative WordPress themes doesn’t have to be complicated. Whether you’re using the built-in theme directory, uploading a premium theme, or working with a page builder, WordPress offers flexible tools to help you build a site that reflects your vision.
But if you’re still unsure where to start or want a professionally designed site without the hassle, Arestós is here to support you. Our experienced team specializes in WordPress design tailored to your brand and business goals.
Contact us now and start your WordPress project with a trusted design partner.
Subscribe to our newsletter!
Get updated to
the lastest IT trends

