Back to featured insights
How to Set Up Google Analytics for Your WooCommerce Shop
Learn how to set up Google Analytics for your WooCommerce shop to track customer behavior, monitor sales performance, and improve your marketing strategy. This step-by-step guide helps you integrate GA4 smoothly and unlock valuable insights to grow your online store effectively.

Table of Content
Share
Running a successful WooCommerce shop requires a deep understanding of your store’s performance and customer behavior. By integrating Google Analytics, you can track user activity, monitor sales trends, and make data-driven decisions to grow your business.
This guide is tailored for WooCommerce store owners, digital marketers, and anyone looking to optimize their eCommerce analytics. In this guide, we’ll walk you through every step of setting up Google Analytics for your WooCommerce shop, from account creation to tracking conversions and key metrics.

Overview of Google Analytics
What is Google Analytics?
Google Analytics is a powerful web analytics platform developed by Google that helps you understand how users engage with your website. It tracks essential data such as traffic sources, page views, user behavior, and on-site actions. With these insights, you can optimize your website, improve user experience, and increase conversions.
The latest version of this tool is Google Analytics 4 (GA4). It uses an event-based data model that provides deeper behavioral insights, enhanced eCommerce tracking, and more flexible reporting. This makes it especially valuable for WooCommerce store owners who want to analyze customer journeys, measure marketing effectiveness, and identify opportunities to grow sales.
Key features of Google Analytics
Google Analytics offers a range of powerful features that help you understand your website’s performance and user behavior more effectively.
- Visitor sources: Learn how people find your store, such as through search results, social media platforms, referral sites, or direct visits.
- On-site behavior: Discover how users move through your website, which pages they explore, how much time they spend, and what elements they interact with.
- Audience insights: Get a clearer picture of who your visitors are, including their age, gender, interests, and the regions they come from.
- Marketing performance: Identify which marketing channels bring the most valuable traffic, whether from SEO, paid ads, social posts, or email newsletters.
- Goal and conversion tracking: Monitor important actions like completed purchases, form submissions, clicks, or any specific goals you have set.
- Live activity monitoring: View real-time user activity to see how visitors respond instantly to promotions, new content, or ongoing campaigns.
- Customizable reports: Build your own dashboards and reports so you can focus on the performance metrics that matter most to your business objectives.
Benefits of integrating Google Analytics with WooCommerce
Integrating Google Analytics with WooCommerce enables store owners to gain actionable insights into their online store’s performance. Key benefits include:
- Product performance: Monitor sales and performance of individual products, top-selling items, underperforming products, and product categories. This helps with inventory management and informed decisions on stock levels, pricing, and promotions.
- Sales trends: Track overall sales patterns daily, weekly, monthly, or seasonally. Understanding trends allows store owners to plan promotions, capitalize on peak shopping periods, and anticipate slow periods.
- Drop-off points: Identify where customers abandon carts or leave the site. Optimizing these points can reduce cart abandonment, improve navigation, enhance user experience, and boost conversion rates.
- Traffic sources: Discover where your visitors come from, such as organic search, paid ads, social media, email campaigns, or referral sites. This insight helps refine marketing strategies and target the most effective channels.
- Session length and user engagement: Measure how long visitors stay on your site and their interaction with content. Higher engagement indicates a compelling shopping experience and increases the likelihood of conversions.
- Cart actions and checkout behavior: Track adding/removing items and the entire checkout process. Streamlining checkout reduces friction and improves the chance of completed purchases.
- Conversion rates: Calculate the percentage of visitors completing a purchase. This reflects website effectiveness and helps assess marketing performance.
- Advanced metrics: Use GA to determine Average Order Value (AOV), Customer Lifetime Value (CLV), and enhanced eCommerce tracking for detailed reports on product impressions, clicks, and checkout behavior.
Step-by-step guide for Google Analytics with WooCommerce
This is a straightforward task. I’ll guide you through a step-by-step process to set up Google Analytics correctly for WooCommerce. Follow the steps below to do it yourself.
Step 1: Install the WooCommerce Google Analytics Plugin
Start by installing a plugin to help set up Google Analytics for your WooCommerce store. I recommend using either the official plugin from WooCommerce developers or one of the suggested plugins available in their marketplace.
In this tutorial, I’ll use the free WooCommerce Google Analytics Integration plugin. Follow these steps:
- Go to your WordPress admin dashboard.
- Click Plugins → Add New. In the search bar, type “WooCommerce Google Analytics” and press Enter.
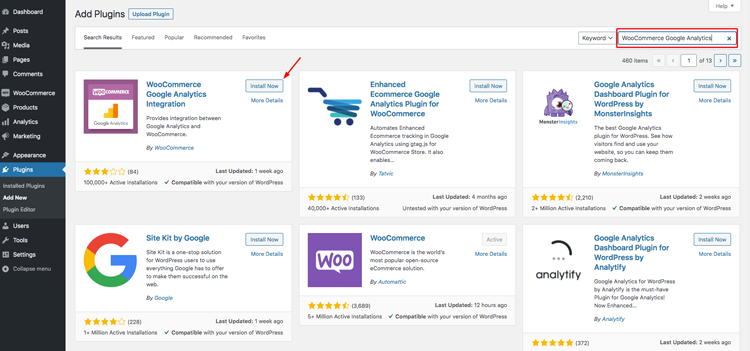
Click Install Now to install the plugin.
Once the plugin is successfully installed and activated, follow the instructions displayed above the plugin list in the same window.
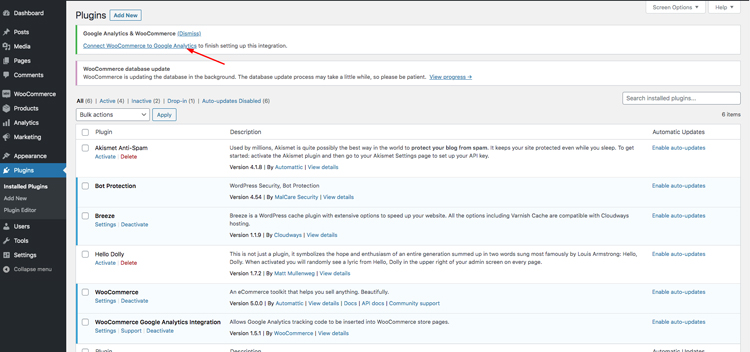
Click “Connect WooCommerce to Google Analytics” to access the plugin settings. You’ll then be prompted to enter your Google Analytics ID.
Step 2: Get Your Tracking ID From Google Analytics
You will now be redirected from your WordPress admin dashboard to your Google Analytics account, where you can create the property and obtain the Google Analytics ID required for the next steps.
- Go to your browser and type Google Analytics.
- Click on the first result, which is Google Analytics’ official website. Log in to your Google Analytics account, and you’ll be redirected to the GA dashboard.
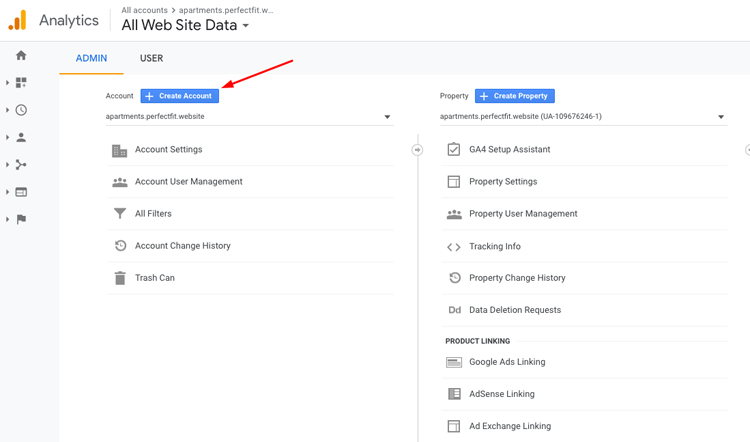
- Once you reach your GA Home Dashboard, click “Admin” located in the bottom left-hand corner.

The next step is to add a new account or a new property, depending on how your GA structure is organized.
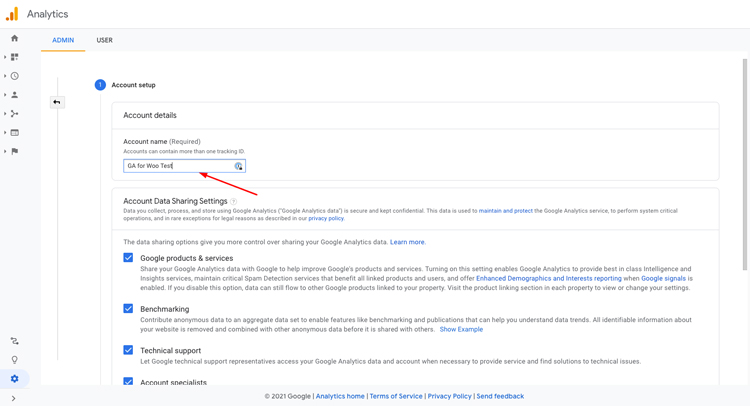
In my case, I created a new account by going to Account → Create Account.
Create a new property once you’ve finished naming your new account.
In this particular case, choose Web, since you are setting it up for WooCommerce, which is a web-based application.
(Note: iOS and Android are other options and are intended for mobile app creation)
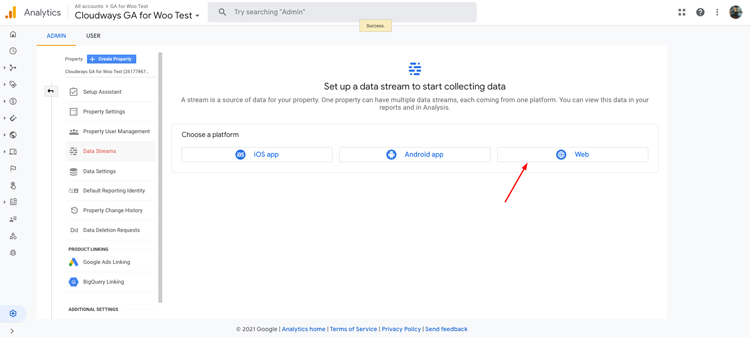
Once you’ve added Web and entered your website’s URL, connect your WooCommerce store with Google Analytics.
Copy and paste the tracking ID provided by Google Analytics into the plugin settings in your WordPress admin dashboard.

- Go back to your WordPress dashboard.
- Navigate to WooCommerce → Settings.
- Paste the Google Analytics tracking ID into the required field.
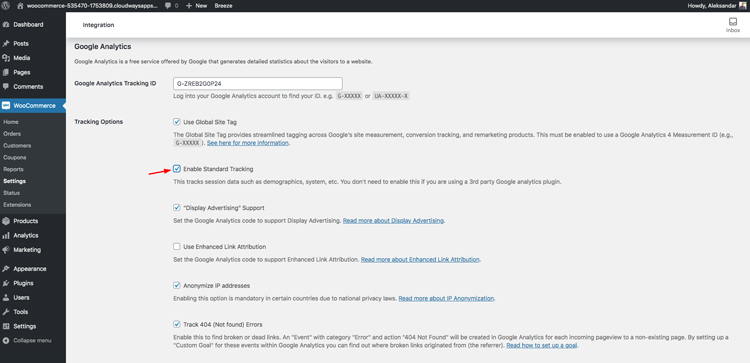
Check the Enable Standard Tracking box after pasting your GA tracking ID.
This ensures you don’t need to manually set up Google Analytics for other tracking activities such as blog visits, search traffic, and general user behaviors across your entire site.
Step 3: Enable E-commerce Settings on the GA Account
There’s one more important setting you need to configure!
Go to your Google Analytics account, click the settings icon in the bottom left corner, and select E-commerce Settings.
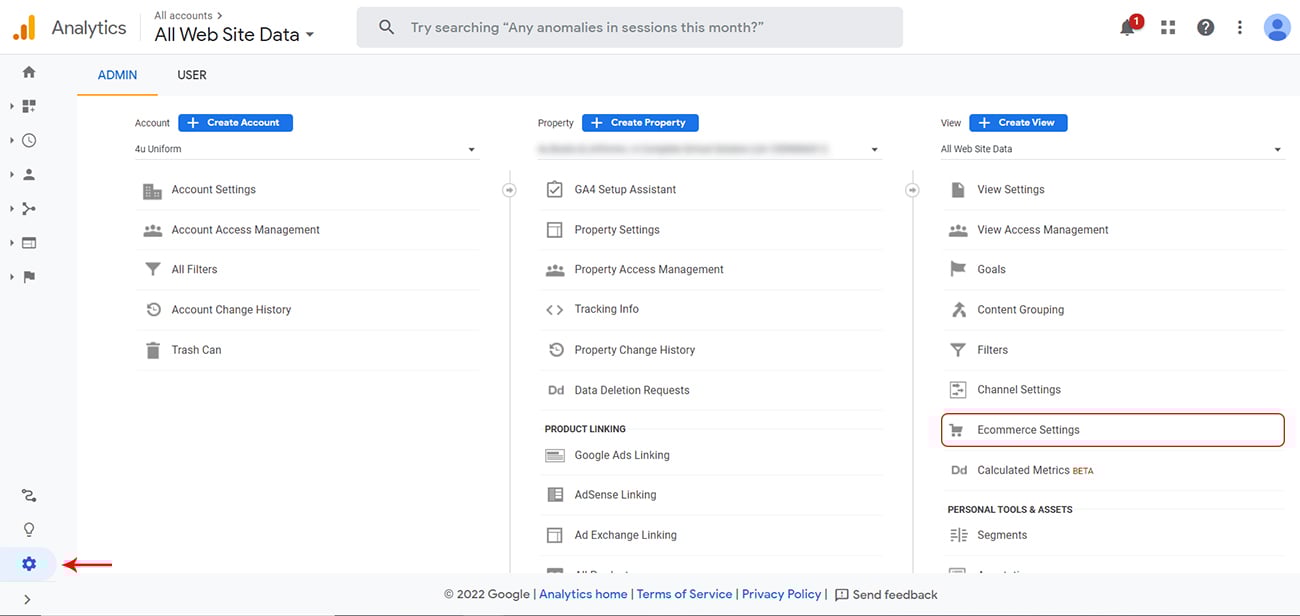
Turn on Enable Ecommerce and Enhanced Ecommerce Reporting under Ecommerce Settings.
Then, click the Save button to apply the changes.

Also, make sure to enable Enhanced Ecommerce if you want to get more detailed reports and insights.

Click the Save Settings button, and you’re all set.
By following the steps above, you’ve successfully connected your WooCommerce store to Google Analytics in just a few minutes.
Now you can track conversions, user behavior, returning visitors and customers, retention, and other key metrics to run your store effectively.
Step 4: Set up WooCommerce Google Analytics Plugin Settings
Now, let’s take a closer look at the options you selected or those that were checked by default.
Use Global Site Tag

You can enable the Global Site Tag (gtag.js framework) by checking this box, which allows tracking for both Google Analytics 4 and Universal Analytics.
Enable Standard Tracking
![]()
Check this box only if you are not already using another plugin to integrate the standard Google Analytics.
Display Advertising Network

If you plan to run Google Ads and want to track their performance not only in the Google Ads dashboard but also in Google Analytics, keep this box checked.
Use Enhanced Link Attribution

For beginners, this option should be left unchecked.
Enhanced Link Attribution improves the accuracy of your In-Page Analytics reports by automatically distinguishing between multiple links to the same URL on a single page using link element IDs.
However, it’s not beginner-friendly, and using it effectively requires a deeper understanding of Google Analytics.
Anonymize IP Addresses

When a customer requests IP address anonymization, Google Analytics will anonymize their IP address.
This anonymization happens at the earliest stage possible in the data collection process. The IP anonymization feature sets the last octet of IPv4 addresses and the last 80 bits of IPv6 addresses to zero in memory shortly after the data is sent to the Analytics Collection Network.
Track 404 Page Not Found Errors

It’s a good practice to keep this box checked, as it allows you to track error pages where your visitors land.
For example, if you delete a product from your store and won’t restock it, leaving the page live with an “Out of Stock” label can be misleading—people may expect the product to return.
If the deleted product is still indexed on Google and visitors click the link, they’ll see a 404 Page Not Found error. This isn’t ideal for your website. The best approach is to monitor all 404 errors and use 301 redirects to send visitors to a similar product or a shop/catalog page.
Purchase Transactions

To track purchases, you’ll need to use popular WooCommerce payment gateway add-ons such as Stripe, Braintree for WooCommerce, PayPal Checkout, or Square.
With these in place, you can track transactions, refunds, revenue, taxes, shipping, and other key financial metrics.
Add to Cart Events

By checking this box, you can track when visitors add products to their cart, analyze their behavior, and identify where they drop off in the shopping process.
Step 5: Track Conversions in Google Analytics
The most important metrics to monitor, without diving too deep into Google Analytics, are conversion rates and drop-off pages.
After setting up everything, you can find Conversions in the left-hand sidebar of your Google Analytics account. You can also create specific events—for example, I created a Black Friday event and want to track conversions coming from the Google Ads channel.
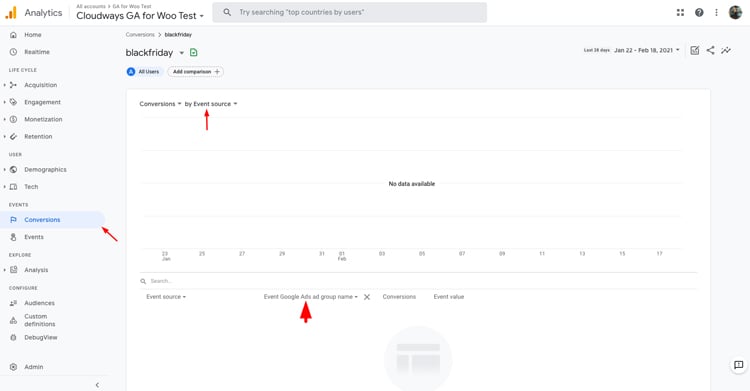
The second key metric is drop-off pages—these are the pages where visitors leave your site without completing a purchase or finishing a checkout step, also known as Checkout Behavior Analysis.
With Enhanced Analytics enabled (which will be covered in the next blog post), you can access detailed reports showing the exact drop-off rates.

Running an online store without tracking user behavior and e-commerce conversions—especially if you’re investing in Google Ads—is impractical at best.
Integrating Google Analytics with your store using the WooCommerce Google Analytics plugin helps you identify what might be going wrong and why potential customers are leaving. It shows which pages visitors leave most often, where they land on your site, and which marketing strategies bring in the most valuable customers so you can focus on the most effective traffic channels.
Understanding GA metrics can be challenging at first. I’ll cover deeper insights into Google Analytics and how to interpret metrics and results in future blog posts.
Plugins for using GA4 with WooCommerce
While plugins aren’t strictly required to use GA4 with WooCommerce, there are many plugins available that can help you get the most out of your Google Analytics data.
Here are some of the most popular options:
Google Analytics for WooCommerce
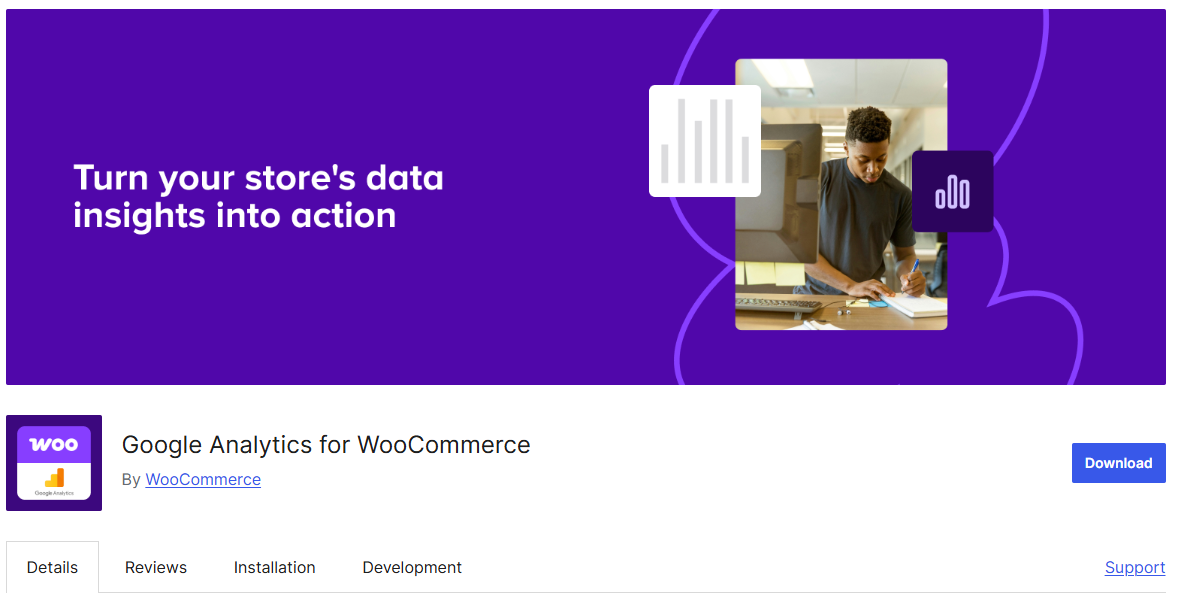
This is the official WooCommerce extension to integrate Google Analytics with your WooCommerce store. It enables you to track eCommerce events such as purchases and cart behavior, plus basic site analytics.
The plugin supports GA4 via the Global Site Tag, making it useful for store owners who want to monitor their revenue, user behavior, and marketing performance from within Google Analytics.
Key features:
- Supports GA4 via Global Site Tag (gtag.js)
- Tracks eCommerce events: purchases, add-to-cart, checkout behavior
- Detects and reports 404 error pages
- Option to exclude admin visits for accurate customer data
- Display Advertising support
- Handles cookie consent & privacy compliance via WP Consent API
Enhanced Ecommerce Google Analytics Plugin for WooCommerce
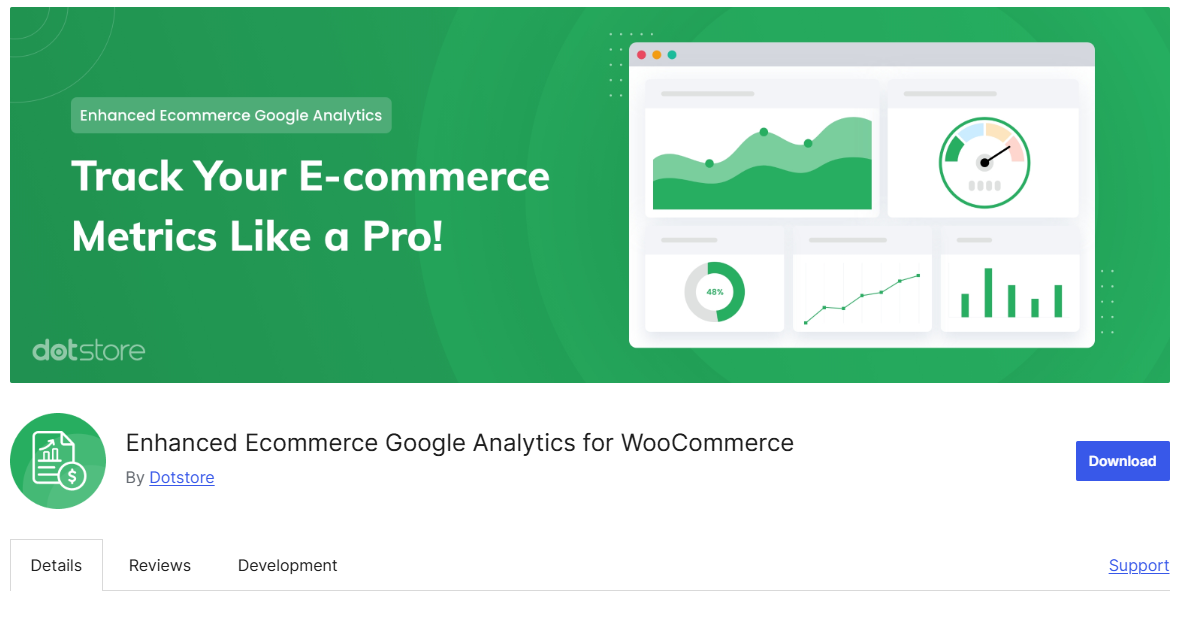
This plugin is designed to unlock the full power of Google Analytics’ Enhanced Ecommerce for WooCommerce stores. It tracks detailed user behavior from product impressions to add-to-cart, checkout, and final purchase, giving you a deep understanding of how shoppers move through your store. With these rich insights, you can identify where customers abandon the funnel and optimize your sales process accordingly.
Key features:
- Track product impressions, clicks, and add-to-cart events at both category pages and product pages
- Monitor shopping behavior with the Shopping Behaviour Report
- Analyze checkout steps and abandonment via the Checkout Behaviour Report
- Evaluate sales performance through the Sales Performance Report
- Support guest checkout to track non-registered users
- Enable anonymization of IP addresses for privacy compliance
- Automatically tag Google Ads for remarketing and sync with Merchant Center
HT Easy GA4 – Google Analytics WordPress Plugin

HT Easy GA4 is a simple and lightweight WordPress plugin that helps you add Google Analytics 4 to your site without writing any code. All you need to do is enter your Measurement ID, and the plugin will handle the rest. It also offers built-in reports (in the Pro version) for eCommerce, real-time analytics, and Google Ads conversions, making it a practical choice for small to medium WooCommerce stores.
Key features:
- Add GA4 Measurement ID without writing code
- Real-time analytics dashboard
- Built-in eCommerce reports (Pro): transactions, revenue, product views, cart additions
- Google Ads conversion tracking (Pro)
- GDPR / Consent mode support
- Event tracking and custom event configuration (Pro)
- Anonymous IP tracking option
Common issues and troubleshooting tips for Google Analytics and WooCommerce
When integrating Google Analytics 4 (GA4) with WooCommerce, store owners may face certain challenges that affect the accuracy of e-commerce tracking and reporting.
This section highlights typical issues and provides practical tips to help you resolve them and maintain a reliable GA4 setup.
Measurement ID not tracking
If your GA4 data is not being recorded or you notice that events are missing in your reports, you can follow these troubleshooting steps to resolve the issues:
- Verify Measurement ID: Double-check that the GA4 Measurement ID entered in your WooCommerce settings is correct. Using an incorrect ID will prevent data from being sent to your GA4 property.
- Check Installation: Make sure the GA4 tracking code or plugin is properly implemented on all pages of your website. Any missing or incorrect installation can lead to incomplete or missing data.
- Use Tag Assistant: Utilize the Google Tag Assistant Chrome extension to debug your setup. This tool allows you to confirm whether GA4 tags are firing correctly and identify any errors in the tagging process.
Data discrepancies between WooCommerce and GA4
If you find that the data in WooCommerce analytics does not align with your GA4 reports, try the following troubleshooting steps:
- Ensure Consistent Time Zones: Confirm that both WooCommerce and GA4 are using the same time zone. Misaligned time zones can cause discrepancies in reported data.
- Review Filters: Look over any filters applied in GA4 to see if they might be excluding certain transactions or events, which can affect the accuracy of reports.
- Check Data Layer: Make sure the data layer on your website is correctly set up and capturing all necessary eCommerce events, including product views, add-to-cart actions, and completed purchases.
Missing eCommerce events
If specific eCommerce events, such as add_to_cart or purchase, are not appearing in GA4, follow these troubleshooting tips:
- Enhanced eCommerce Setup: Make sure that Enhanced eCommerce tracking is activated in your GA4 property. Without this, many eCommerce-specific events will not be recorded.
- Event Parameters: Check that the correct event parameters are being sent along with each eCommerce action. Incorrect or missing parameters can prevent events from being logged properly.
- DebugView: Use the GA4 DebugView tool to monitor events in real time and identify any issues with event tracking.
Duplicate transactions
If you notice duplicate transactions in GA4, which can cause inflated revenue and transaction numbers, try the following troubleshooting tips:
- Transaction IDs: Verify that every transaction is assigned a unique Transaction ID. Duplicate or missing IDs can result in the same transaction being counted multiple times.
- Order Confirmation Page: Check that the GA4 tracking code or purchase event is not triggered more than once on the order confirmation page. Multiple triggers can lead to repeated recording of the same transaction.
Slow loading times
If your WooCommerce site begins to load more slowly after integrating GA4, consider these troubleshooting tips:
- Asynchronous Loading: Make sure GA4 tracking tags are set to load asynchronously. This helps prevent the analytics code from delaying page rendering and improves overall site performance.
- Tag Manager Optimization: Use Google Tag Manager to organize and optimize the loading of multiple tracking tags. This approach can reduce page load times and ensure all tags fire efficiently without affecting user experience.
Privacy and compliance issues
If you are concerned about compliance with privacy regulations like GDPR, CCPA, or others, consider the following troubleshooting tips:
- Cookie Consent: Use a cookie consent management tool to obtain user permission before collecting any tracking data.
- Anonymize IP: Activate IP anonymization in GA4 to ensure compliance with privacy laws and protect user identities.
- Data Retention: Configure data retention settings in GA4 to control how long user data is stored and avoid keeping personal information longer than necessary.
By addressing these common issues and applying these practical solutions, you can improve the accuracy and reliability of your eCommerce tracking in GA4, resulting in more precise insights and better-informed business decisions.
Frequently Asked Questions
1. Do I need a plugin to use GA4 with WooCommerce?
While it’s possible to add GA4 tracking manually by inserting the code into your website, using a plugin simplifies the setup, ensures proper event tracking, and enables eCommerce-specific reports.
2. How long does it take for GA4 data to appear?
After setting up GA4, most standard reports are updated within 24–48 hours. However, real-time reports are available immediately to monitor live user activity.
3. Can I track both website and app data in the same GA4 property?
Yes, GA4 allows you to track data from multiple platforms, including websites and mobile apps, within a single property. This provides a unified view of user interactions across different channels.
4. Why are my WooCommerce analytics and GA4 reports showing different numbers?
Differences may arise due to mismatched time zones, filters in GA4, incomplete data layer setup, or delays in data processing. Ensure consistent settings and correct implementation to reduce discrepancies.
Conclusion
In summary, setting up Google Analytics for your WooCommerce shop is a crucial step to understand your customers, monitor sales, and make informed decisions that drive business growth. By following this guide, you can track key metrics, optimize marketing strategies, and enhance your store’s performance.
At Arestós, we specialize in WooCommerce solutions, helping businesses build, customize, and optimize their online shops for maximum efficiency and growth. Our team ensures seamless integration with Google Analytics and other essential tools to support your eCommerce success.
Contact us now to learn how we can help take your WooCommerce shop to the next level and unlock the full potential of your online business.
Subscribe to our newsletter!
Get updated to
the lastest IT trends
Related Posts
Update the latest technology trends for your business