Back to featured insights
How to Migrate a WordPress Site to a New Domain (Step-by-Step Guide)
Migrating a WordPress site to a new domain can support rebranding, improve SEO strategy, and create a stronger online presence. In this guide, you’ll learn when to move to a new domain, what to prepare before migration, and the key steps to ensure a smooth transition without losing traffic or rankings.
Table of Content
Share
Migrating a WordPress Site to a New Domain is a common process for businesses that want to rebrand, improve SEO, or move their website to a more suitable domain name. When handled correctly, this migration helps maintain search rankings, preserve website traffic, and ensure a smooth user experience.
This guide is useful for website owners, marketers, developers, and businesses planning to change their domain without disrupting their online presence. In this guide, we’ll explain when you should migrate to a new domain, what preparations are required, and the key steps to complete the migration successfully.
Why Migrate Your WordPress Site to a New Domain?
Migrating your website to a new domain can be an important step for businesses that are rebranding, expanding to new markets, or improving their online presence. A new domain name can better reflect your brand identity, make your website easier to remember, and strengthen credibility with your target audience.
In some cases, website owners also move to a new domain to improve SEO performance, switch to a more relevant domain extension, or separate different business units. With proper planning and redirection strategies, migrating to a new domain can be done smoothly without losing valuable traffic or search engine rankings.
When Should You Migrate to a New Domain?
Migrating to a new domain is not always necessary, but there are certain situations where it becomes the best strategic decision for your website or business.
- Rebranding your business: When your company changes its brand name, a new domain helps maintain brand consistency across all platforms.
- Targeting a new market: Businesses expanding internationally may switch to a domain that better fits a specific country or audience.
- Changing domain extensions: Moving from extensions like .net or .org to .com or other relevant domains can improve credibility and memorability.
- Merging multiple websites: If you are consolidating several websites into one, migrating to a new domain may simplify your online structure.
- Improving SEO or domain relevance: Sometimes a new domain with a clearer brand identity or keyword relevance can support long-term SEO strategies.
Planning the migration carefully is essential to ensure that your website maintains its traffic, rankings, and user experience during the transition.
What to Prepare Before You Change Domains
Before changing your WordPress domain, proper preparation is key to ensure a smooth migration and prevent downtime, broken links, or SEO issues. Here are the essential steps you should take before starting the process:
- Backup Your Website: Create a full backup of your WordPress files and database. This ensures you can restore your site if anything goes wrong during the migration.
- Check Your Current SEO Performance: Note your rankings, traffic, and indexed pages. This helps you monitor the impact of the migration and maintain SEO.
- List All URLs and Important Pages: Make an inventory of all critical pages, posts, and media files to ensure nothing is missed during the transfer.
- Prepare Your New Domain: Register the new domain, set up hosting, and ensure it is ready to accept your WordPress installation.
- Gather Login Credentials: Have your FTP, cPanel, and WordPress admin login details for both old and new domains handy.
- Choose Your Migration Method: Decide whether you’ll use a plugin like Duplicator or perform a manual migration, so you’re ready to follow the chosen process efficiently.
Proper preparation will make your domain change smoother and help maintain your site’s performance and search engine rankings.
How to Migrate a WordPress Site to a New Domain
Migrating your WordPress site to a new domain may sound technical, but it becomes much easier when you follow a clear structure.
Below are 7 essential steps to help you move your website safely, prevent data loss, and protect your SEO performance during the transition.
- Step 1: Install a WordPress Migration Plugin
- Step 2: Create a Duplicator Package of Your WordPress Site
- Step 3: Create a Database for Your New Domain Name
- Step 4: Unpack WordPress on Your New Domain Name
- Step 5: Set Up Permanent 301 Redirects
- Step 6: Clean Up Your New Website
- Step 7: Notify Google About Your New Domain
Let’s break down each step in detail.
Step 1: Install a WordPress Migration Plugin
If you’re new to WordPress, handling a manual migration may feel overwhelming since it requires direct access to and modification of your website files. To reduce the risk of errors that could disrupt your site, using a migration plugin is a safer and more beginner-friendly option.
One reliable solution is Duplicator. This plugin allows you to bundle your website files and database into a single portable package, making the transfer process much faster and more convenient—without needing to manually download every file.
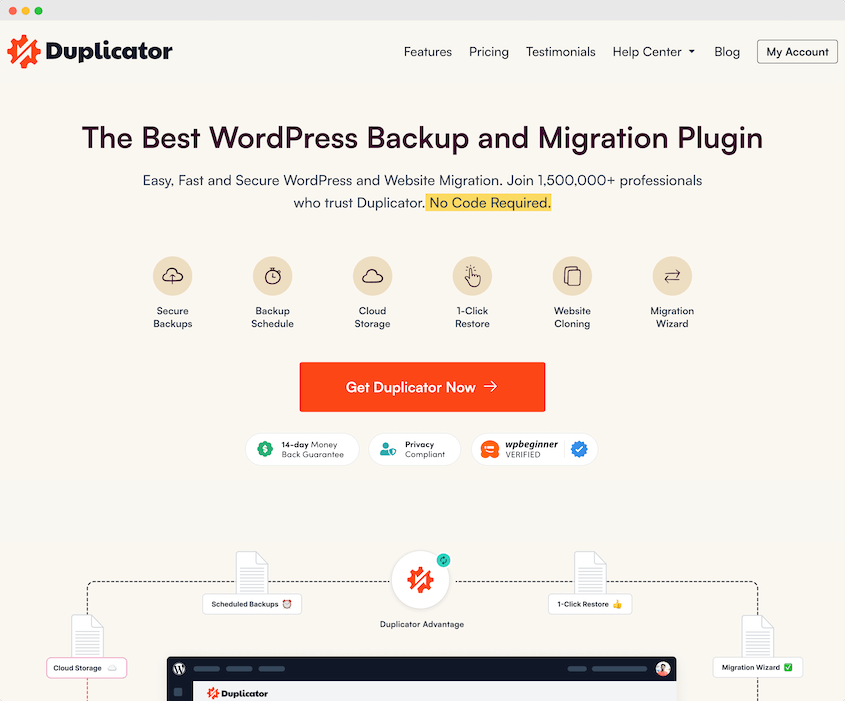
In addition, Duplicator Pro offers a convenient drag-and-drop migration feature. After creating a backup of your existing website, you can easily upload the package to the new domain without complex configuration.
Step 2: Create a Duplicator Package of Your WordPress Site
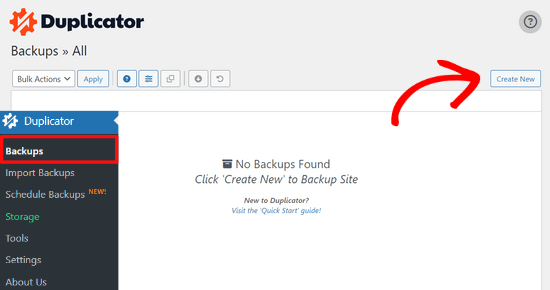
After activation, Duplicator will appear as a new menu item in your WordPress dashboard. To generate a backup, navigate to Duplicator » Backups and click the Create New button to build a fresh copy of your website.
The Duplicator backup wizard will now start and automatically generate a default name for your package. To proceed, simply click the Next button.

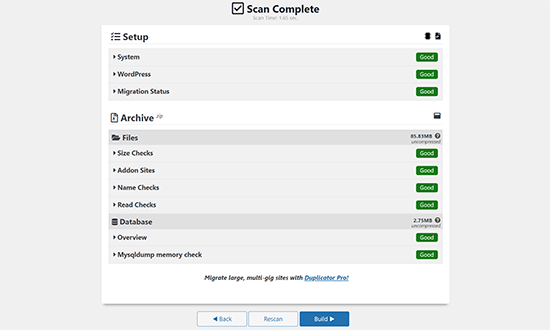
Duplicator will now perform a series of checks to ensure your site is ready for backup. If any problems are detected, you’ll see a warning message along with guidance on how to fix them.
If all results are marked as Good, go ahead and click the Build button to create your backup package.
The Duplicator plugin will now begin generating a complete package of your website files. The time required will depend on your site’s size and content.
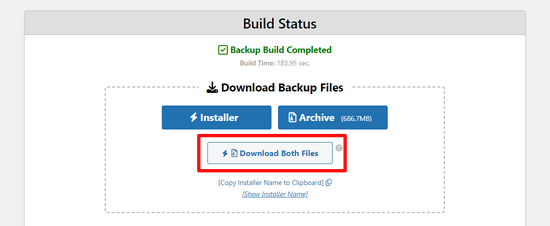
When the process is complete, you’ll see a Download button. Clicking it will give you the option to download Both Files together or download the Installer and Archive (ZIP) separately.
Select Download Both Files to save everything to your computer at once.
The Archive file contains a full snapshot of your WordPress website, including themes, plugins, media uploads, permalink structure, and any additional files generated by installed plugins.
The Installer is a PHP script that automates the migration process. It extracts the archive and guides you through setting up your WordPress site on the new domain.
Step 3: Create a Database for Your New Domain Name
Before transferring your WordPress site to the new domain, you must set up a fresh SQL database where the site data will be installed. If you’ve already created one, you can move on to the next step.
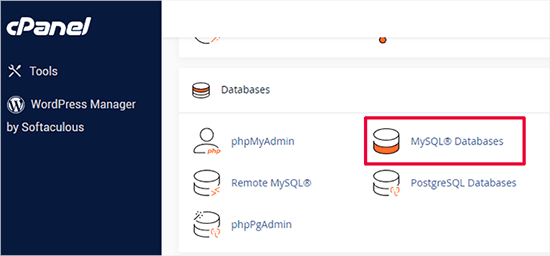
To create a new database, access your hosting account’s cPanel, scroll to the Databases section, and select MySQL Databases.
For this example, we’ll demonstrate the process using Bluehost, though the general steps are similar across most hosting providers.
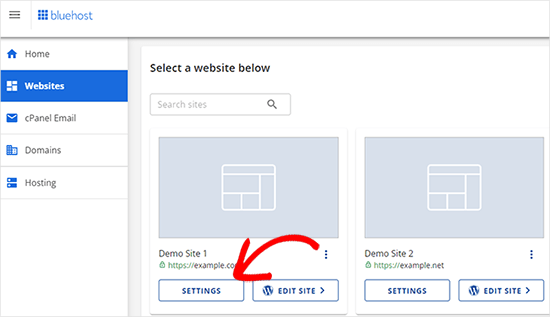
Start by logging into your Bluehost dashboard and clicking the Settings button beneath your website to access the necessary configuration options.
From your website’s settings page, open the Advanced tab. Then scroll to the cPanel area and select Manage to enter the control panel.

This action will take you to the cPanel dashboard. From there, scroll down to the Databases section and select MySQL Databases to continue.
Please note that your hosting control panel interface may differ slightly from the screenshots shown. Even so, you should still be able to locate a Databases section where you can create a new database.
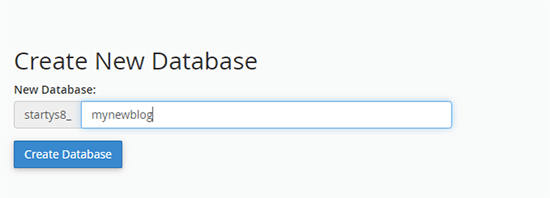
Enter a name for your database and click the Create Database button to proceed.
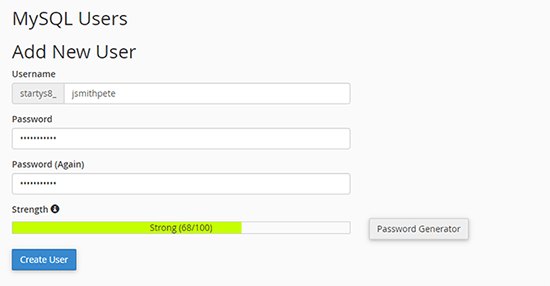
cPanel will now generate the new database for you. Once that’s done, scroll down to the MySQL Users section.
Enter a username and a secure password for the new database user, then click Create User. Be sure to store these credentials safely, as you’ll need them later during the migration process.
The new user you just created still does not have permission to work on the database. Let’s change that.
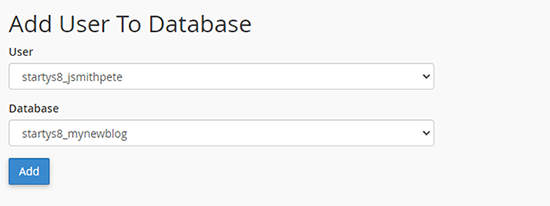
Scroll down to the ‘Add User to Database’ section. First, select the database user you created from the dropdown menu next to the ‘User’ field. Then select the new database you just created and click on the ‘Add’ button.
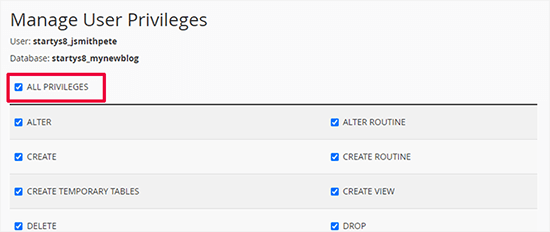
You’ll now be prompted to assign permissions to the database user. Choose All Privileges to grant full access, then click Make Changes to save your settings.
Your new database is now set up and ready for the WordPress migration.
Be sure to record the database name, username, and password, as you’ll need these details in the next step of the process.
Step 4: Unpack WordPress on Your New Domain Name
Next, upload the Duplicator files you downloaded earlier to your new domain. Since the package already contains your complete WordPress installation, there’s no need to install WordPress separately on the new domain.
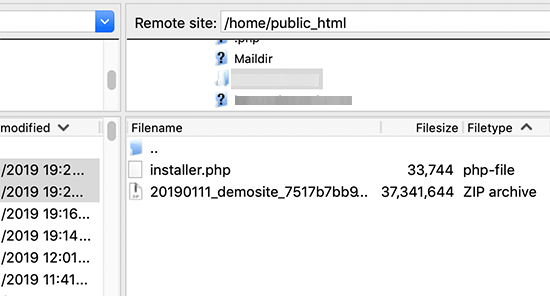
Begin by connecting to your domain using an FTP client. After logging in, ensure that the website’s root directory is empty.
Then, upload both the archive and installer files to the root folder, which is typically named public_html.
After both files are fully uploaded, you’re ready to begin unpacking your WordPress site.
Open a new browser tab and enter the following URL: http://yournewdomain.com/installer.php
(Be sure to replace yournewdomain.com with your actual domain name.)
This will launch the Duplicator migration wizard, where you can start the installation process.
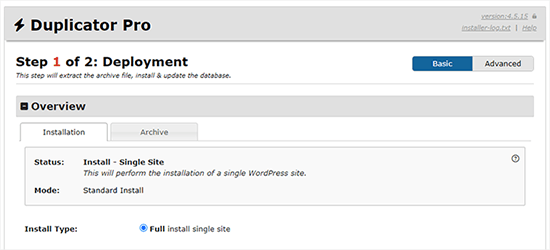
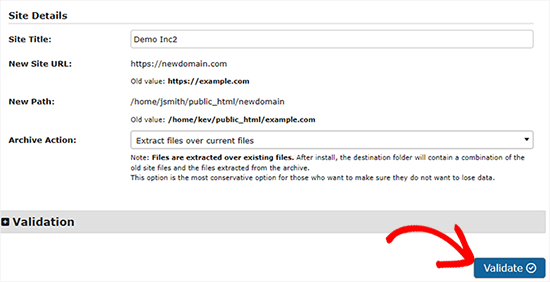
The installer will automatically detect the archive file and pre-select the recommended configuration settings on the screen.
Scroll down to the database section and enter the details of the database you created earlier, including the database name, username, and password.
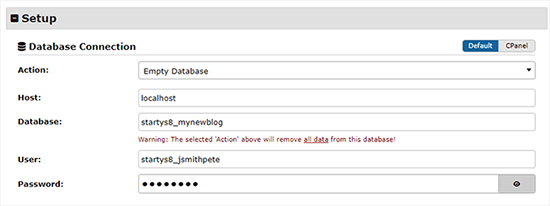
Below this section, Duplicator will display both your old domain URL and the new domain URL for confirmation.
If the details are correct, click Validate to proceed to the next step.
Duplicator will now try to connect to the database using the credentials you entered.
If the connection is successful, you’ll see a Validation Pass message. If not, a warning will appear with instructions to help you resolve the issue.
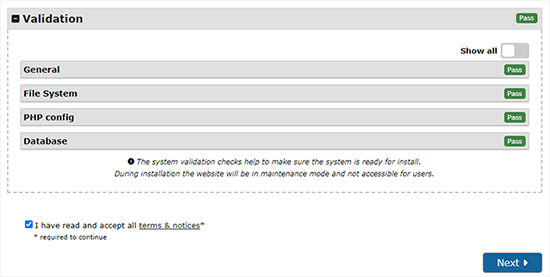
Click the Next button to proceed.
Duplicator will then begin importing your WordPress site to the new domain. When the process is complete, a success message will appear along with an Admin Login button, allowing you to access your newly migrated website.
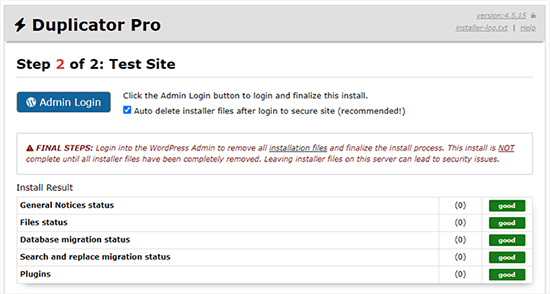
Duplicator will automatically replace the old URLs with your new domain name. You can then click the Admin Login button to access the WordPress dashboard of your migrated site.
After logging in, the plugin will automatically remove the installation files, including installer.php and the archive ZIP file. This is an important security measure, so be sure to confirm that you see a notification indicating these files have been successfully deleted.
Step 5: Set Up Permanent 301 Redirects
The next step is to direct traffic from your old domain to the new one by configuring 301 redirects.
These redirects are essential for both SEO and user experience. They ensure that visitors and search engines are automatically forwarded to your new domain instead of encountering 404 errors. This means any post or page accessed on the old domain will seamlessly redirect to its corresponding URL on the new domain.
At this stage, you technically have two identical websites — one on the old domain and one on the new domain. To maintain proper redirection, you’ll need to keep the old WordPress installation active so it can continue forwarding visitors.
There are two main ways to implement 301 redirects: an easier method that only takes a few clicks, and a more advanced approach that involves manually editing your site files.
Method 1: Set Up 301 Redirects With All in One SEO
For this approach, you’ll need All in One SEO (AIOSEO), one of the most popular SEO plugins for WordPress that makes optimization and redirection management simple.
Start by returning to the WordPress dashboard of your old website. Then, install and activate the All in One SEO plugin just as you would with any other WordPress plugin.
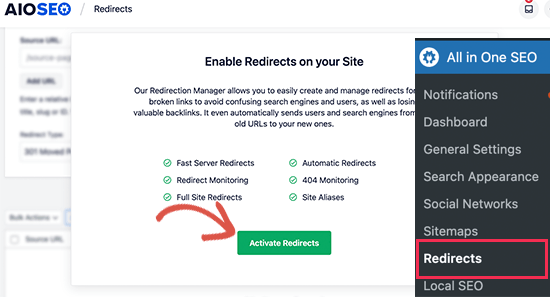
After activating All in One SEO on your old domain, go to All in One SEO » Redirects in your dashboard and click the Activate Redirects button to enable the redirection feature.
Next, open the Full Site Redirect tab and enable the Relocate Site toggle.
Then, enter your new domain name in the Relocate to domain field to set up the redirection.
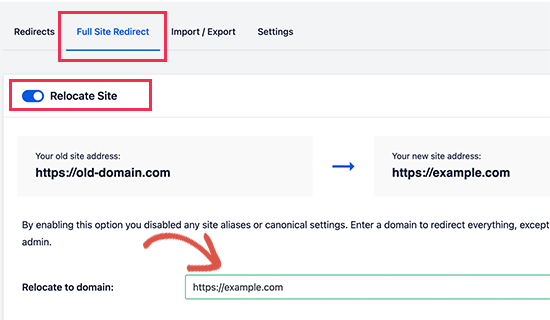
Be sure to click the Save Changes button to apply and store your new settings.
Method 2: Manually Set Up Redirects to New Domain
This method involves manually editing the WordPress .htaccess file on your old domain.
Start by connecting to your old website using an FTP client. Locate the .htaccess file in the root directory — the same folder that contains the wp-admin and wp-includes directories.
Open the .htaccess file and insert the required redirect code at the very top of the file before saving your changes.
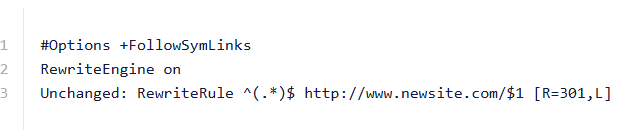
Be sure to replace newsite.com in the code with your actual new domain name.
After saving the changes, visit your old domain to test the redirect. If everything is configured correctly, you should be automatically forwarded to the new domain.
If the redirect doesn’t work, it may indicate that the rule wasn’t set up properly or that your server doesn’t have RewriteEngine enabled. In that case, contact your hosting provider’s support team and ask them to enable rewrite rules on your server.
Step 6: Clean Up Your New Website
After migrating your website, it’s important to check for broken links. Improperly redirected URLs can prevent users from accessing your content and harm SEO.
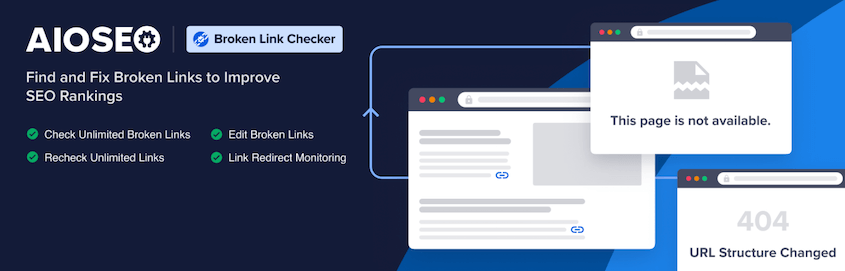
The Broken Link Checker plugin is an excellent tool for this task. It automatically scans your site and alerts you to any broken or missing links so you can fix them promptly.
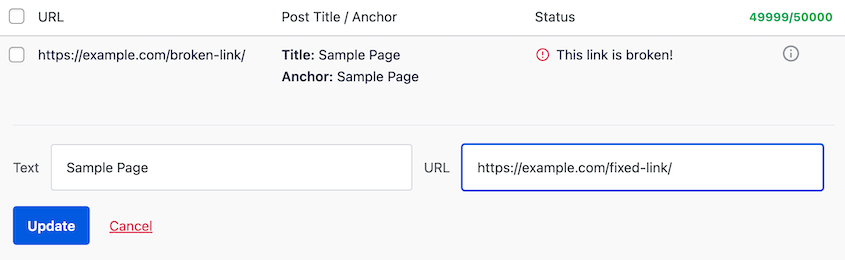
Once the Broken Link Checker plugin is activated, it will display a list of broken URLs on your website. To fix a link, click Edit URL and replace it with the correct, working URL.
Without a migration plugin like Duplicator, you would need to perform a database search and replace to update every instance of your old URL with the new one. Fortunately, Duplicator automates this process for you.
Next, check that your new site is working properly. Navigate through all your pages manually, making sure that images, contact forms, and other elements display and function as expected.
Step 7: Notify Google About Your New Domain
Now that your WordPress site has been moved to a new domain and redirects are in place, the next step is to notify Google about the change of address. This helps Google discover your new domain faster and update its search results accordingly.
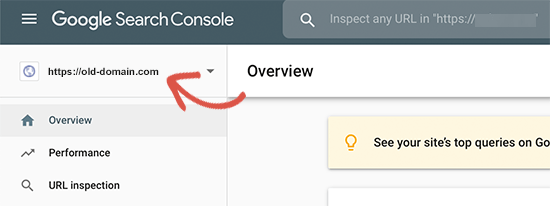
First, ensure that both your old and new domains are added to Google Search Console as separate properties. You can follow step 1 in our Google Search Console guide for detailed instructions.
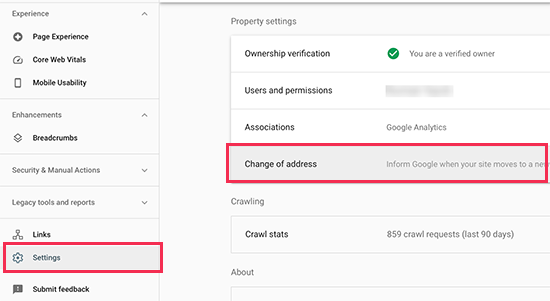
Next, select your old domain as the active property within the Google Search Console dashboard to proceed with the address change process.
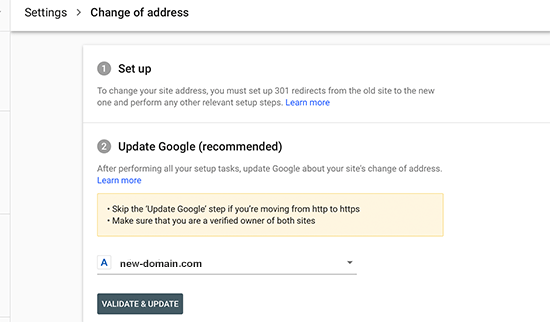
Now, select your new domain in the Update Google section.
After that, click the Validate & Update button to confirm the change of address and notify Google.
At this step, choose your new domain under the Update Google section.
Then, click Validate & Update to confirm the address change and inform Google about your site migration.
That’s it! Google will now verify that your old domain correctly redirects to the new one and save your changes.
On the next screen, Google Search Console will guide you through a step-by-step wizard to submit your change of address request.
Common Migration Errors & How to Fix Them
Even when you follow the correct migration steps, technical issues can still happen — here are the most common problems and how to quickly fix them.
- Database Connection Error: Check and update database name, username, password, and host in wp-config.php; ensure the database user has full privileges; confirm the correct DB host with your hosting provider.
- White Screen of Death (WSOD): Increase PHP memory limit; disable all plugins via FTP; switch to a default theme; verify your new server is running a compatible PHP version.
- Internal Links Still Pointing to Old Domain: Run a safe search-and-replace using Better Search Replace or WP-CLI; avoid manual SQL replace that can break serialized data.
- Images Not Displaying: Confirm the /wp-content/uploads folder was fully migrated; check file permissions (755 folders, 644 files); run a domain search-and-replace.
- Mixed Content Warnings (HTTP/HTTPS Issue): Force HTTPS in WordPress settings; update URLs to HTTPS in the database; add 301 redirect rules in .htaccess.
- Too Many Redirects / Redirect Loop: Verify WordPress Address and Site Address URLs; remove duplicate redirect rules in .htaccess; clear browser and server cache.
- 404 Errors After Migration: Go to Settings → Permalinks and click “Save Changes” to refresh rewrite rules; ensure .htaccess is regenerated properly.
- Login Redirect Loop (wp-admin Not Accessible): Clear browser cookies; manually update siteurl and home in the database; temporarily disable plugins via FTP.
- Traffic Drop After Domain Change: Set up proper 301 redirects from old to new domain; verify and submit the new domain in Google Search Console; resubmit sitemap and monitor indexing.
Frequently Asked Questions
1. Will changing my domain affect my SEO?
Yes, changing your domain can temporarily affect your SEO performance because search engines need time to reindex your new domain. However, if the migration is handled correctly—especially by setting up proper 301 redirects from the old domain to the new one—you can preserve most of your rankings and traffic.
2. How long does it take to migrate a WordPress site?
The migration process itself can usually be completed within a few hours, depending on the size and complexity of the website. However, it may take a few days or weeks for search engines to fully recognize the new domain and update search results.
3. Do I need to create a new database for the new domain?
In most cases, you do not need to create a completely new database. You can keep the existing database and simply update the site URL and home URL settings to match the new domain. Some migrations may require updating database references to ensure all links point to the new domain.
4. Can I keep my old website live after migration?
Yes, but it is generally recommended to redirect the old domain to the new one using 301 redirects. This ensures that visitors and search engines are automatically sent to the new website and helps preserve SEO value.
5. How do I notify Google about my new domain?
You can notify Google by using Google Search Console. Add and verify your new domain property, then use the Change of Address tool to inform Google about the domain migration. This helps search engines update their index more quickly.
Conclusion
Migrating a WordPress site to a new domain can help improve branding, support SEO strategies, and create a stronger online presence. With proper planning and the right approach, the process can be completed smoothly while maintaining your website’s traffic, search rankings, and overall user experience.
At Arestós, we provide professional WordPress solutions designed to help businesses manage website changes and improvements efficiently. Our team focuses on delivering reliable, high-quality WordPress services that ensure your website remains stable, optimized, and ready for long-term growth.
Contact us today and let our experts support your website transition.
Subscribe to our newsletter!
Get updated to
the lastest IT trends
Related Posts
Update the latest technology trends for your business