Back to featured insights
How to Migrate Wix to WordPress: A Step-by-Step Guide
Migrate Wix to WordPress and unlock greater flexibility, stronger SEO, and long-term growth for your website. This guide walks you through the transition process clearly and confidently, helping you move beyond Wix’s limitations and build a faster, more scalable WordPress site.
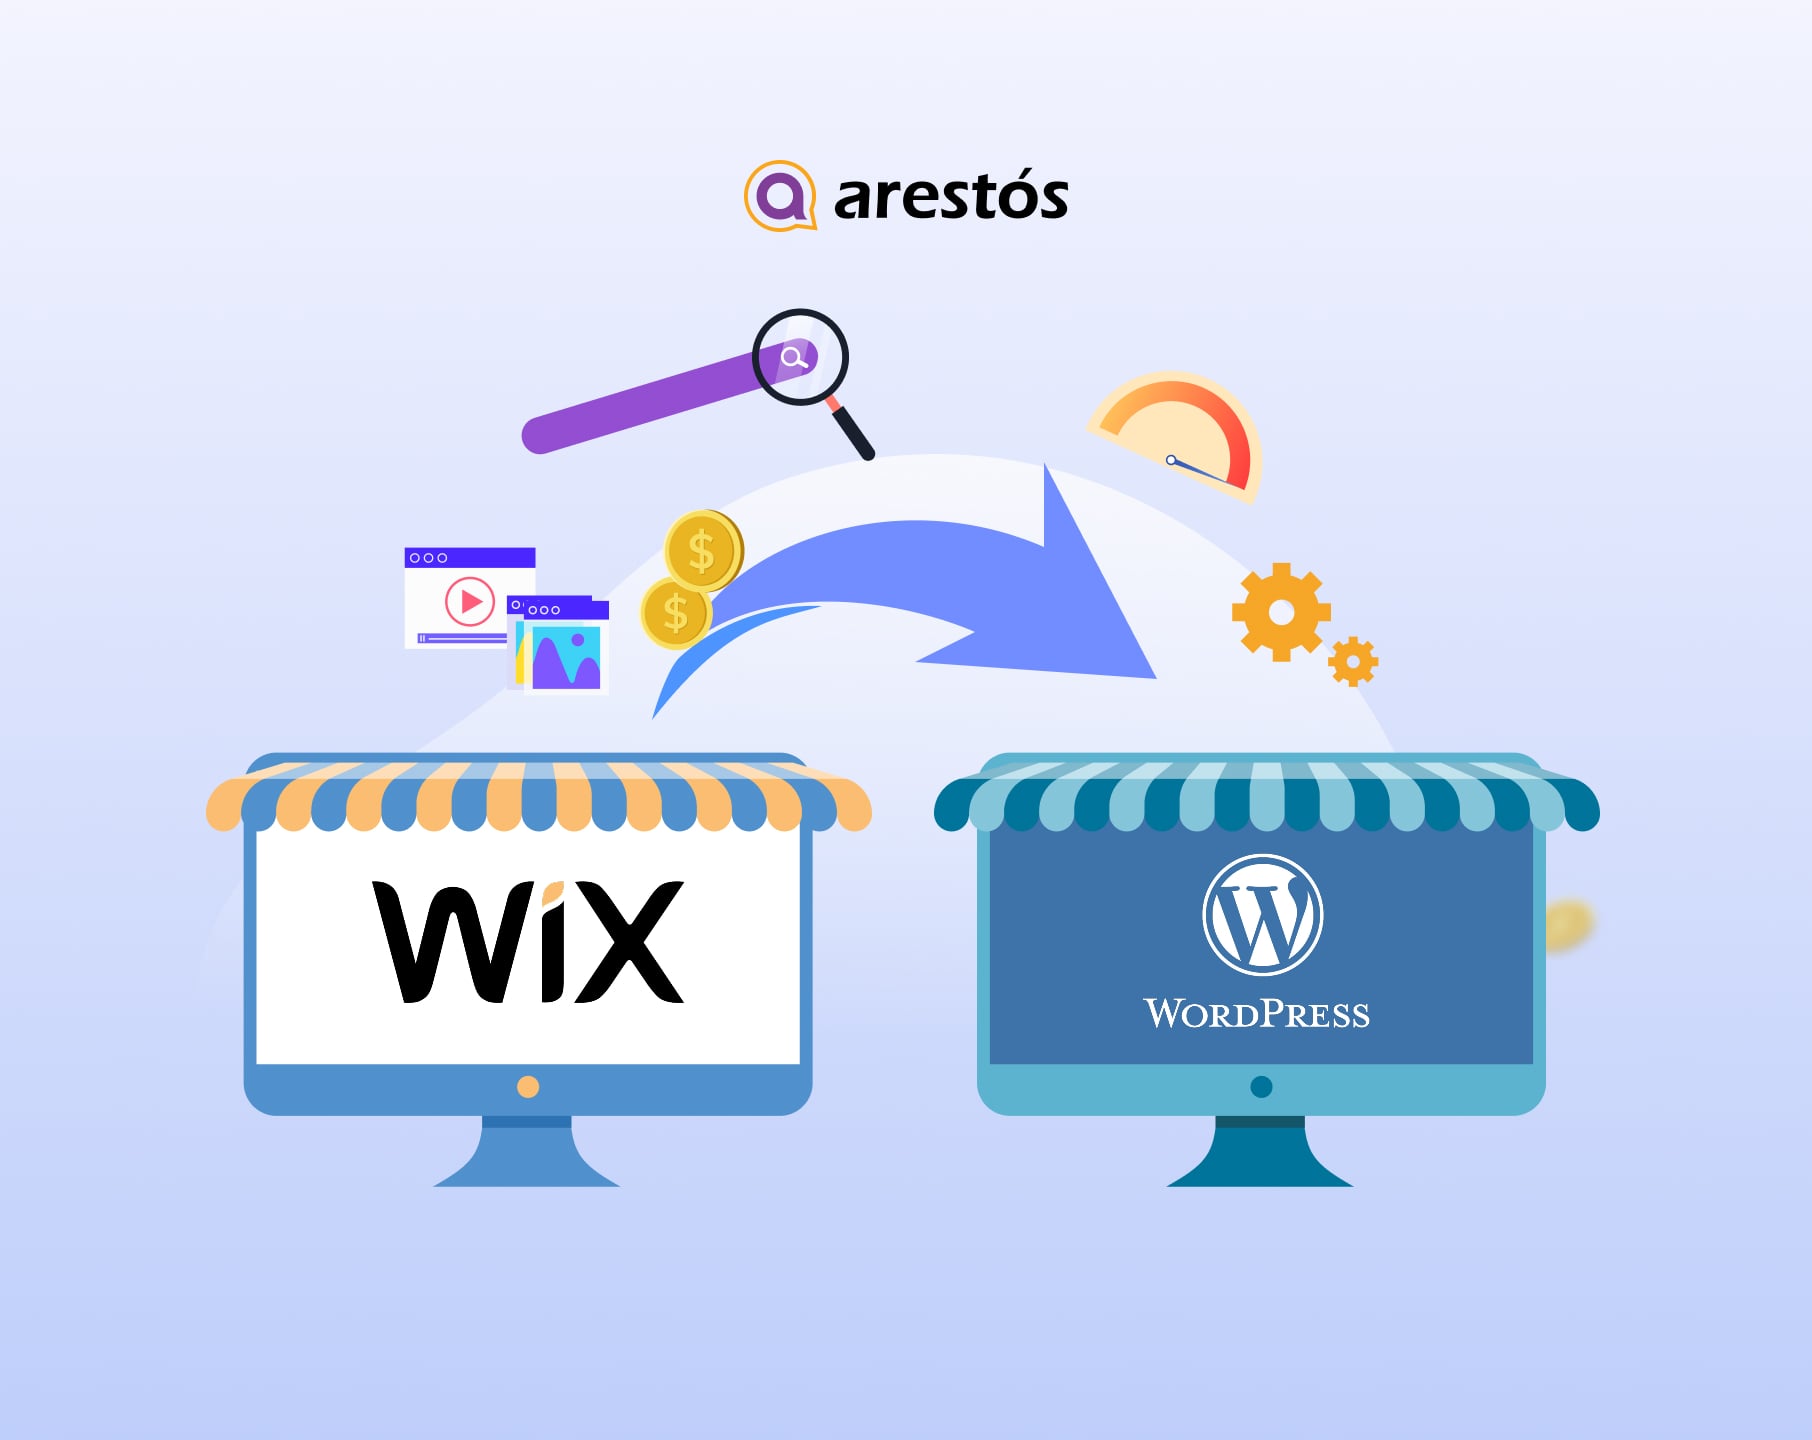
Table of Content
Share
Migrate Wix to WordPress is a popular choice for website owners looking for greater flexibility, full control, and long-term scalability. WordPress offers stronger SEO capabilities, deeper customization options, and access to a vast ecosystem of plugins compared to Wix.
This guide is ideal for business owners, bloggers, and marketers who want to move away from Wix’s limitations. In this guide, you’ll learn how to migrate Wix to WordPress step by step while preserving your content, SEO value, and site structure.
What is WordPress?
WordPress is a free, open-source Content Management System (CMS) that allows you to create, manage, and customize websites with ease. It powers over 40% of all websites on the internet, making it the most popular CMS worldwide.
With WordPress, you don’t need to be a coding expert. Its intuitive dashboard, flexible themes, and vast library of plugins make it easy to build anything from a personal blog to a professional business website or an online store. WordPress also gives you full control over your site, unlike platforms like Wix, where features are more limited.
Whether you want to optimize for SEO, add e-commerce functionality, or design custom layouts, WordPress provides the tools and flexibility to grow your website exactly how you want.
For a more comprehensive comparison with other platforms, check out our guide: CMS WordPress vs Other CMS Platforms

Why Should You Move from Wix to WordPress?
Migrating from Wix to WordPress offers several key advantages:
- Full Control & Flexibility: WordPress gives you complete control over your website’s design, functionality, and hosting, unlike Wix which has limitations on customization.
- Better SEO Options: With WordPress, you can leverage powerful SEO plugins like Yoast SEO or Rank Math to optimize every page and post for search engines.
- Scalability: WordPress is ideal for growing businesses. You can expand your site with plugins, themes, and custom code without constraints.
- E-commerce Capabilities: WooCommerce and other WordPress plugins allow you to create robust online stores with more features than Wix’s built-in store.
- Extensive Plugin Library: WordPress has over 60,000 plugins for every need—from forms, analytics, backups, to speed optimization.
- Ownership & Portability: With WordPress, you fully own your site and can move it to any hosting provider, while Wix sites are tied to Wix servers.
- Professional Appearance: WordPress themes provide more design flexibility, making it easier to create a professional and unique website.
Check out our detailed comparisons to understand why WordPress stands out:
Consider preparing before migrating from Wix to WordPress.
Before you start the migration process, proper preparation will help you avoid data loss, downtime, and SEO issues:
- Review your current Wix site: Identify which pages, blog posts, images, and features you want to migrate to WordPress.
- Back up important content: Since Wix doesn’t offer a full site export, make sure to save your text content, images, and media files manually.
- List all URLs: Write down your existing Wix page URLs so you can recreate them or set up redirects in WordPress later.
- Check SEO settings: Take note of your meta titles, meta descriptions, and important keywords to reapply them after migration.
- Choose your WordPress setup: Decide on a hosting provider, domain configuration, and whether you’ll use a staging site or a live environment.
- Plan your site structure: Think about your new navigation menu, page hierarchy, and content organization in WordPress.
- Audit third-party features: Identify Wix apps or built-in tools (forms, bookings, stores) and find equivalent WordPress plugins.
How to Transfer a Wix Site to WordPress
This section walks you through how to transfer a Wix site to WordPress in 10 clear steps, helping you move your content safely while minimizing the risk of data or SEO loss.
- Step 1: Set Up WordPress
- Step 2: Back Up Your Wix Content
- Step 3: Create a WordPress Backup Point
- Step 4: Import Your Wix Blog Posts
- Step 5: Import Images to WordPress
- Step 6: Recreate Your Wix Pages
- Step 7: Choose and Install a Theme
- Step 8: Configure Permalinks
- Step 9: Transfer Your Domain
- Step 10: Install Essential Plugins
Let’s break down each step in detail
Step 1: Set Up WordPress
Before transferring your Wix site, you need to set up a WordPress installation. The easiest way is to use a hosting provider that offers one-click WordPress installation, which allows you to get your site up and running in just a few minutes without technical knowledge.
Alternatively, you can install WordPress manually by downloading the software from WordPress.org, uploading it to your hosting server, creating a database, and completing the setup through the installation wizard. Whichever method you choose, make sure your WordPress site is fully functional before moving on to the next steps.
Step 2: Back Up Your Wix Content
After setting up your WordPress site, the next step is preparing your Wix content for migration. Unlike WordPress, Wix does not provide a full website export or backup option, so it’s important to secure your content in advance.
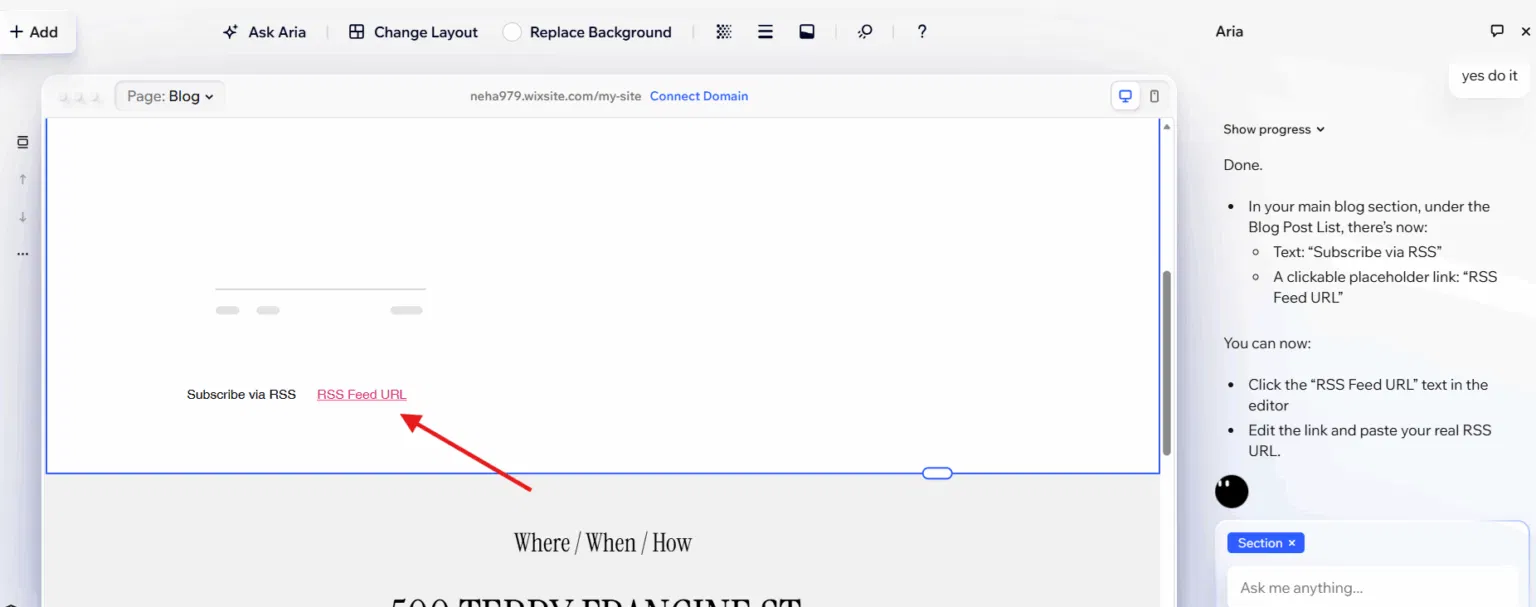
If your site includes blog posts, enabling the RSS feed on Wix is essential, as it allows you to transfer blog content to WordPress more easily. You can activate the RSS feed by going to Add Elements, selecting Blog, and then enabling the RSS Feed option.
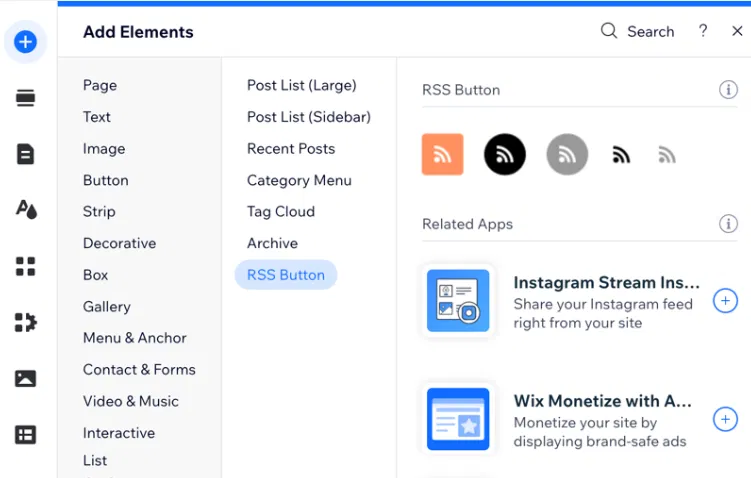
You can also ask Aria, Wix’s AI assistant, to do this for you. With just a few commands, it can enable the RSS feed for your Wix blog.
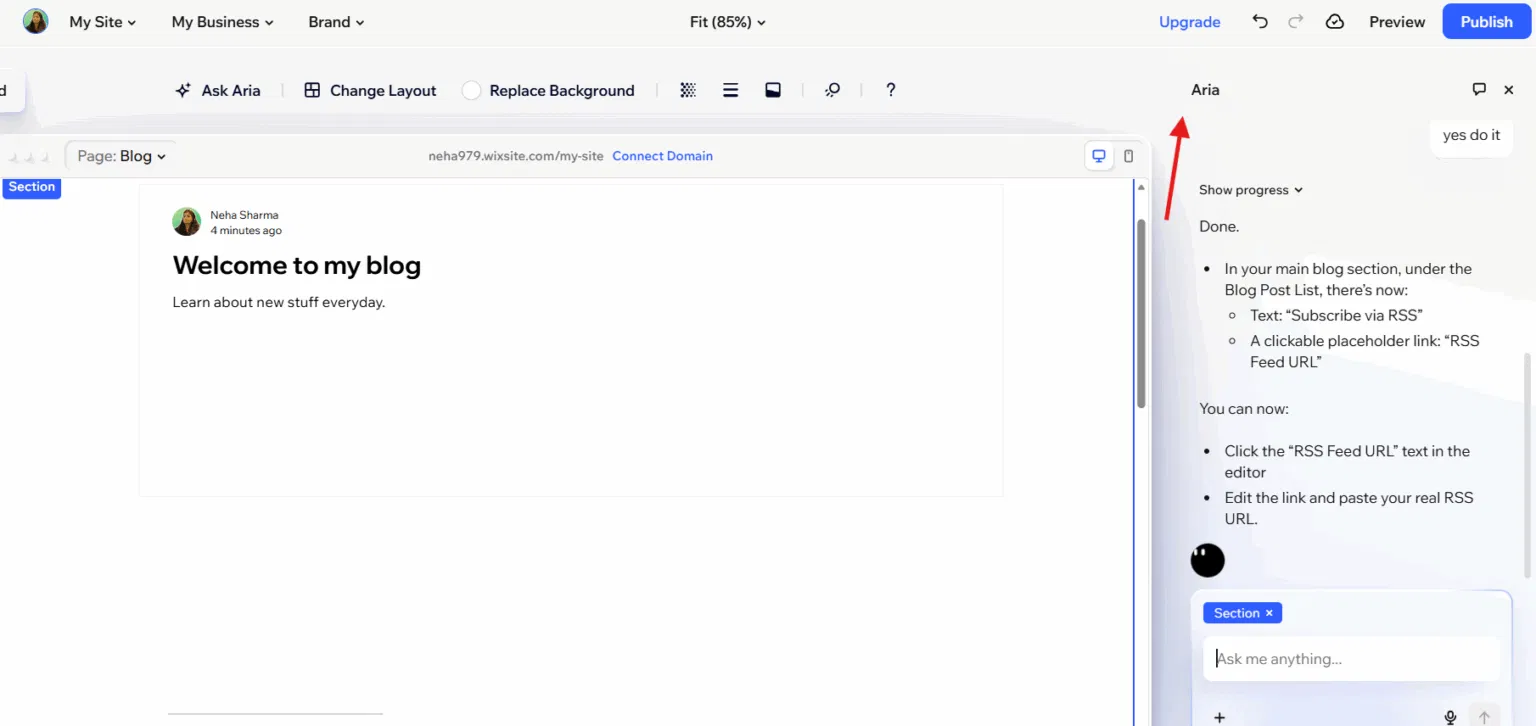
However, there is one limitation: the RSS feed only displays up to 20 of your most recent blog posts, meaning older articles will not be migrated from Wix to WordPress.
Once the RSS feed is enabled, you can find the feed link at the bottom of your blog page.
When the XML file appears in your browser, simply right-click anywhere on the page and choose “Save As” to store it on your computer. For static pages and images, the migration process must be handled manually since Wix does not support exporting page content.
You’ll need to copy text from each page you want to keep or capture screenshots for reference. Images can be saved individually by right-clicking and downloading them, or you can use browser extensions to download multiple images at once.
Additionally, make sure to note down your navigation menu structure, page URLs, and overall content hierarchy, as you’ll need to rebuild this layout later in WordPress.
Step 3: Create a WordPress Backup Point
Before importing any data, it’s recommended to create a fresh backup of your WordPress site. This allows you to quickly roll back to a clean state if anything goes wrong during the import process, without needing to reinstall WordPress from scratch.
Simply access your site dashboard, navigate to Tools, and generate a snapshot. This backup will store your entire WordPress environment, including the database, themes, plugins, and site files.

Step 4: Import Your Wix Blog Posts
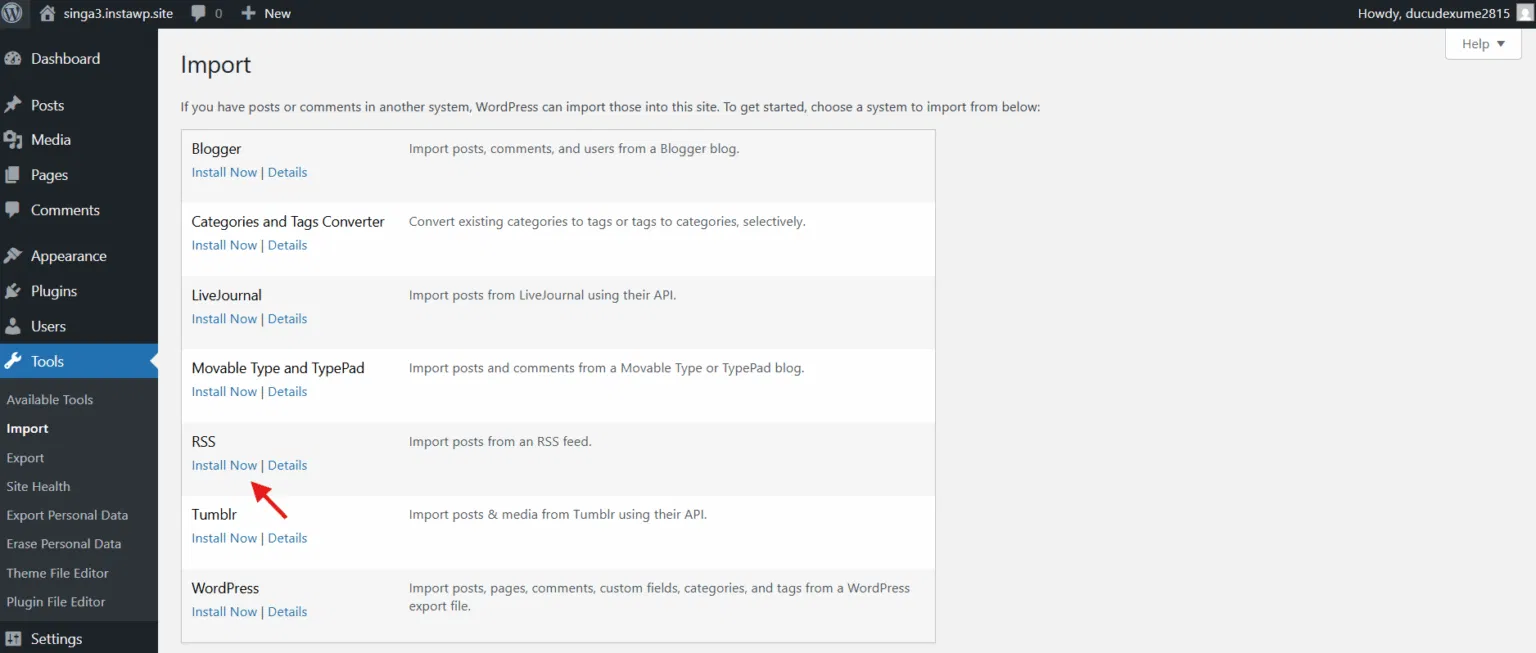
WordPress comes with a native RSS import tool that lets you automatically bring blog content over from Wix. From your WordPress dashboard, navigate to Tools > Import, locate RSS in the list of available importers, and click Install Now to set it up.
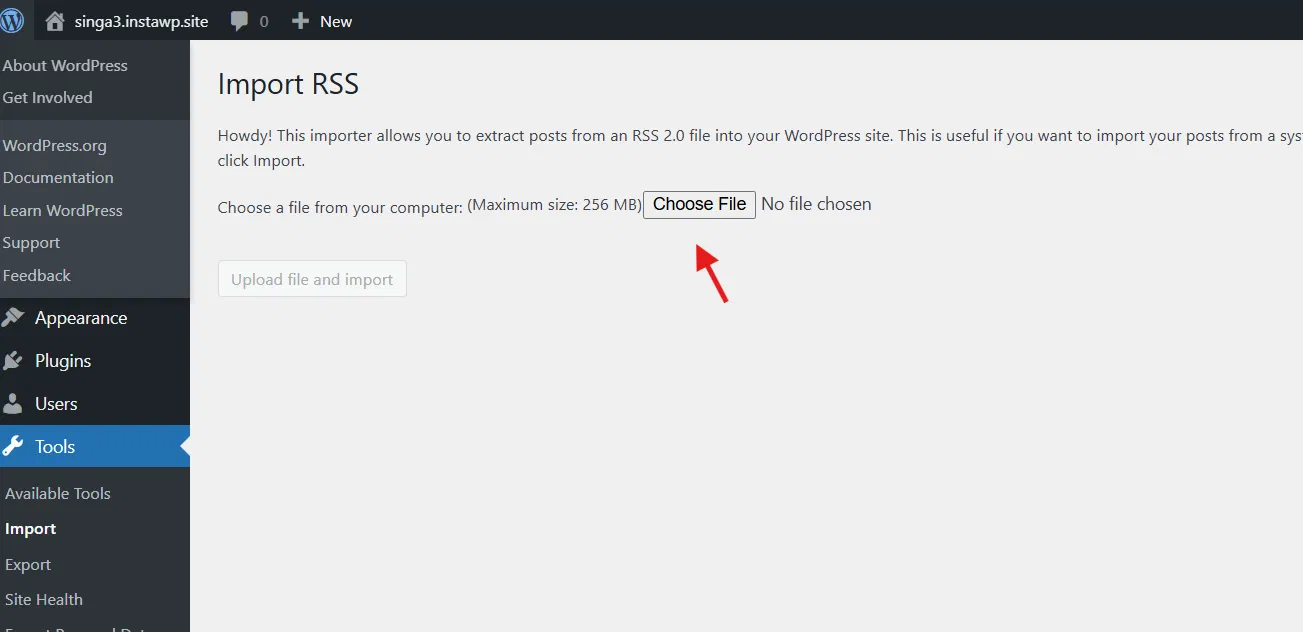
After the importer is installed, click Run Importer, then select Choose File and upload the feed.xml file you downloaded from Wix. Finally, click Upload file and import to start bringing your blog posts into WordPress.
The importer will read your RSS feed and convert each Wix blog entry into a WordPress post. The duration of this process depends on the total number of articles and may take a few minutes to complete.
Keep in mind that only the text content is imported—images are still linked to Wix’s servers. To prevent broken images in the future, especially if you decide to close your Wix account, you’ll need to transfer those images into your WordPress media library.
Step 5: Import Images to WordPress
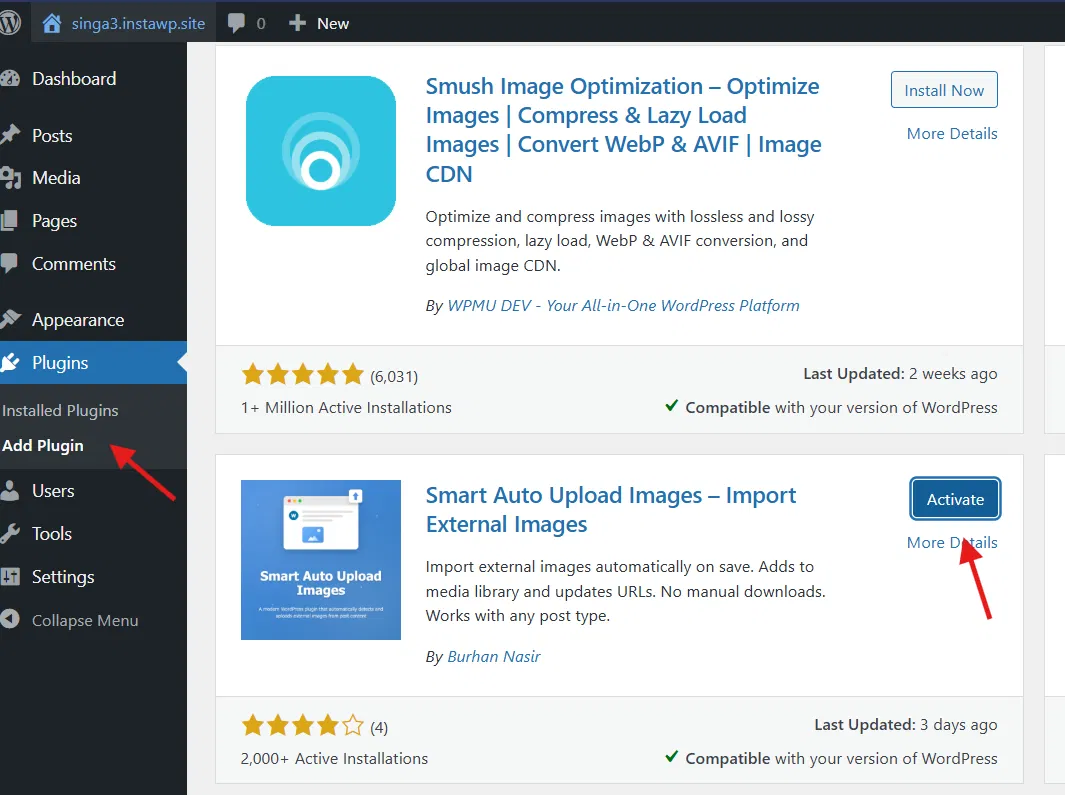
After the posts are imported, the images inside them are still linked to Wix URLs. To resolve this, you can use the Smart Auto Upload Images plugin, which automatically downloads those images and saves them directly to your WordPress media library.
- Go to Plugins > Add New
- Search for “Auto Upload Images”
- Install and activate the plugin
To trigger the image import, your posts need to be re-saved. Instead of opening each post one by one, go to Posts > All Posts, click Screen Options at the top of the page, and increase the Number of items per page to 999 so you can update multiple posts more efficiently.

Click Apply, then use the checkbox at the top of the list to select all posts. From the Bulk Actions dropdown, choose Edit and click Apply again to proceed.
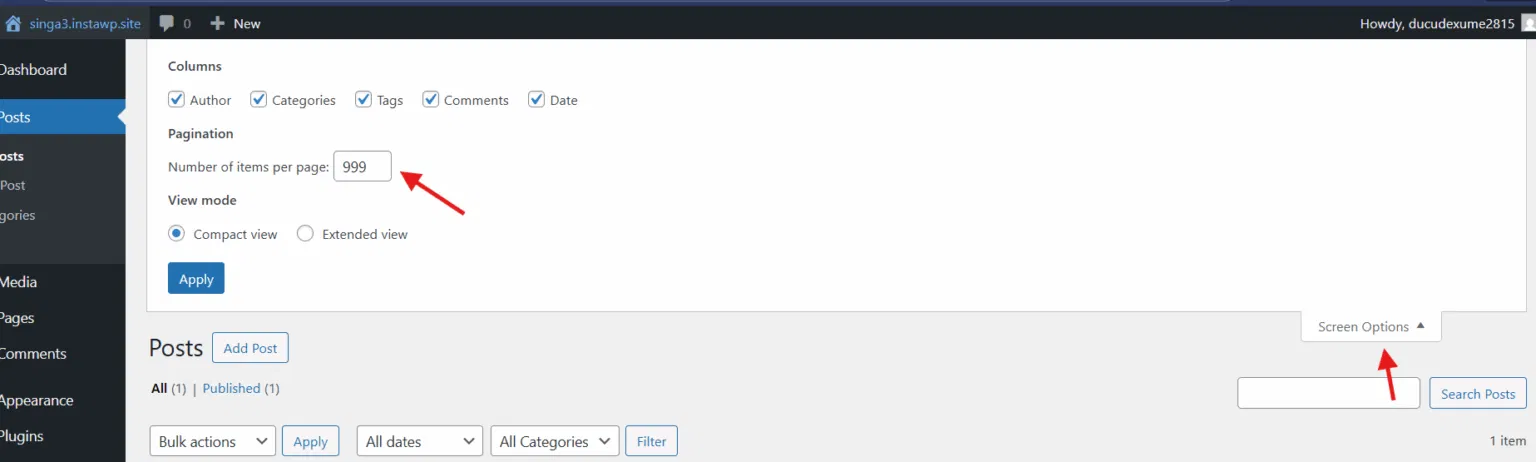
In the bulk edit panel, simply click Update without modifying any settings. This action triggers the plugin to download each image from Wix and replace the external URLs with local WordPress file paths. Once completed, all images will be securely stored in your WordPress media library.
Step 6: Recreate Your Wix Pages
Unlike blog posts, Wix pages can’t be imported via RSS and must be recreated manually in WordPress.
- Open your Wix site in one browser tab
- Open your WordPress admin in another tab
- Go to Pages > Add New in WordPress
- Copy the content from each Wix page and paste it into WordPress
- Download images from Wix and upload them to your WordPress Media Library
- Insert the images into your page content
- Click Publish
Repeat this process for all remaining pages, including About, Contact, Services, Portfolio, and any other static pages on your site. Contact forms also need to be recreated, as Wix forms cannot be transferred to WordPress.
To do this, install a WordPress form plugin such as WPForms, Contact Form 7, or Gravity Forms, then rebuild your forms using their drag-and-drop builders. Likewise, if your Wix site relies on built-in Wix Apps like Stores, Bookings, or Events, you’ll need to replace them with WordPress plugins that offer equivalent features.
Step 7: Choose and Install a Theme
WordPress comes with a default theme already installed, but it may not be the best match for your migrated Wix content. To evaluate how your site looks and behaves with this theme, you can simply open your website in a new browser tab.
If you want to preview a specific page or post, go to Posts or Pages in the WordPress dashboard, hover over the item you want to check, and click View.
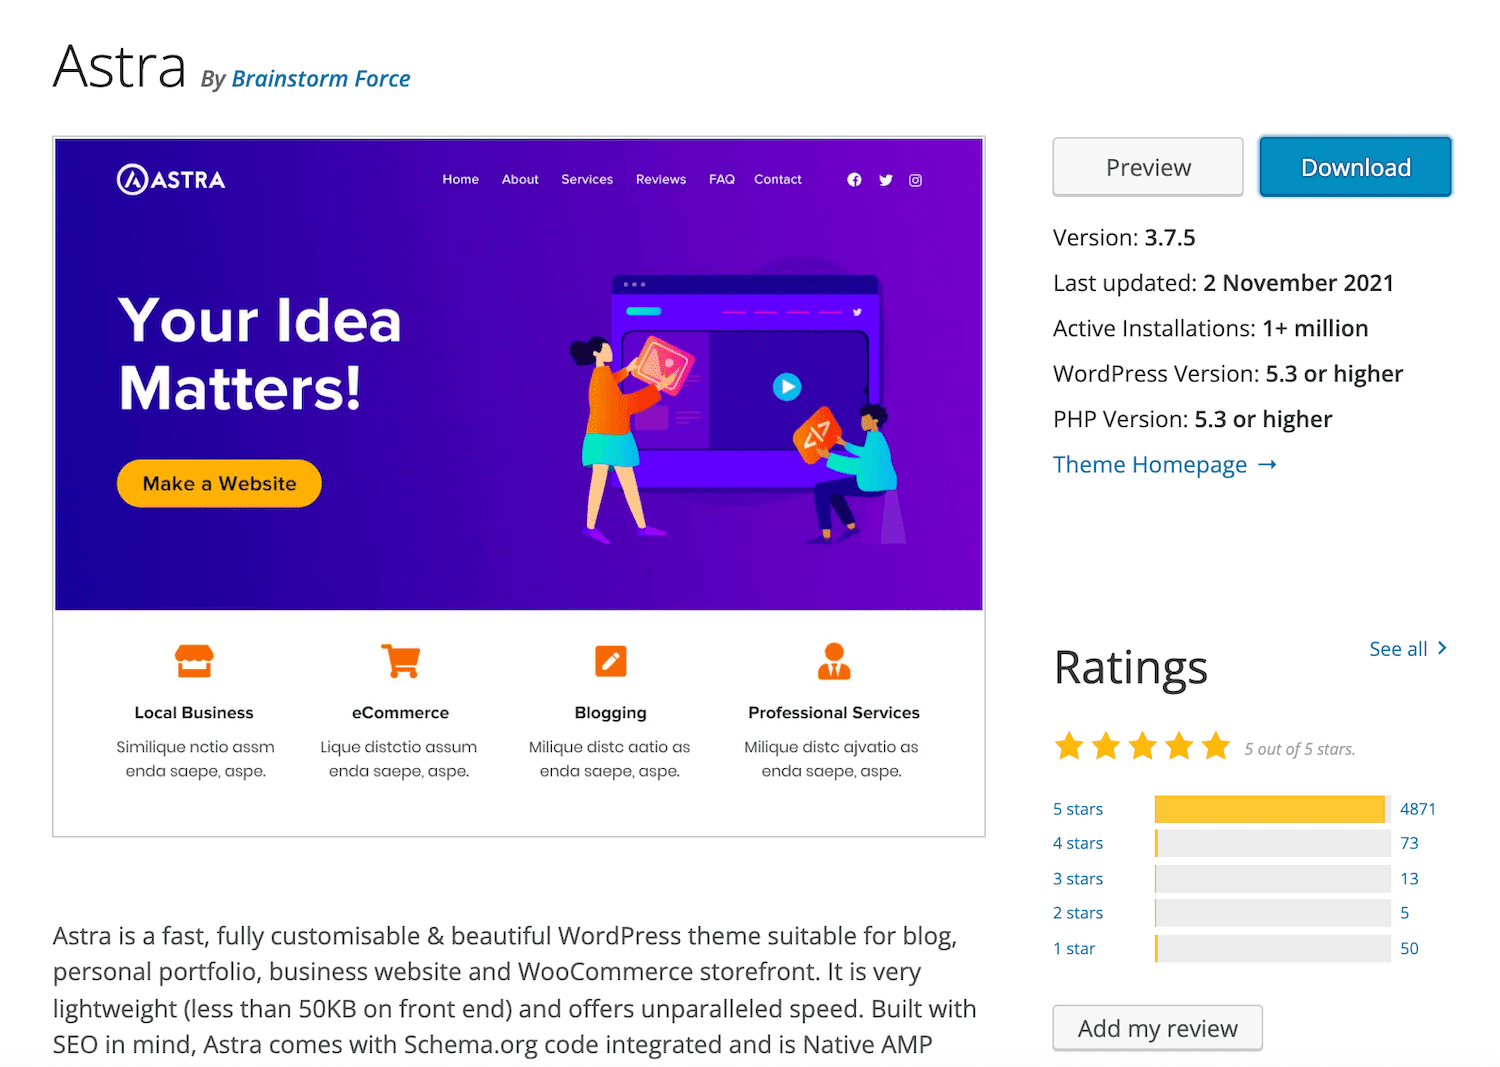
If the default design doesn’t meet your expectations, the next step is to install a new WordPress theme. With thousands of free and premium themes available, you have plenty of options to find a design that matches your brand and works well with your migrated content.
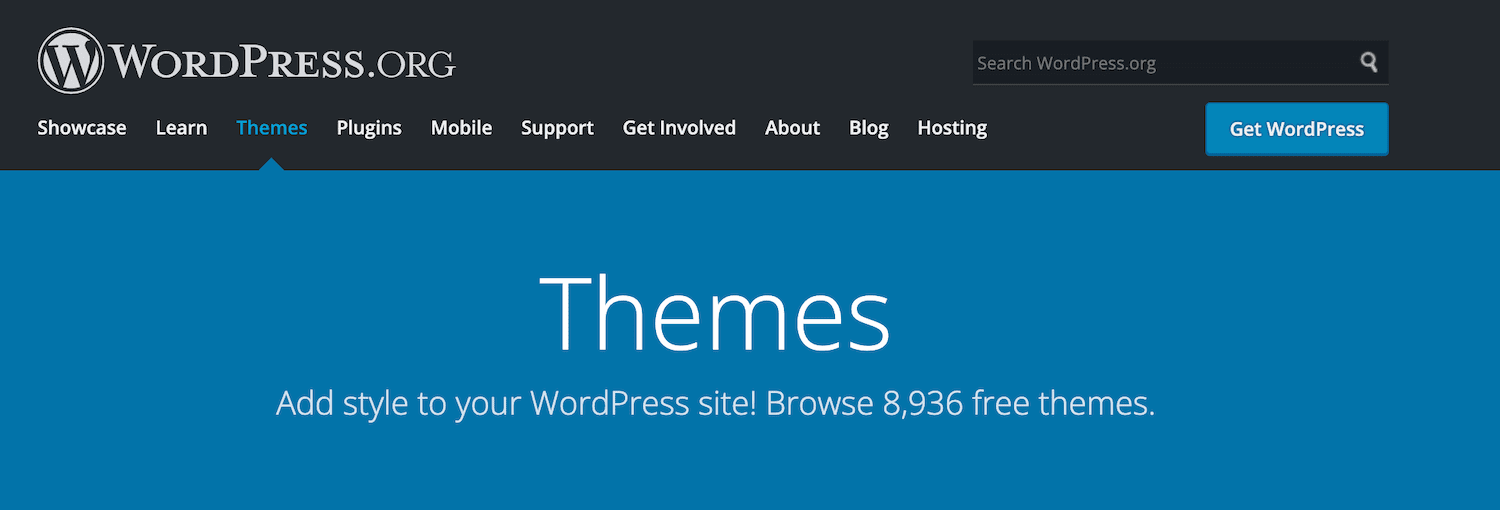
To install a theme from the official WordPress repository, go to Appearance > Themes in your dashboard, then click Add New to browse and preview the available themes.
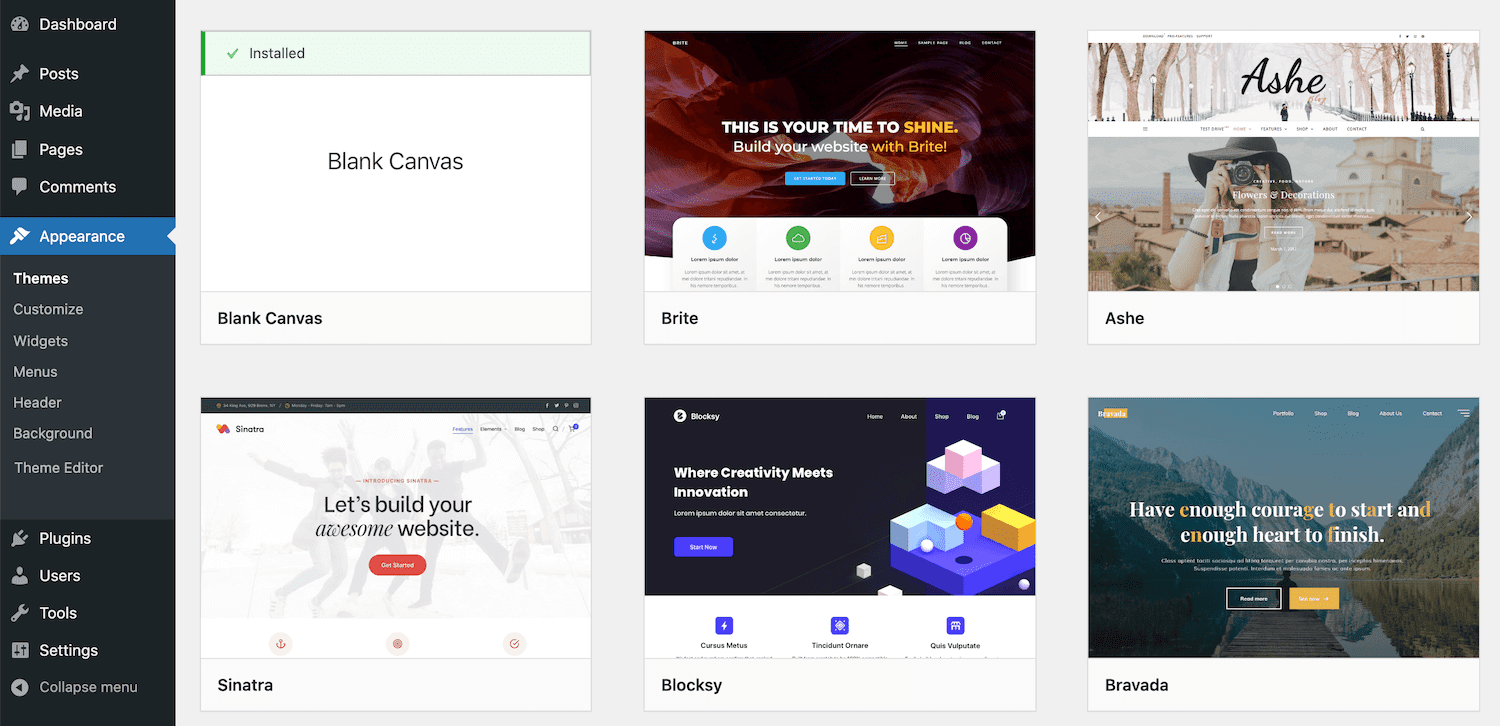
When a theme looks promising, hover over it and click Preview to see how your website would appear with that design applied. While browsing themes, it’s also important to check the average star rating and user reviews, especially the most recent ones.
Even if a theme has a high overall rating, a wave of recent negative feedback can indicate issues introduced in the latest update.
With billions of smartphone users worldwide, it’s essential to choose a theme that is fully responsive and optimized for mobile devices. This is especially important for online stores, as a large share of e-commerce traffic now comes from mobile users.
Once you’ve found the right theme, simply click Install and then Activate. Your migrated Wix content will now be displayed using the new WordPress theme.
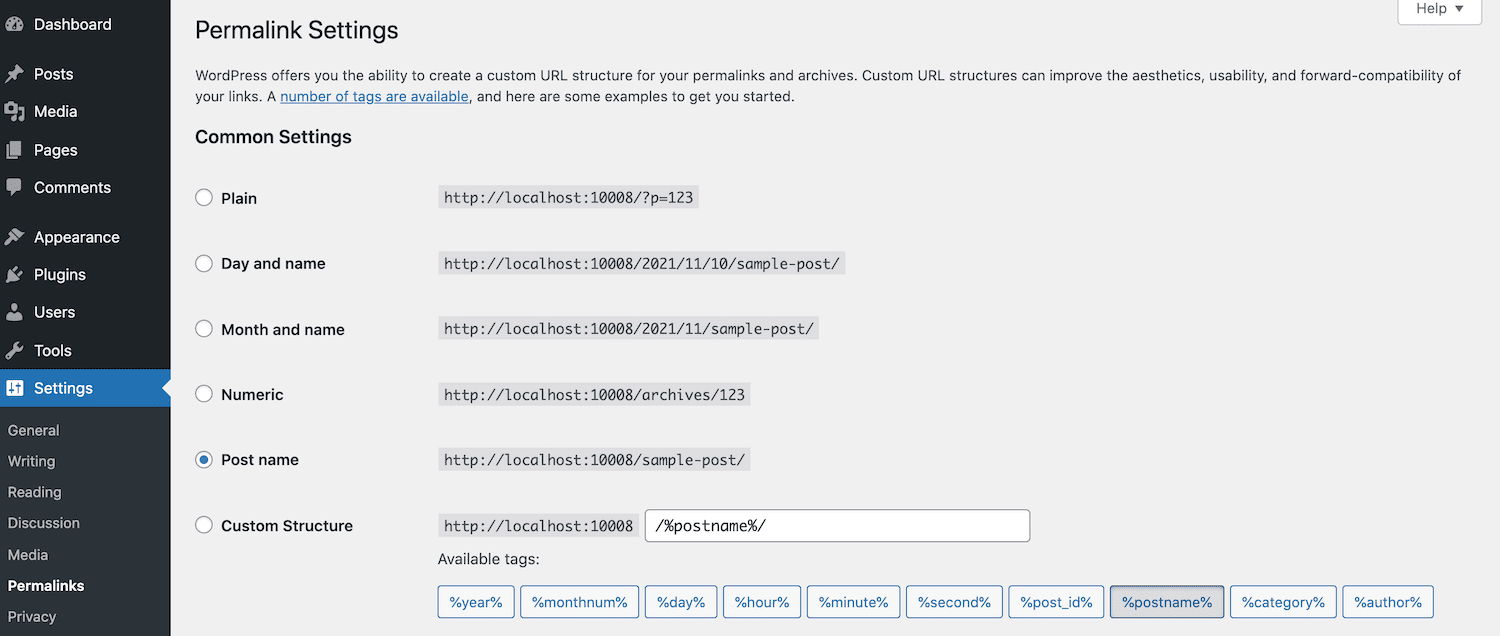
Step 8: Configure Permalinks
Start by going to Settings > Permalinks and selecting Post name. This updates your URL structure to a cleaner, more readable format that’s also better for search engines.
Next, update your website’s title and tagline by going to Settings > General in your WordPress dashboard.
At the top of the page, you’ll find the Site Title and Tagline fields. Update these to match the name and tagline of your existing website.
While these two changes are enough to get started, you can adjust the remaining settings as needed to better suit your site.
Step 9: Transfer Your Domain
Once your WordPress site has been tested and is ready to go live, the final step is pointing your domain to its new hosting environment.
If your domain is registered with Wix
You have two main options:
- Transfer your domain to another registrar such as Namecheap, Cloudflare, or Google Domains, then point it to your WordPress hosting provider.
- Update the nameservers directly in Wix to connect your domain to your WordPress host.
To update nameservers in Wix:
- Log in to your Wix dashboard
- Go to Domains
- Select your domain and click Manage
- Open Advanced and locate the nameserver settings
- Enter the nameservers provided by your WordPress hosting provider
If your domain is registered with another provider
Simply log in to your domain registrar and update the nameservers, or add the required DNS records (such as an A record or CNAME) pointing to your WordPress server’s IP address.
If you’re using InstaWP, domain mapping is built in. Just open your site in the InstaWP dashboard, click the three-dot menu, and select Map Domain to connect your domain.
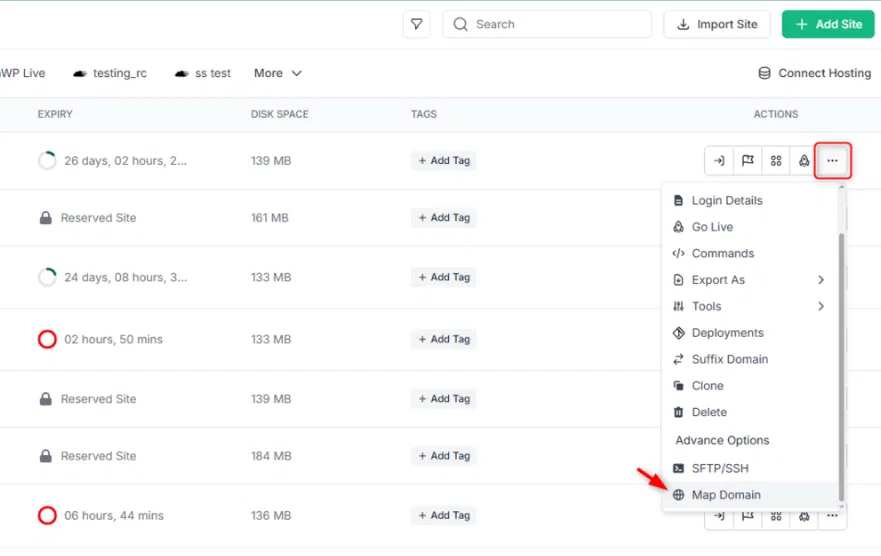
Enter your custom domain, copy the CNAME record provided, and then add this record to the DNS settings at your domain registrar.
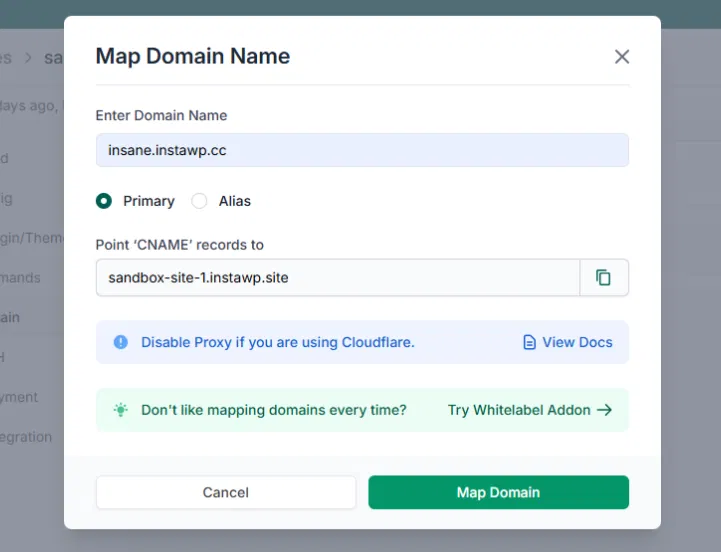
Return to InstaWP and click Map Domain to complete the process. SSL certificates will be generated automatically for mapped domains.
DNS changes can take up to 48 hours to propagate, although most updates are completed within a few hours. During this time, some visitors may still see your old Wix site, while others are directed to your new WordPress site.
Step 10: Install Essential Plugins
WordPress relies on plugins to add features that are built into Wix by default. After migrating from Wix, you’ll need to install a few essential plugins to restore and enhance your site’s functionality.
- SEO: Install an SEO plugin such as Yoast SEO, Rank Math, or All in One SEO to manage meta titles, meta descriptions, XML sitemaps, and overall search engine optimization. Take time to compare features and choose the plugin that best matches your workflow.
- Security: Plugins like Wordfence, Sucuri, or iThemes Security help protect your site from malware, brute-force attacks, and other common threats. Since WordPress is widely used, adding a security layer is highly recommended.
- Backups: Use tools such as UpdraftPlus, Duplicator, or your hosting provider’s backup solution to create regular backups. Automating backups ensures your data is safe if something goes wrong.
- Performance: A caching plugin like WP Rocket, W3 Total Cache, or LiteSpeed Cache can dramatically improve page loading speed and overall site performance.
- Contact forms: To replace Wix’s built-in form system, install a form plugin such as WPForms, Contact Form 7, or Gravity Forms. These plugins let you rebuild contact forms using simple drag-and-drop builders.
You can also explore additional essential tools in our guide Top 10 Must-Have WordPress Plugins for Your Site to further enhance your website’s functionality and performance.
Wix to WordPress Migration Finished: What’s Next?
Now that you’ve successfully migrated your site from Wix to WordPress, it’s a good idea to make a few final updates and adjustments to ensure everything runs smoothly before going live.
Here are six essential tasks to complete before launching your WordPress site:
Create a WordPress Menu
A clear menu or navigation bar helps visitors move through your site easily and improves the overall user experience.
Go to your WordPress admin dashboard, then navigate to Appearance → Menus. Enter a name for your menu and click Create Menu.
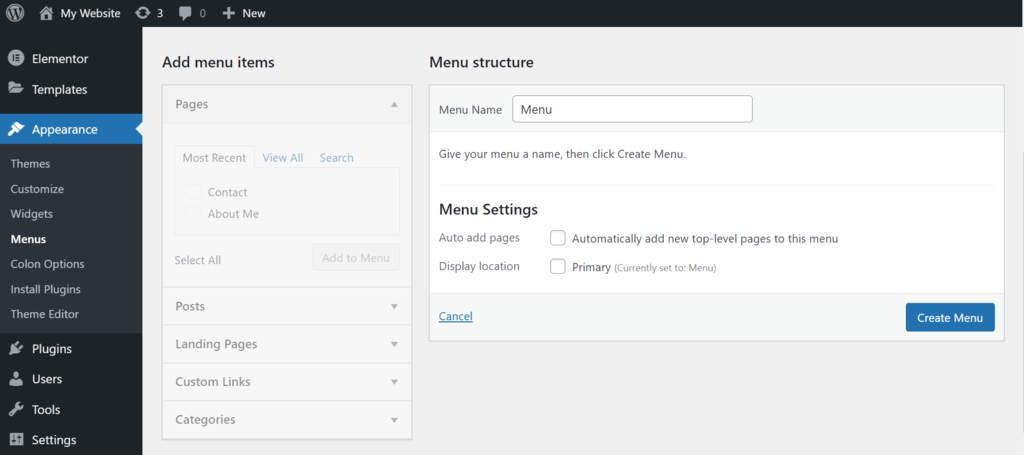
Select the pages you’ve created from the left panel and click Add to Menu. Once finished, click Save Menu to apply your changes.
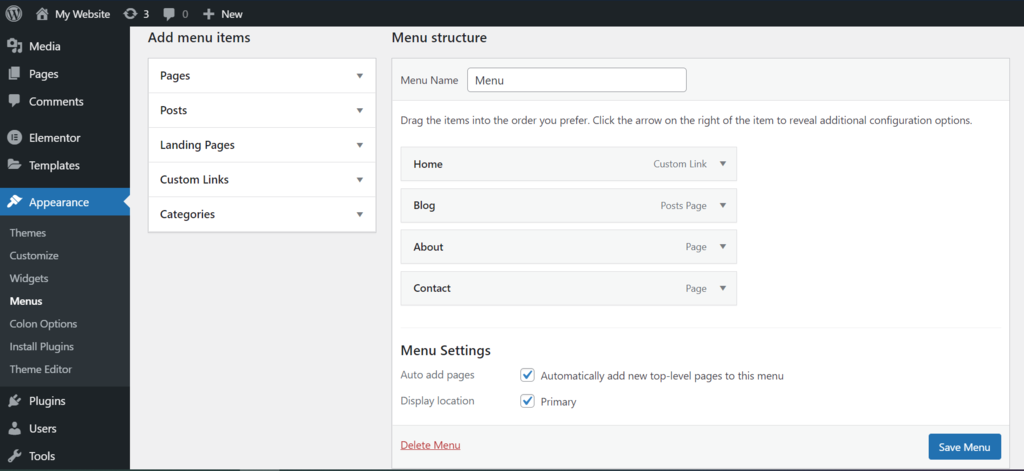
To change where your menu appears on the site, open the Manage Locations tab. The available menu locations depend on your theme. To display the menu at the top of the site, assign it to Main Menu or Header Menu.
Redirect Your Wix Site to WordPress
Next, you’ll need to redirect your old Wix website to your new WordPress site. This ensures that anyone visiting your old URLs is automatically sent to the new site, helping you retain existing traffic and avoid losing your audience during the migration.
However, if your Wix site was built on a Wix subdomain, this redirect option isn’t available. That said, if you used the CMS2CMS plugin and purchased the additional redirect feature, this step will already be handled for you.
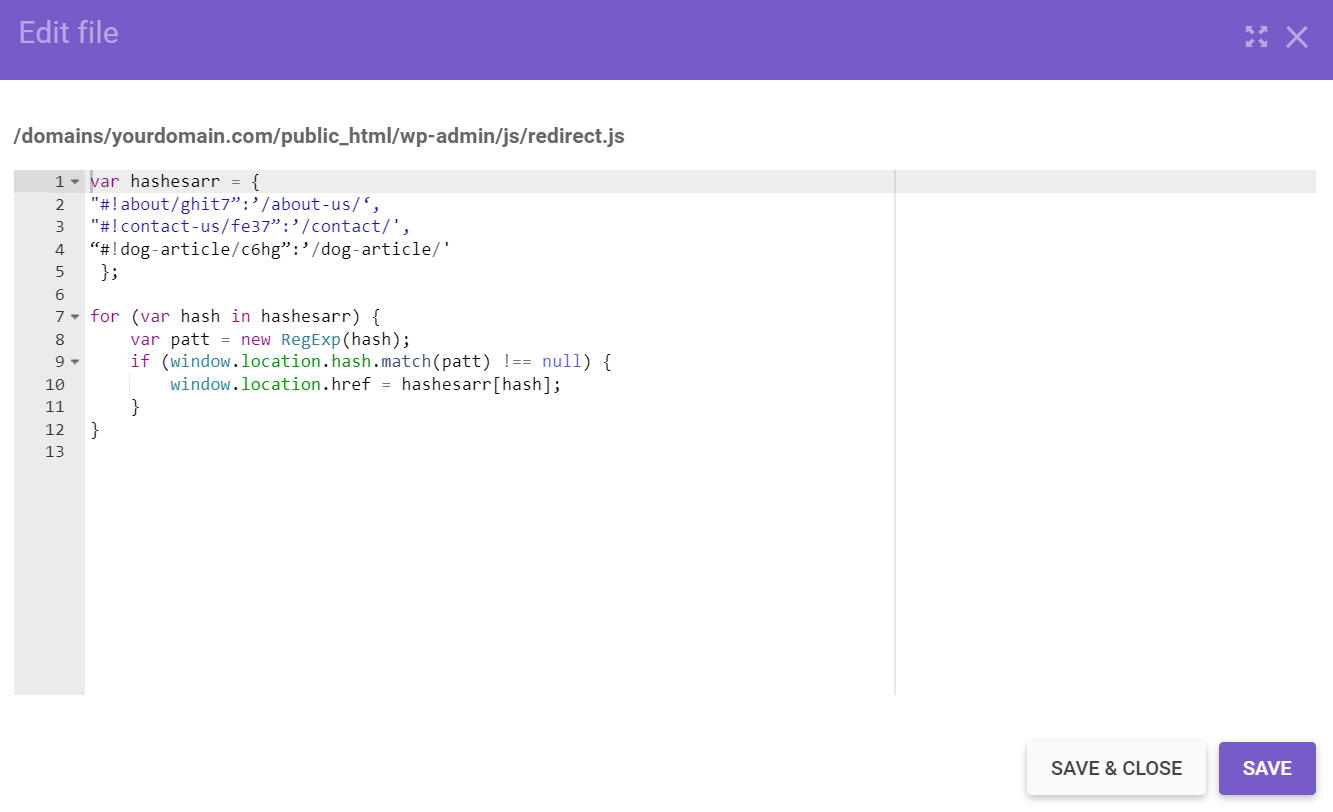
To set up the redirect manually, start by pasting the following code into your preferred text editor:
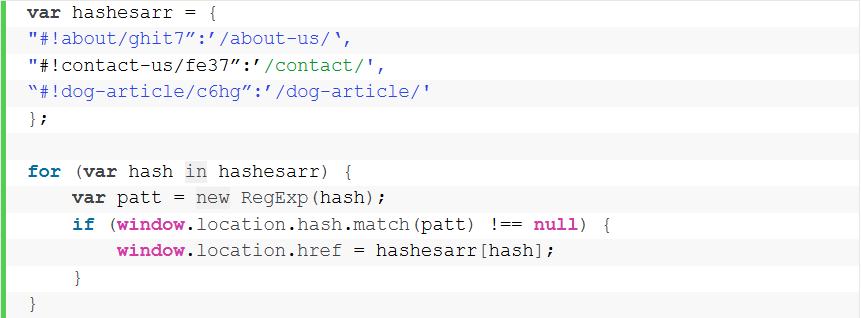
In our example, we used three URLs with the same format. The first part of the string, #!about/ghit7, should be replaced with your old Wix URL, and the second part, /about-us/, with the URL of the corresponding WordPress page.
To redirect all your Wix pages, you’ll need to add each URL manually in the same format.
Once complete, save the file as redirect.js and upload it to the public_html/wp-admin/js directory on your server. You can use the File Manager provided by your hosting account or an FTP client to upload the file.
Finally, you need to edit your functions.php file to make sure the redirect script you just created runs correctly. Locate functions.php within your active theme folder, or go to Appearance → Theme Editor → Theme Functions in your WordPress dashboard.
Open the functions.php file and add the following code:

Save the changes to your functions.php file, and your Wix-to-WordPress redirects should now be active.
Set Up Yoast SEO
If you’ve been using Wix’s built-in SEO tools, you’ll want to set up a similar solution on your WordPress site.
One of the most popular options is Yoast SEO, which helps you optimize every post and page for your target keywords while guiding you on best practices to improve your search engine ranking.
To install Yoast SEO, go to Plugins → Add New in your WordPress dashboard and search for Yoast SEO.
Set Up Google Analytics
Adding Google Analytics to your new WordPress site helps you monitor its performance and provides detailed insights about your visitors, including their location, behavior, and traffic sources.
Before connecting Google Analytics, sign up for an account with Google and provide details about the website you want to track.
The easiest way to integrate Google Analytics with WordPress is by using a plugin. Popular options include freemium plugins like MonsterInsights and Analytify, or open-source solutions like Site Kit.
Simply install and activate the plugin of your choice, then follow the setup instructions. For example, MonsterInsights offers an intuitive installation wizard that guides you through the process.

Double-Check Existing Media and Content
Another important step is performing a final check of your website. Issues like broken permalinks or formatting errors can occur during migration, so it’s crucial to fix them and ensure the site functions correctly.
Go through each post and page to verify that everything displays and works as intended. Before publishing new content, always preview it first—this helps you catch mistakes and ensures proper formatting for visitors.
Speed Up Your Website
The final step is ensuring your WordPress website loads quickly. A slow site can harm user experience and drive visitors away.
To evaluate your site’s speed, use PageSpeed Insights. If your site isn’t performing optimally, it’s important to address the issues promptly to improve loading times.
If you want professional help, consider our WordPress Speed Optimization Services at Arestós to ensure your website runs fast and efficiently.
Frequently Asked Questions
1. Can I automatically migrate my entire Wix site to WordPress?
No. Wix does not support full site exports. Blog posts can be migrated via RSS, but pages, images, and layouts must be rebuilt manually or with third-party tools.
2. Will my SEO be affected when moving from Wix to WordPress?
SEO can be preserved if you recreate URLs carefully, set up proper redirects, and reapply meta titles and descriptions. WordPress also offers more advanced SEO tools.
3. Can I keep my existing domain after migrating from Wix?
Yes. You can either transfer your domain away from Wix or update the nameservers/DNS records to point to your new WordPress hosting.
4. How long does it take to migrate from Wix to WordPress?
A basic site may take a few hours, while larger sites with many pages and blog posts can take several days, depending on complexity.
5. Is WordPress harder to use than Wix?
WordPress has a learning curve, but it offers much greater flexibility and control. With the right theme and plugins, it can be just as user-friendly as Wix.
Conclusion
Migrating from Wix to WordPress may seem complex at first, but with the right preparation and step-by-step approach, it becomes a manageable and rewarding process. From backing up your content and rebuilding pages to setting up redirects, SEO, performance, and analytics, each step helps ensure a smooth transition without losing traffic or functionality. By the end of the migration, you’ll have a more flexible, scalable, and future-proof website powered by WordPress.
If you want to skip the technical hassle, Arestós offers professional WordPress services tailored for businesses that need reliable migration, performance optimization, SEO setup, and long-term support. Our team ensures your website is migrated safely, optimized for speed and search engines, and ready to grow with your business.
Contact us today and let our experts handle the entire process for you.
Subscribe to our newsletter!
Get updated to
the lastest IT trends
Related Posts
Update the latest technology trends for your business