Back to featured insights
WooCommerce Shop Page Hooks: Complete Guide and Best Practices
Discover how WooCommerce shop page hooks can transform your store’s layout and functionality. Learn practical ways to enhance design, improve user experience, and keep your customization clean and efficient.

Table of Content
Share
WooCommerce shop page hooks are powerful tools that let you customize your store’s layout without editing core template files. They allow you to easily add, remove, or rearrange elements to create a more engaging and professional shopping experience. This guide is ideal for anyone looking to improve their WooCommerce shop page through flexible and code-friendly customization.
In this article, we’ll explore what shop page hooks are, why they’re useful, and how to use them effectively to build a better online store.
What Are WooCommerce Shop Page Hooks?
WooCommerce shop page hooks are predefined points in the WooCommerce code that allow you to insert, modify, or remove content and functionality on your shop page — without directly editing template files. These hooks are part of WordPress’s core “hook system,” which helps developers and store owners extend or customize their websites safely and efficiently.
In simple terms, a hook is like a placeholder in the code where you can “hook in” your own custom functions. On the WooCommerce shop page, these hooks determine where elements like banners, product lists, filters, and pagination appear.
There are two main types of hooks in WooCommerce:
- Action hooks: Used to add or execute custom functions at specific points in the shop page layout (for example, before product listings or after pagination).
- Filter hooks: Used to modify existing data before it’s displayed on the front end — such as changing product titles, prices, or button labels.
By using these hooks, you can:
- Add promotional messages or banners above the product grid.
- Rearrange elements like breadcrumbs or category titles.
- Modify text, buttons, or product information dynamically.
In short, WooCommerce shop page hooks give you full control over how your store looks and behaves — all without touching the core WooCommerce files, ensuring that your customizations stay safe even after updates.
How WooCommerce hooks work
To make the most of hooks in your WooCommerce store, it’s important to understand how they’re structured and how they operate behind the scenes. In this section, we’ll take a closer look at the components of action and filter hooks, highlighting their key differences and how they connect with your custom code.
Action hooks
Action hooks let you run your own functions at specific points while WooCommerce is loading a page. They make it possible to add new features or adjust existing behavior without changing the plugin’s core files.
When WooCommerce encounters an action hook in its code, it automatically triggers and runs any functions attached to it through the add_action() function. Unlike filter hooks, action hooks don’t return a value — their purpose is to execute custom code whenever they’re called.
Here’s the basic structure for adding a custom function to an action hook:

In this syntax:
- hook_name refers to the specific action hook you want to target.
- your_function_name is the name of the custom function that will run when the hook is triggered.
- priority is an integer that defines the order in which your function executes if multiple functions are hooked to the same action. Lower numbers run earlier, and the default value is 10.
- accepted_args represents how many arguments your function can receive. This parameter is optional and defaults to 1.
Here’s a simple example of how to use the add_action() function in WooCommerce:
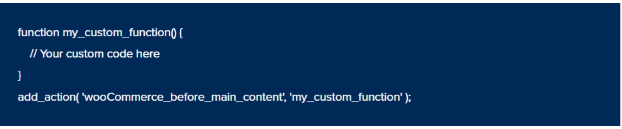
In this example, the my_custom_function() will run whenever the woocommerce_before_main_content action hook is triggered. This hook typically fires just before the main content area of a WooCommerce page is displayed.
Some commonly used WooCommerce action hooks include:
- woocommerce_before_shop_loop – Executes before the product loop on archive or shop pages.
- woocommerce_before_single_product – Runs before the main content of a single product page is loaded.
- woocommerce_after_add_to_cart_form – Fires after the “Add to Cart” form on product pages.
- woocommerce_checkout_order_processed – Triggers right after an order has been processed.
Filter hooks
Filter hooks, on the other hand, let you modify and return data before it’s displayed on the front end or stored in the database. They allow you to dynamically adjust WooCommerce content — such as product titles, prices, or descriptions — without permanently changing the original data.
When WooCommerce encounters a filter hook, it passes a value through all the functions attached to it via the add_filter() function. Each function can change that value and then return it, passing the modified version to the next function in line. Once all the hooked functions have run, WooCommerce uses the final, filtered value in its output.
The syntax for adding a custom function to a filter hook is almost identical to add_action():

The parameters function similarly to those used with add_action(). However, the main distinction is that your custom function needs to accept the value being filtered as an argument and then return the modified version of that value.
Here’s a simple example demonstrating how to use the add_filter() function:

In this example, the my_custom_price() function is attached to the woocommerce_get_price filter hook. It receives both the current product price and the product object as parameters, applies a modification to the price, and returns the updated value. WooCommerce then displays this adjusted price instead of the original one.
Some commonly used WooCommerce filter hooks include:
- woocommerce_product_get_price: Modifies the product price
- woocommerce_product_title: Adjusts the product title before display
- woocommerce_checkout_fields: Edits or adds checkout form fields
- woocommerce_add_to_cart_redirect: Changes the redirect URL after adding a product to the cart
By understanding how action and filter hooks operate—and how to integrate your own functions with them—you can open up powerful customization opportunities for your WooCommerce store.
You’ll be able to extend core functionality, introduce new features, and craft a user experience that aligns perfectly with your brand and business goals.
Why Use Hooks to Customize the WooCommerce Shop Page?
Using hooks to customize the WooCommerce shop page provides a flexible, safe, and efficient way to manage design and functionality changes. Below are the key reasons why developers and store owners prefer using hooks instead of editing templates directly.
- No need to edit template files: Hooks allow you to insert or modify content without touching the core WooCommerce or theme files. This means you don’t have to edit files like archive-product.php or content-product.php directly, which can easily break your site if done incorrectly.
- Safe and update-friendly customization: Custom code added through hooks stays separate from the core files. When WooCommerce or your theme updates, your customizations remain intact — ensuring that your design and layout changes won’t be lost or overwritten.
- Flexible control over page layout: Hooks give you fine-grained control over what appears on the Shop Page and in which order. You can easily move elements such as the page title, sorting dropdown, product grid, or “Add to Cart” button to new positions without rewriting large portions of code.
- Cleaner and more maintainable code: All your changes can be centralized in one place, usually in your functions.php file or a custom plugin. This makes your codebase easier to manage, debug, and share with other developers.
- Better compatibility with themes and plugins: Since hooks follow WooCommerce’s built-in structure, they work seamlessly with most themes and extensions. This minimizes conflicts and makes your site more stable overall.
- Reusable and scalable solution: Hook-based customizations are modular. You can reuse the same snippet across multiple WooCommerce sites or apply them to child themes without starting from scratch.
- Professional and future-proof approach: Using hooks is considered a best practice in WordPress and WooCommerce development. It ensures your customizations are future-proof, easier to maintain, and aligned with industry coding standards.
In short, hooks give you total control over the WooCommerce Shop Page — allowing you to customize your store safely, efficiently, and without compromising performance or stability.
How to use WooCommerce Shop Page Hooks
Once you understand what WooCommerce shop page hooks are, it’s time to learn how to use them effectively. Here’s a step-by-step guide to help you customize your Shop Page layout and functionality.
Step 1: Identify the Right Shop Page Hooks
Before you start coding, you need to find the correct hooks that control elements on the Shop Page — such as product titles, thumbnails, prices, or the “Add to Cart” button. WooCommerce provides a wide range of hooks specifically for the shop loop and product listing.
You can locate these hooks through several methods:
- Check WooCommerce documentation: The official WooCommerce Hook Reference lists all available actions and filters.
- Search WooCommerce plugin files: Look for add_action() or add_filter() within WooCommerce’s plugin folder to identify hook names and parameters.
- Use the Query Monitor plugin: This tool helps you see which hooks are triggered on the Shop Page in real time.
- Refer to visual guides: Sites like Business Bloomer’s Visual Hook Guides show the exact placement of each hook on the Shop Page layout.
Taking the time to identify the right hook ensures your customization appears exactly where you want — without breaking other parts of your store.
Step 2: Write a Custom Function (Callback)
After identifying the appropriate hook, you’ll create a function that runs when WooCommerce triggers that hook.
This function is known as a callback, and it defines what your custom code will do.
In this example:
- custom_shop_page_notice() defines your callback function.
- The echo statement outputs a message styled with WooCommerce’s default class.
- add_action( ‘woocommerce_before_shop_loop’, ‘custom_shop_page_notice’ ); attaches your custom function to the before shop loop hook — ensuring it appears before the list of products.
You can apply the same approach to other hooks, such as woocommerce_after_shop_loop_item_title (to insert content below the product title) or woocommerce_after_shop_loop (to add elements after the product grid).
Step 3: Add the Hook Code to Your Site
Once your code is ready, you need to decide where to place it.
There are three main methods — each with pros and cons:
- Add to your theme’s functions.php: The simplest method, but not ideal for large projects or frequent theme updates. If you go this route, create a child theme first to ensure your customizations aren’t lost when updating your main theme.
- Use a code snippet plugin: Plugins like Code Snippets or WPCode let you safely manage your custom hooks from the WordPress dashboard. This method is safer for beginners and keeps your site clean and organized.
- Create a custom plugin: For advanced users or long-term projects, creating your own plugin is best. It isolates your custom code from themes, making maintenance and troubleshooting easier over time.
Step 4: Test and Adjust
Finally, test your custom hooks on the Shop Page. Make sure the new elements appear in the right place, look consistent with your theme, and don’t affect performance.
Use developer tools or Query Monitor to check that the correct hooks are firing. Once everything looks right, you’ve successfully customized your WooCommerce Shop Page using hooks — with full control and zero need for hardcoding templates.
List of Common WooCommerce Shop Page Hooks
When customizing your WooCommerce shop page, understanding where and how each hook works is essential. Below is a list of the most commonly used hooks specifically for the shop (archive) page, along with their functions and practical use cases.
- woocommerce_before_main_content: Fires before the main content of the shop or category page. You can use it to display a custom header, breadcrumbs, or promotional banners that introduce your store or highlight ongoing deals.
- woocommerce_before_shop_loop: Executes right before the product loop starts. This hook is ideal for adding sorting options, product filters, or a short description above your product listings to enhance user navigation.
- woocommerce_before_shop_loop_item: Triggers before each individual product item begins rendering. It’s often used to wrap custom HTML or div tags around each product for styling or layout customization.
- woocommerce_before_shop_loop_item_title: Fires just before the product title appears within each item. You can use this hook to add sale badges, custom icons, or other visual elements that grab customers’ attention.
- woocommerce_shop_loop_item_title: Displays the product title itself. Developers can use this hook to modify how product names are presented or add supplementary details like SKU or brand information.
- woocommerce_after_shop_loop_item_title: Executes immediately after the product title. This is a common place to show product ratings, prices, or other key information that influences purchasing decisions.
- woocommerce_after_shop_loop_item: Fires at the end of each product item’s output. You can use it to add a custom “Quick View” button, wishlist option, or call-to-action elements.
- woocommerce_after_shop_loop: Runs after the product loop has finished. It’s useful for displaying pagination, “Load More” buttons, or promotional messages encouraging customers to explore more categories.
- woocommerce_after_main_content: Executes after all main content has been displayed on the shop page. This hook is perfect for adding newsletter sign-up sections, testimonials, or footer promotional content.
Best Practices for Customizing the Shop Page Layout
When customizing your WooCommerce shop page using hooks, it’s important to follow best practices to keep your store’s layout consistent, responsive, and easy to maintain. Here are some essential tips to guide you:
- Use Child Themes for Customization: Always make your hook-related changes inside a child theme instead of the parent theme. This ensures that your custom code won’t be lost when you update the theme. Keeping customizations in a child theme also helps you organize your modifications more clearly and avoid conflicts.
- Avoid Directly Editing Core WooCommerce Files: Never modify WooCommerce core plugin files directly. Doing so can cause compatibility issues after updates and make debugging difficult. Instead, use action and filter hooks to make your desired changes safely.
- Use the Right Hook Placement: Each hook has a specific position within the WooCommerce shop page structure. Before adding your code, identify the correct hook position by checking the WooCommerce template files or using debugging tools like wc_print_hooks() to visualize where each hook fires.
- Combine Hooks with CSS for Better Design Control: Hooks control what appears and where, while CSS controls how it looks. Use hooks to insert content or elements, then apply CSS to style them properly. This separation ensures cleaner and more flexible customization.
- Keep Custom Code Organized and Documented: Use clear naming conventions for your custom functions and add comments describing what each hook does. Well-documented code is easier to maintain, especially if multiple developers work on the same project later.
- Test on Different Devices and Browsers: After adding or modifying hooks, always preview your shop page on desktop, tablet, and mobile devices. Hooks can change the structure of your page, so testing ensures that the design remains responsive and visually appealing.
- Use Conditional Tags for Targeted Customization: Combine hooks with WooCommerce conditional tags like is_shop(), is_product_category(), or is_product_tag() to apply changes only where needed. This keeps your site lightweight and avoids unnecessary code execution.
- Backup Before Major Changes: Before applying new hook-based modifications, always back up your website. This allows you to revert easily if something breaks or doesn’t look as expected.
Frequently Asked Questions
1. What are WooCommerce shop page hooks used for?
WooCommerce shop page hooks are used to add, remove, or modify content and functionality on your shop page — without editing template files. They allow developers to customize layouts, display promotional banners, or insert additional elements easily.
2. Can I use multiple hooks on the same shop page?
Yes. You can combine several hooks to control different parts of your shop layout. Just be careful with hook priority and order, as it determines when each piece of code executes.
3. What happens if I use the wrong hook?
If you use a hook that doesn’t exist on the shop page or place it incorrectly, your code simply won’t run — but it usually won’t break your site. Use tools like Query Monitor or Business Bloomer Visual Hook Guide to verify hook placement.
4. Can hooks slow down my WooCommerce store?
Generally, no — unless you add heavy or inefficient code inside the hook functions. Keep your snippets lightweight and avoid running unnecessary logic on every page load.
Conclusion
Customizing your WooCommerce shop page using hooks is one of the most efficient and flexible ways to shape your store’s layout. By understanding where and how each hook works, you can create a professional, engaging shopping experience without touching complex code or core files. Mastering shop page hooks empowers you to take full control over your WooCommerce design and deliver a unique experience that truly fits your brand.
At Arestós, we help businesses make the most of WooCommerce by providing tailored eCommerce solutions that fit their goals. Our team delivers everything from custom theme development to plugin integration and store optimization, ensuring your WooCommerce shop runs smoothly and looks great.
Contact us now to discover how we can help you customize and optimize your WooCommerce store for long-term success.
Subscribe to our newsletter!
Get updated to
the lastest IT trends
Related Posts
Update the latest technology trends for your business


