Back to featured insights
How to Connect Your WooCommerce Shop with Facebook: A Complete Guide
Want to boost sales and reach more customers? Learn how to connect your WooCommerce shop with Facebook, sync your product catalog, and manage ads directly from WordPress. Follow our step-by-step guide to unlock the full potential of social selling.
Table of Content
Share
Connecting your WooCommerce shop with Facebook can open up a powerful new sales channel for your online store. By linking your products to Facebook, you can reach millions of potential customers, run targeted ads, and boost your brand visibility. This guide is perfect for e-commerce store owners, marketers, small business owners, and anyone looking to expand their online reach and increase sales.
In this guide, we’ll walk you through every step to seamlessly integrate your WooCommerce store with Facebook and start selling more effectively.
Why connect a WooCommerce shop with Facebook?
Integrating WooCommerce with Facebook is more than just a technical setup — it’s a powerful way to combine e-commerce with social media, helping you maximize visibility and drive more sales.
- Expand your reach: Connecting your WooCommerce shop with Facebook allows you to reach millions of active users daily. Beyond Facebook, you can also expand into Instagram Shopping to boost brand visibility.
- Seamless product sync: All products from WooCommerce can be automatically synced to your Facebook Shop. This saves time on manual updates and ensures product details (price, stock, descriptions) remain accurate and consistent.
- Powerful advertising opportunities: With Facebook Pixel integration, you can track customer behaviors (viewing products, adding to cart, completing purchases) and leverage this data for remarketing, lookalike audiences, or highly effective Dynamic Product Ads.
- Boost customer convenience: Customers can browse and purchase products directly from the Facebook Shop or the Instagram Shop without leaving the platform. This seamless shopping experience helps reduce cart abandonment and increase conversions.
- Strengthen social commerce strategy: Integrating WooCommerce with Facebook not only enables direct sales but also helps you build a full social commerce strategy: promotion, selling, customer support, and remarketing—all in one place.
Step-by-step guide to connect a WooCommerce shop with Facebook
One of the most effective methods to connect your WooCommerce shop with Facebook is through the Facebook for WooCommerce plugin. With this tool, you can automatically sync your product catalog to your Facebook page, manage Facebook ads without leaving WordPress, and unlock additional marketing features.
Here’s a simple 7-step process to connect your WooCommerce shop with Facebook:
- Step 1: How to Connect Your WordPress Website to Facebook
- Step 2: Choose a Facebook Business Manager
- Step 3: Connect to Instagram Business (Optional)
- Step 4: Choose a WooCommerce Product Catalog
- Step 5: Create or Choose a Facebook Ad Account
- Step 6: Set up the meta pixel
- Step 7: Review your Facebook for WooCommerce settings
Now, we’ll walk you through the step-by-step process of integrating your WooCommerce store with Facebook.
Step 1: How to Connect Your WordPress Website to Facebook
To get started, you’ll first need to install and activate the Facebook for WooCommerce plugin on your WordPress site.
After activating the plugin, navigate to Marketing> Facebook in your WordPress dashboard. From there, click the ‘Get Started’ button to begin the setup process.

This action will redirect you to a screen where you can link your Facebook page with your WooCommerce online store. Simply choose the Facebook account you’d like to connect with WooCommerce, and proceed with the setup.
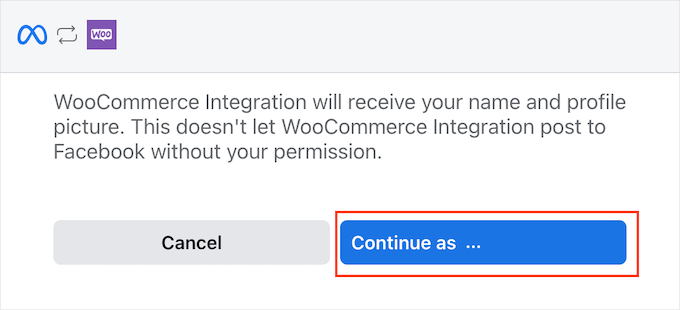
On the next screen, you’ll find an overview of the features and benefits available once WooCommerce is connected to Facebook. After reviewing this information carefully, simply click the ‘Next’ button to continue the setup.
Step 2: Choose a Facebook Business Manager
Facebook will now display some default settings, including the product catalog it will use to manage your WooCommerce inventory.
You may need to adjust some or all of these default settings by clicking on each option and following the onscreen instructions.
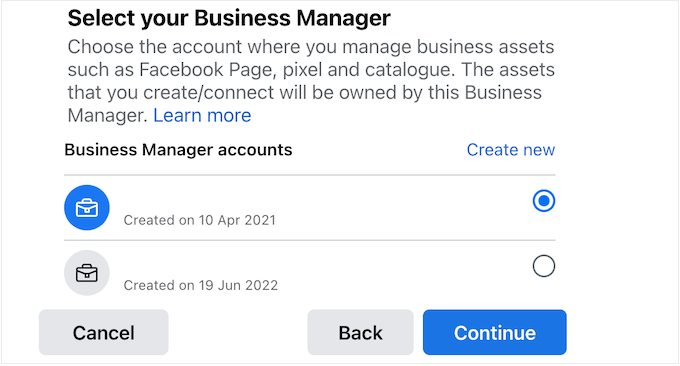
Let’s begin with Business Manager.
The Business Manager is a separate profile that lets you manage all the business assets linked to your Facebook account.
- If you don’t already have a Business Manager, click ‘Create New’ and follow the onscreen steps to set up your account.
- If you already have a Business Manager profile, simply select the radio button next to that account and then click ‘Continue.’
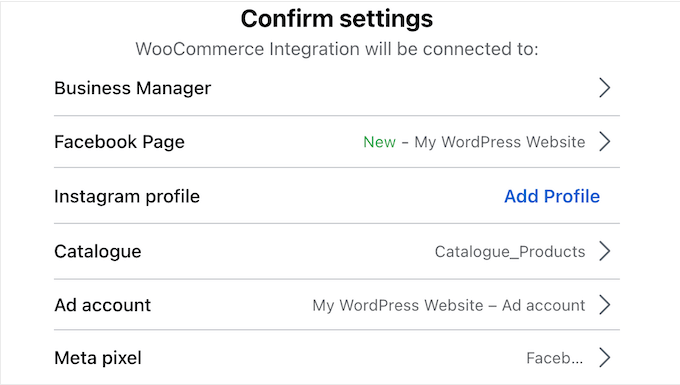
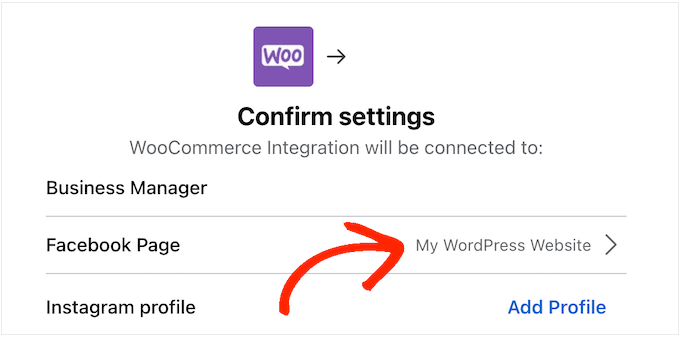
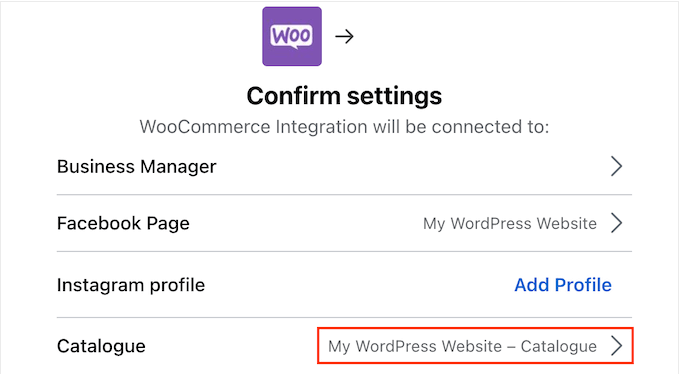
Once that’s completed, you can confirm the Facebook Page where your WooCommerce products will be displayed.
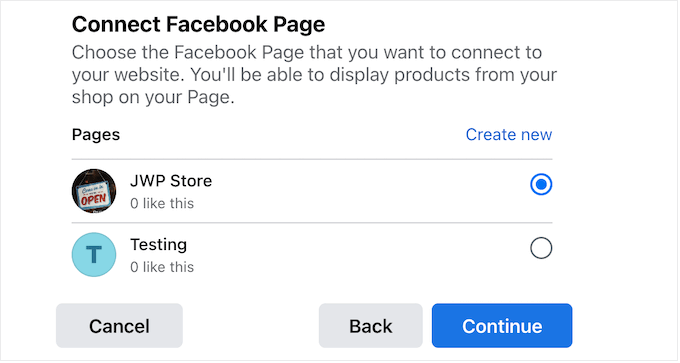
To do this, click on the arrow next to ‘Facebook Page’ and choose the page you want to connect.
You’ll now see a list of all the Facebook pages linked to your account. Simply choose the page you want to use for your WooCommerce store, and then click ‘Continue.’
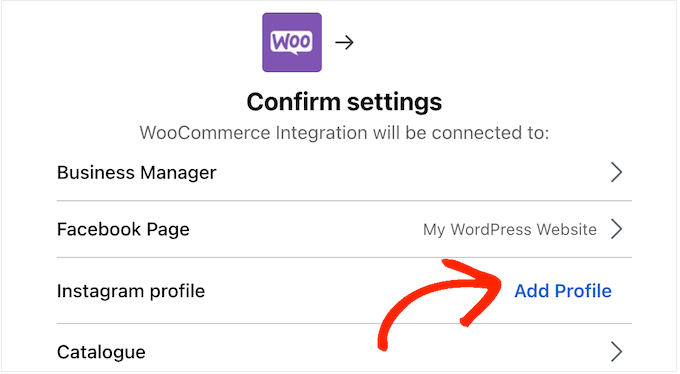
Step 3: Connect to Instagram Business (Optional)
If you have an Instagram Business profile, you may also want to connect Facebook for WooCommerce to this account.
Doing so allows you to manage both your Facebook and Instagram pages from the same Business Manager dashboard (Meta’s online hub). This makes it easier to run ads and sell products on Instagram.
To link your Instagram account, simply click ‘Add Profile’ next to ‘Instagram Profile.’
You’ll now see a list of all your Instagram pages linked to your account.
Simply select the page you want to use, and then click ‘Continue.’
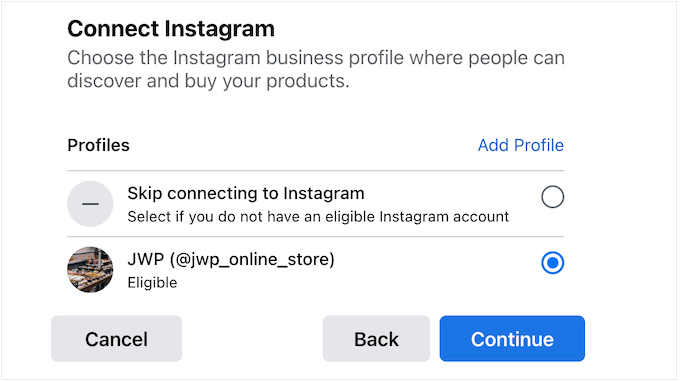
If you don’t have an Instagram Business account, you can simply choose ‘Skip connecting to Instagram’. Once that’s done, go ahead and click ‘Continue’ to move forward with the setup.
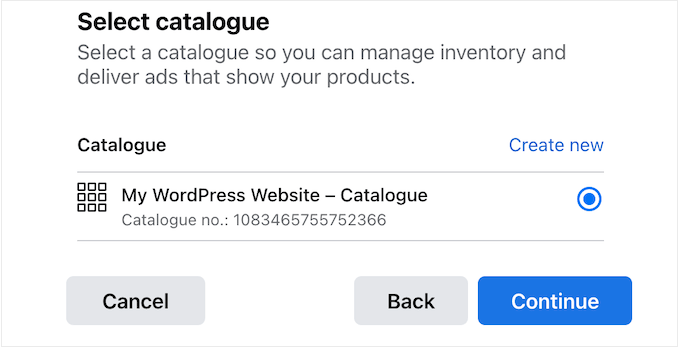
Step 4: Choose a WooCommerce Product Catalog
After this step, you’ll be asked to select the WooCommerce product catalog you want to connect. Think of the catalog as a container that holds all the products you plan to showcase on Facebook.
You can create multiple catalogs for different product types, but it’s generally best to use a single catalog, as this makes inventory management much simpler.
If you’d like to organize items into smaller groups, you can create collections or sets within the same catalog. These allow you to group related products together, and we’ll explain more about them later in this guide.
For now, simply select an existing catalog and then click ‘Continue.’
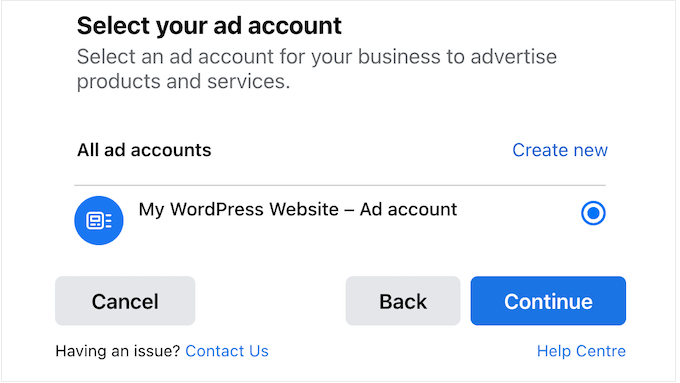
Step 5: Create or Choose a Facebook Ad Account
After completing the catalog setup, the next step is to select the ad account you want to use for running ads on Facebook and Instagram. This account will be linked to your WooCommerce store, allowing you to create and manage campaigns directly.
Keep in mind that you can’t use a personal ad account with a Business Manager profile. If you don’t already have a compatible Facebook ad account, just click ‘Create New’ and follow the onscreen instructions to set one up.
Next, simply choose the ad account you’d like to use for your Facebook and Instagram ads, and then click ‘Continue.’
Step 6: Set up the meta pixel
Next, you’ll need to choose a Meta Pixel. This tracking tool allows you to:
- Manage and sync your product inventory
- Set up WooCommerce conversion tracking
- Deliver personalized content and ads to different audiences
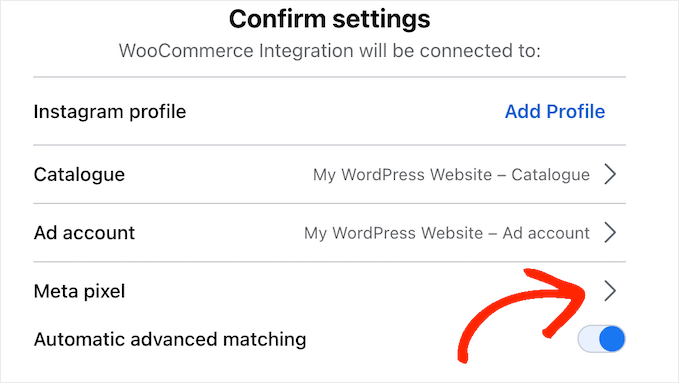
If you don’t already have a Pixel, click the arrow next to ‘Meta Pixel’ and follow the onscreen steps to create one.
Once your Pixel is ready, simply select the radio button next to it and then click ‘Continue.’
![]()
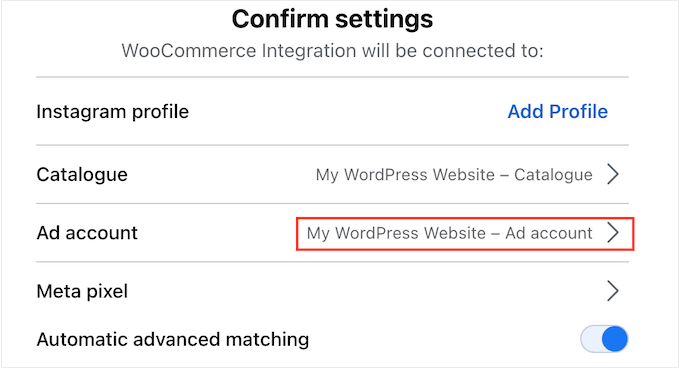
Step 7: Review your Facebook for WooCommerce settings
Now, a pop-up will appear showing all the settings you’ve selected so far.
At this stage, it’s a good idea to enable Automatic Advanced Matching. This feature helps match visitors from your WordPress site with their profiles on Facebook.
Not only does this allow you to deliver more personalized content, but it can also improve the accuracy of your conversion tracking.
With that in mind, we recommend turning on the ‘Automatic Advanced Matching’ slider.
![]()
After that, click the ‘Next’ button.
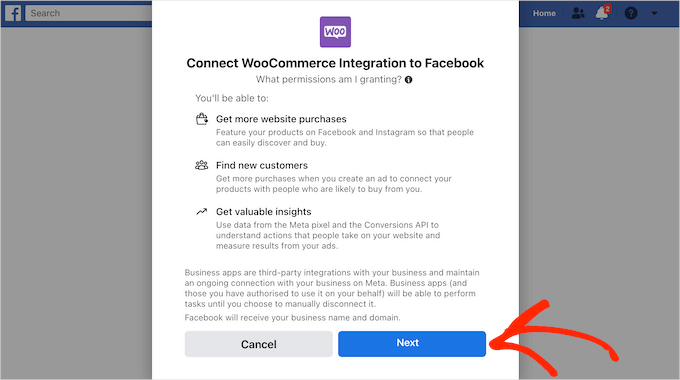
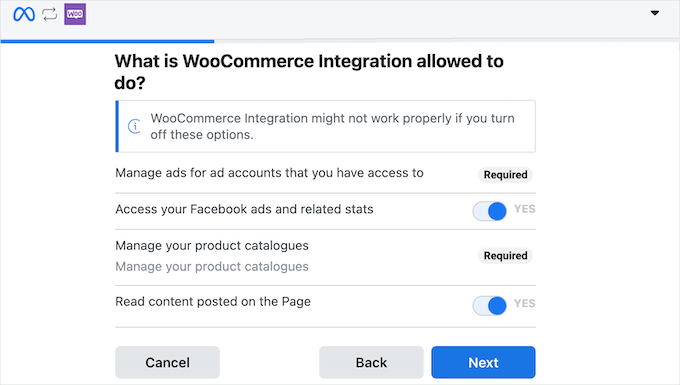
You’ll then see a screen outlining the types of data the plugin can access and the actions it’s allowed to perform. While you do have the option to disable certain toggles, doing so may cause the integration to stop working correctly.
For the best results, we recommend keeping all the toggles enabled. Once you’re satisfied with the permissions, go ahead and click ‘Next.’
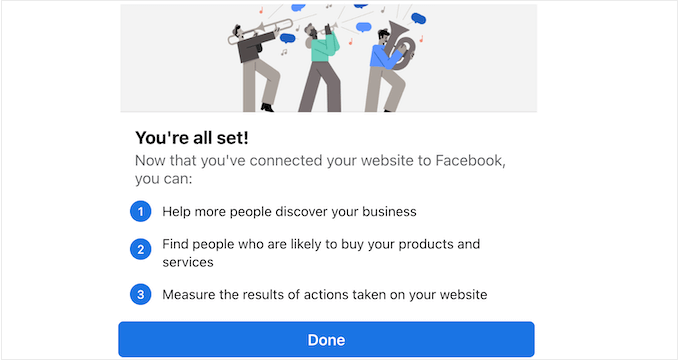
The plugin will now connect your WooCommerce store with your Facebook page.
After a short while, you should see a message saying ‘You’re all set.’ At this point, simply click ‘Continue’ to complete the setup process.
How to add WooCommerce products to your Facebook page
Now that you’ve successfully linked your WooCommerce store with your Facebook page, you can start exploring the many ways to take advantage of this integration.
For most store owners, the next step is to promote WooCommerce products on social media by setting up a Facebook Shop. If you want to learn more about organizing your products before promoting them, check out our guide: How to Create a Grouped Product WooCommerce Tutorial for Beginners.
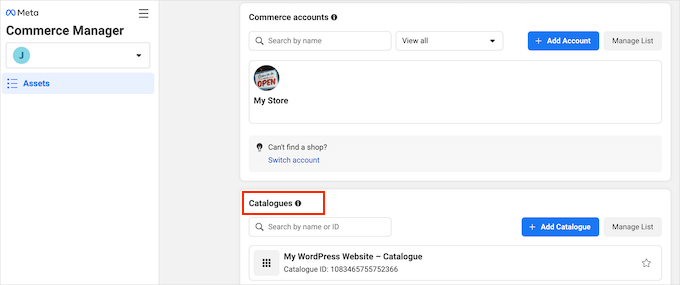
To start selling on Facebook, go to the Facebook Commerce Manager. Under the ‘Catalogues’ section, choose the product catalog that you want to use for your Facebook Shop.
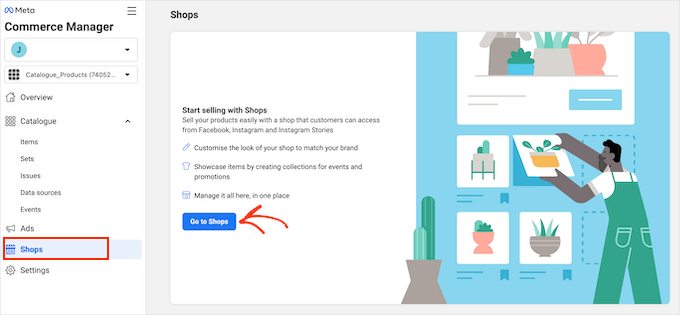
From the left-hand menu, navigate to the ‘Shops’ section. Once there, click the ‘Go To Shops’ button to continue.
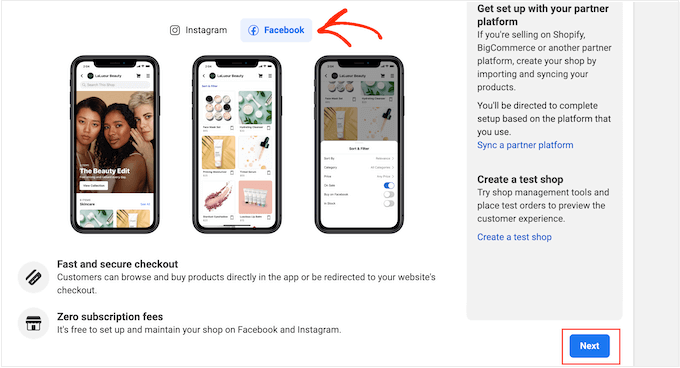
On the next screen, select ‘Facebook’ as your sales channel.
After that, simply click ‘Next’ to continue.
Next, you’ll need to choose a checkout method for your Facebook store.
By default, the option ‘Checkout on another website’ is selected. With this method, customers can browse your products on Facebook, but they’ll be redirected to your website to complete the purchase.
If you prefer a different checkout method, click the ‘Change’ link next to ‘Checkout Method.’
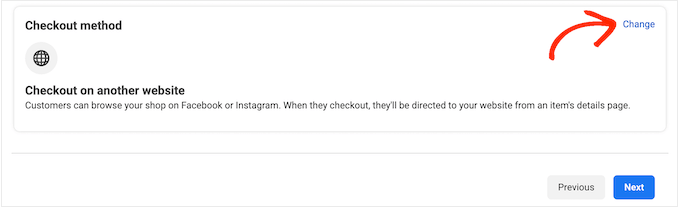
At this stage, you’ll see several checkout options.
The first option is to let customers check out directly on Facebook. This can greatly reduce friction in the buying process, especially if shoppers have already saved their payment and delivery details on Facebook.
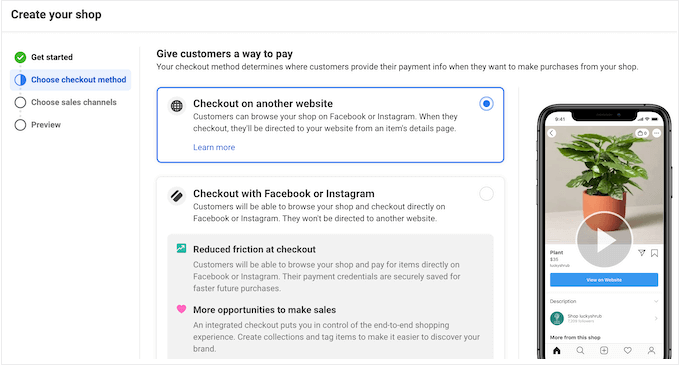
However, keep in mind that Meta charges an additional selling fee — 5% per shipment, or a flat fee of $0.40 for orders of $8.00 or less.
In addition, Facebook checkout is currently available only to businesses in the US, which means you’ll need a US bank account and business address to qualify.
Another drawback is that shoppers can complete their purchases without ever visiting your website. This isn’t ideal if you’re trying to increase site traffic or rely on ads for revenue.
With that said, if you still want to use this option, you can select ‘Checkout with Facebook or Instagram.’

Another option is to let customers check out via Facebook Messenger or WhatsApp.
With this method, a ‘Message’ button will appear on your product listings inside the Facebook Shop, allowing shoppers to contact you directly to complete their orders.
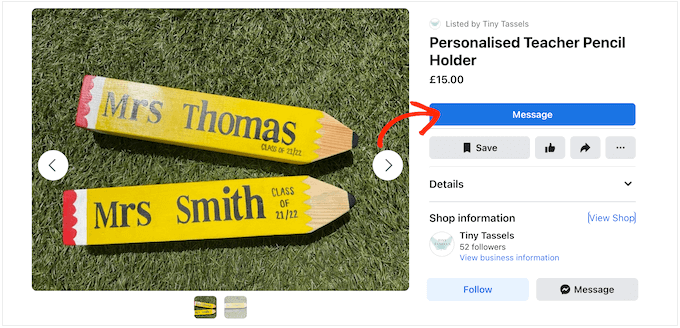
When shoppers click this button, it will open either Facebook Messenger or WhatsApp, along with some suggested questions to help start the conversation.
The example below shows how this option might appear inside the Facebook Messenger live chat interface.
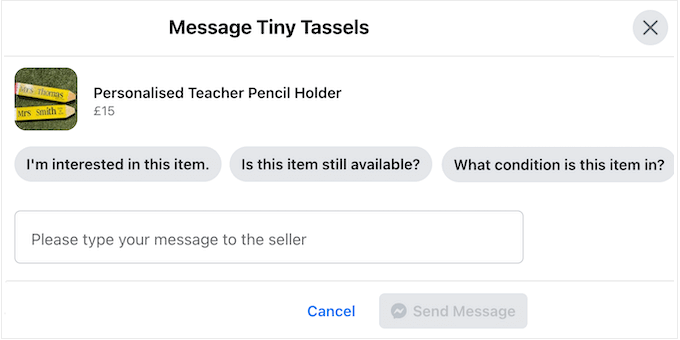
Keep in mind that this option doesn’t include a built-in checkout system. This means you’ll need to set up your own WooCommerce payment gateway to process customer orders.
To enable this method, simply select the radio button next to ‘Checkout with messaging.’
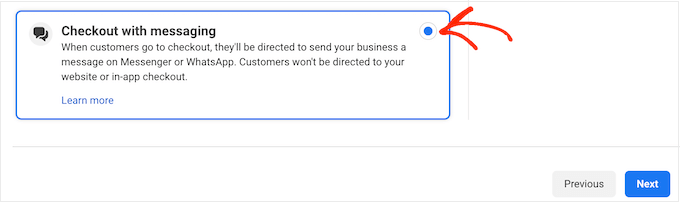
Once you’ve made your selection, simply click ‘Next’ to proceed.
Read more: 6 Tips Optimizing Your WooCommerce Checkout Process for Holiday Sales
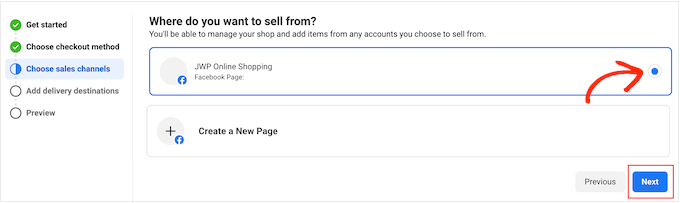
At this stage, Facebook may prompt you to confirm the page and catalog you want to use. Simply make your selections, then click ‘Next’ to continue.
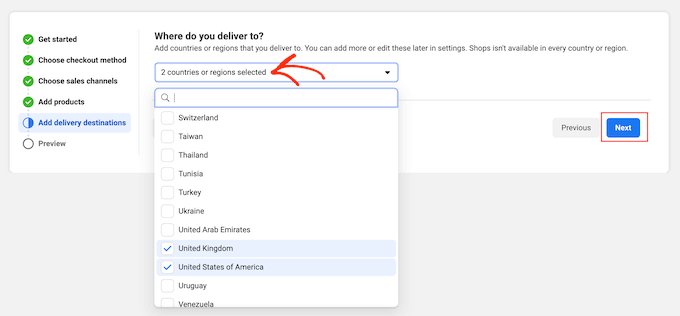
Next, expand the dropdown menu to select the locations where you deliver. Once you’ve made your selections, click ‘Next’ to proceed.
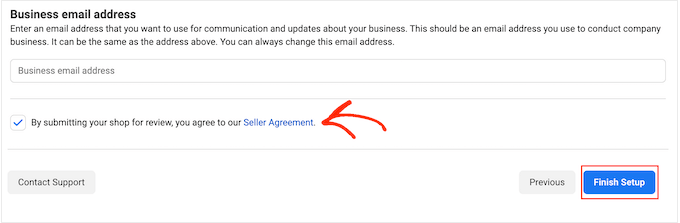
On the following screen, enter your business email address to continue.
Facebook will now display all your settings. Take a few moments to review them carefully, and make sure to read the Seller Agreement thoroughly.
If everything looks good, check the box next to ‘Seller Agreement’ and then click ‘Finish setup’ to complete the process.
After a short moment, a pop-up will appear prompting you to start the verification process. During this step, Facebook will collect information about you and your business.
To begin, click ‘Start Verification.’
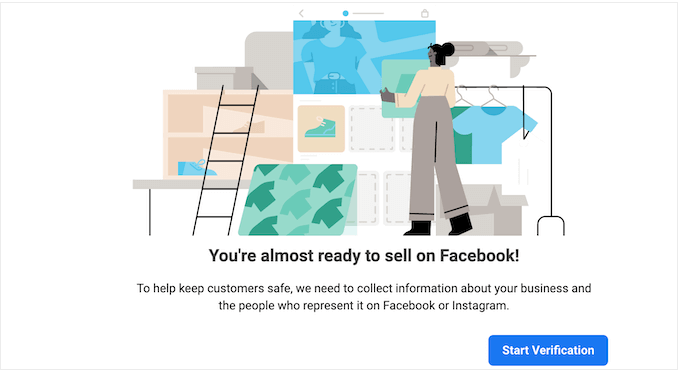
Now, follow the onscreen instructions to verify your identity and business. Once your information has been successfully verified, you’ll be ready to start selling on Facebook.
Tips for optimizing a WooCommerce shop with Facebook
Here are some practical tips to help you optimize your WooCommerce shop on Facebook and maximize sales:
- Use High-Quality Product Images: Clear and professional images attract more attention and increase the likelihood of clicks and purchases.
- Write Compelling Product Descriptions: Include key details, benefits, and keywords to make your products easier to find and more appealing.
- Enable Facebook Pixel Tracking: This helps you track customer behavior, retarget visitors, and improve ad performance.
- Organize Products into Collections: Group related products into collections to make it easier for shoppers to find what they need.
- Engage with Customers: Respond promptly to messages and comments on your Facebook Shop to build trust and encourage purchases.
- Run Targeted Facebook Ads: Use the data from your Pixel to create ads that reach the right audience.
- Keep Inventory Updated: Ensure your product catalog is always accurate to avoid disappointing customers.
Frequently Asked Questions
1. Can I sell on Facebook if I don’t have a WooCommerce store?
Yes, you can still sell on Facebook using Facebook Shops, but integrating with WooCommerce makes product management, inventory syncing, and advertising much easier.
2. Are there fees for selling on Facebook?
Using Facebook checkout comes with a selling fee — 5% per shipment, or a flat fee of $0.40 for orders $8.00 or less. Checkout via your website or messaging does not incur this fee.
3. How do I track sales and conversions?
You can track conversions using the Facebook Pixel installed on your WooCommerce store. This allows you to measure ad performance and retarget customers effectively.
4. Can I use Instagram along with my Facebook Shop?
Yes, connecting your Instagram Business profile allows you to manage both platforms from the same Business Manager account and sell products on Instagram.
Conclusion
In this guide, we’ve walked you through how to connect your WooCommerce shop with Facebook, set up your product catalog, choose checkout methods, and optimize your store for better sales. By following these steps, you can reach more customers, streamline your operations, and grow your online business effectively.
At Arestós, we specialize in WooCommerce development and customization. Our team can help you set up a fully integrated online store, connect it with social media channels like Facebook, and implement strategies to boost conversions and revenue.
Ready to take your WooCommerce store to the next level? Contact us today and start maximizing your online sales potential!
Subscribe to our newsletter!
Get updated to
the lastest IT trends
Related Posts
Update the latest technology trends for your business


