Back to featured insights
WordPress Installation: Complete Guide for Beginner
This step-by-step WordPress installation guide simplifies the entire process, making it easy for beginners to set up their website quickly and confidently. Follow clear instructions designed to help you launch your site smoothly without any hassle.
Table of Content
Share
Manual WordPress installation might sound technical, but it’s actually quite simple. With a clear understanding of the procedures, the entire setup can be done in just a few minutes, and no advanced coding skills are required to finish it effectively.
In this guide, you’ll explore a simple, step-by-step process for manually installing WordPress on your site. We’ll walk you through downloading the platform, setting up the database, configuring the required connection files, and running the installation script.
By the end, you’ll have a fully functional WordPress site, along with a deeper understanding of how your website operates behind the scenes.
Everything you need to know for a complete manual WordPress installation:
- What do you need before installing WordPress manually?
- Step-by-step guide to manual WordPress installation
- Common WordPress Installation Issues and Solutions
- Frequently asked questions about WordPress Installation
Let’s get started with the step-by-step process of manually installing WordPress – it might sound tricky at first, but it’s actually easier than you think!

What do you need before installing WordPress manually?
Before you begin installing WordPress, it’s essential to ensure you have everything in place for a smooth and successful setup. Preparing these elements in advance will help streamline the process and minimize potential issues.
- Domain Name – This is the web address users will type in to access your site, such as wpzoom.com. It serves as the foundation of your website’s identity.
- Web Hosting Account – You’ll need a hosting plan to store your WordPress files and data. Most hosting providers offer packages specifically optimized for WordPress websites.
- File Transfer Access (FTP or File Manager) – To upload WordPress files to your server, you’ll need an FTP client like FileZilla (a free and popular option), or you can use the File Manager available in your hosting provider’s cPanel.
- Basic Technical Knowledge – While you don’t need programming skills, you should feel comfortable uploading files, creating a database, and following step-by-step technical instructions.
- Latest Version of WordPress – Download the most recent release directly from WordPress.org during the installation process.
- Database Access (MySQL) – Your hosting account must allow you to create a MySQL database. Most providers offer tools like phpMyAdmin or the MySQL Database Wizard to make this easy.
Each of these components plays a critical role in the installation process. If your hosting provider offers 24/7 technical support, keep their contact information handy in case you run into any issues.
Ready with these prerequisites? Let’s move on to the first step of installing WordPress!
Read more: Guide on how to build a WordPress website for beginners.
Step-by-step guide to manually install WordPress
Below is the step-by-step guide for WordPress installation, detailing each stage of the manual setup process:
- Step 1: Download the WordPress files
- Step 2: Extract the WordPress files
- Step 3: Upload WordPress files to your web server
- Step 4: Create a MySQL Database and User
- Step 5: Configure the wp-config.php file
- Step 6: Run the WordPress Installation script
- Step 7: Complete the WordPress Installation
Let’s dive into each step
Step 1: Download the WordPress files
The first step in manually setting up WordPress is to download its latest version from the official website.
Go to the Download page on WordPress.org and click the big blue “Download WordPress” button.
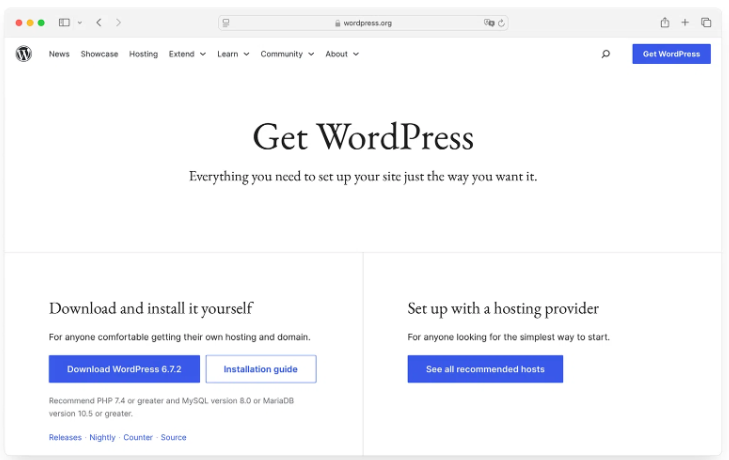
This action will save the most recent release of WordPress to your computer in a compressed ZIZIP file (something like “wordpress-6.x.x.zip“).
This ZIP file includes everything required to install and run WordPress, such as:
- The core application files
- Default theme
- Sample configuration
- README file with helpful information
You don’t need to make any changes to these files at this point. The package comes fully pre-configured with all the essential components needed to start building your WordPress website.
Step 2: Extract the WordPress files
After downloading WordPress, the next step is to extract the files before uploading them to your web server. You can use your operating system’s built-in extraction tool or any third-party archive software:
- On Windows: Right-click the ZIP file and select “Extract All”
- On macOS: Double-click the ZIP file to automatically extract its contents
- On Linux: Right-click and choose “Extract,” or use the terminal command: unzip wordpress-xxxzip
Once extracted, you’ll see a WordPress folder containing various files and subdirectories, each serving a specific purpose:
- /wp-admin/ – Contains files for the WordPress admin dashboard
- /wp-content/ – This is where your themes, plugins, and uploaded media are stored
- /wp-includes/ – Holds the core system files that power WordPress
- PHP files in the root directory – These manage the primary operations of your WordPress site
Step 3: Upload WordPress files to your web server
Once you’ve successfully extracted your WordPress files, the next step is to upload them to your web hosting environment. There are multiple ways to do this, and one of the most commonly used is via FTP (File Transfer Protocol).
Using FTP (File Transfer Protocol)
1. Launch your preferred FTP client, such as FileZilla or Cyberduck.
2. Enter your FTP credentials to establish a connection:
- Host: Your domain name or server IP address (often ftp.yourdomain.com)
- Username: Your FTP login name
- Password: Your FTP password
- Port: Usually 21, the standard port for FTP
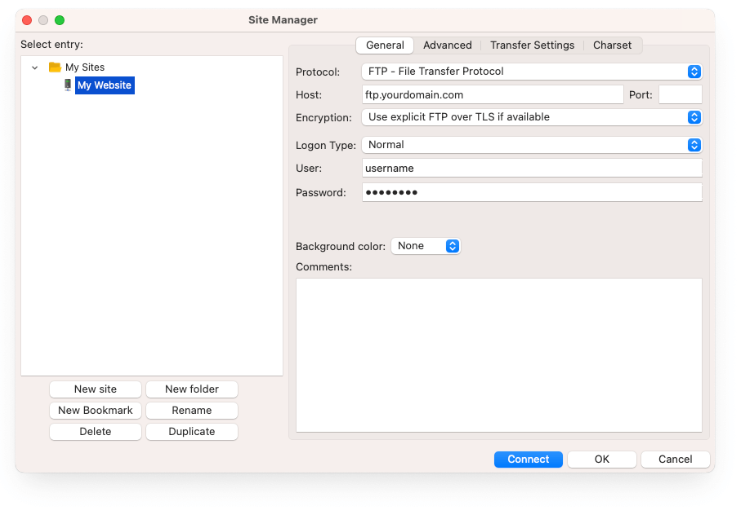
3. Connect to your web server.
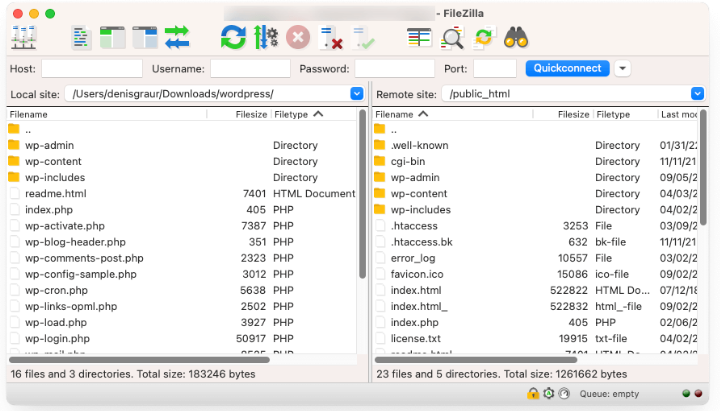
4. In the remote panel, navigate to your site’s root directory — usually named public_html, www, or httpdocs.
5. On your local panel, select the contents inside the extracted WordPress folder (not the folder itself), then drag and drop them into the root directory of your server.
Make sure you’re uploading the internal contents of the WordPress folder — not the outer folder itself — to avoid incorrect directory structure.
Using File Manager ( Through cPanel)
1. Log in to your hosting cPanel
2. Find and click on “File Manager” in the Files section 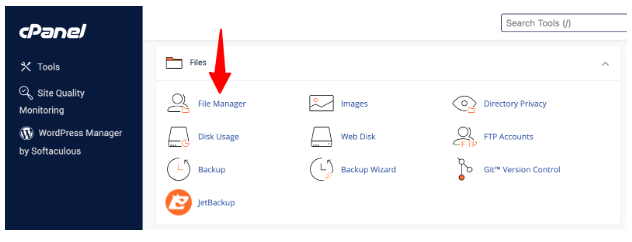
3. Navigate to your root directory (usually public_html)
4. Click “Upload” and select all files from the WordPress folder on your computer
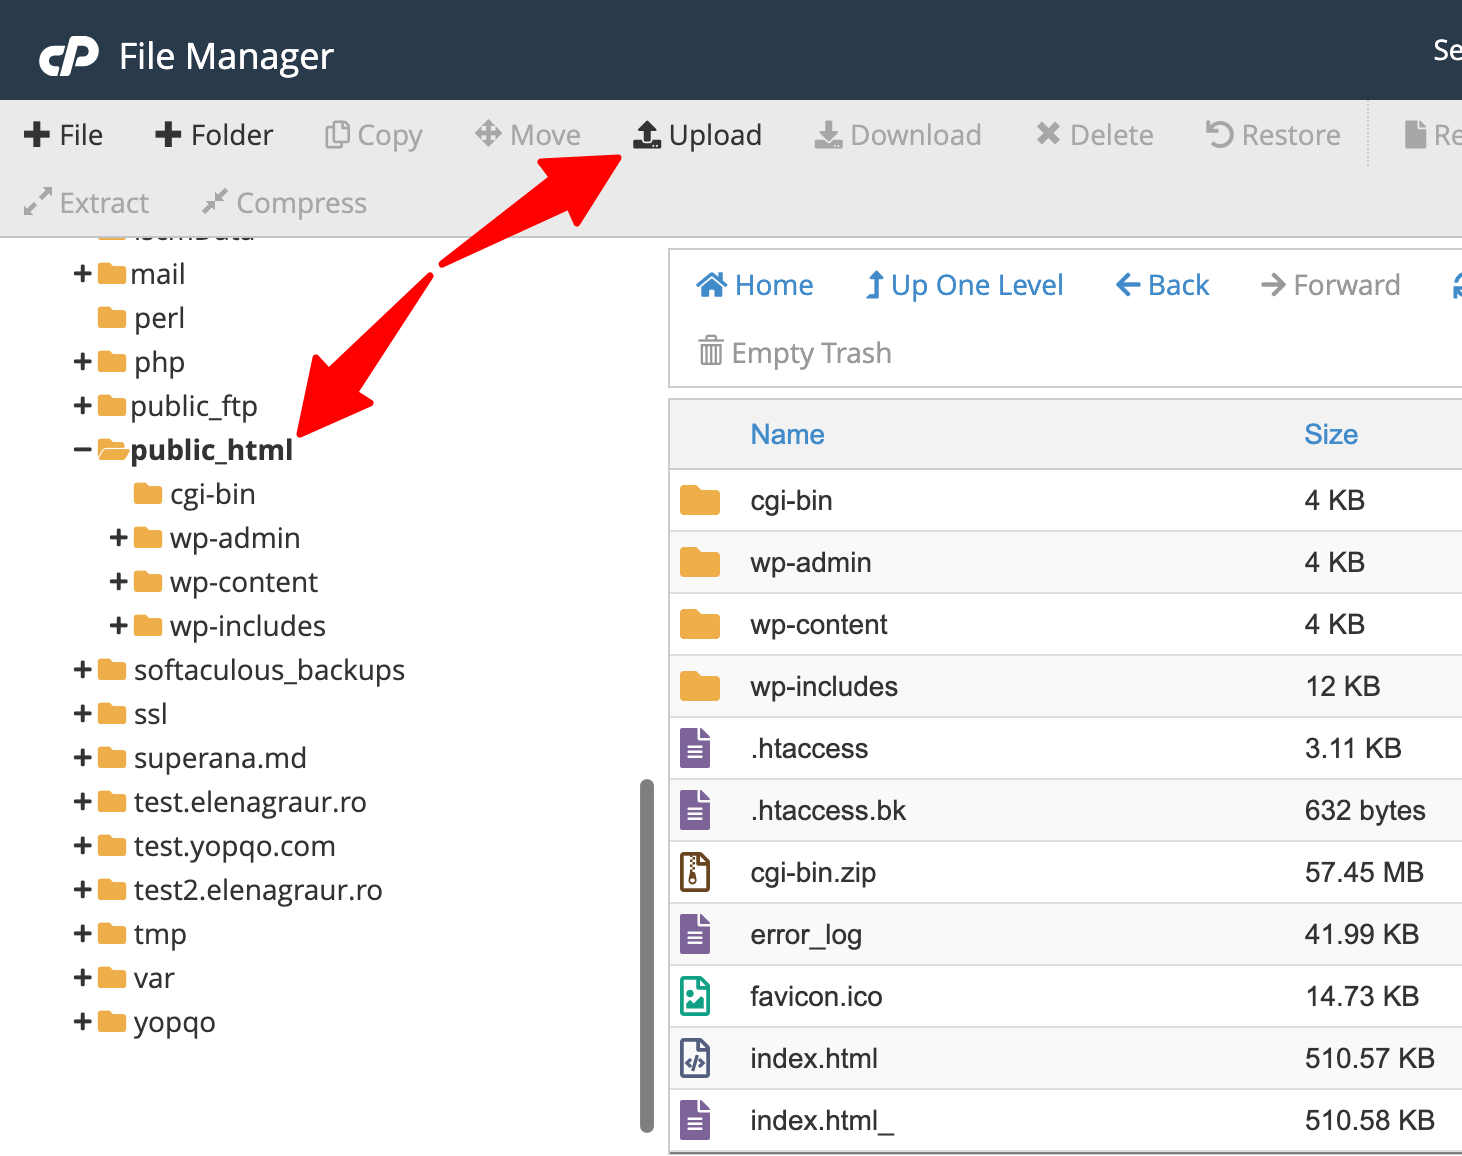
5. Wait for the upload to complete – this may take a few minutes, depending on your internet connection
Where to upload the files?
You have two options for where to place your WordPress files on the server, depending on how you want your website to be accessed:
- Root Directory – If you want WordPress to appear directly on your main domain (e.g., example.com), upload all the files to the root directory of your hosting account, typically named public_html.
- Subdirectory – If you prefer to run WordPress from a subfolder (e.g., example.com/blog), first create that folder (e.g., “blog”) on your server, then upload all WordPress files into that subdirectory.
Step 4: Create a MySQL Database and User
WordPress stores all your site content, settings, and user information in a database. Before proceeding with the installation, you need to create a database and a user account. Many hosting providers offer tools through cPanel that make this process straightforward.
Using MySQL Database Wizard in cPanel
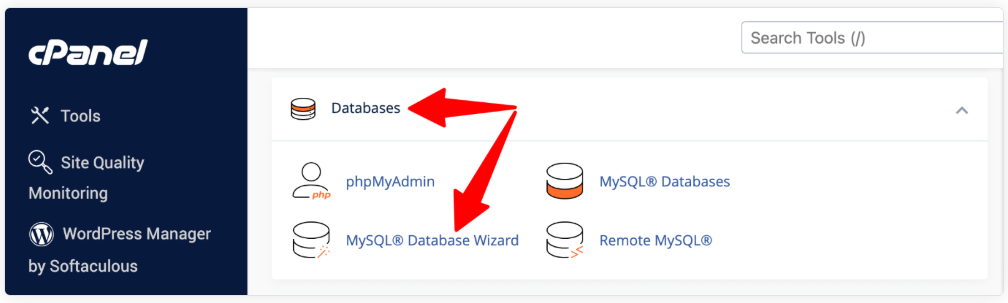
1. Log in to your hosting account’s cPanel.
2. In the “Databases” section, click on “MySQL Database Wizard”.
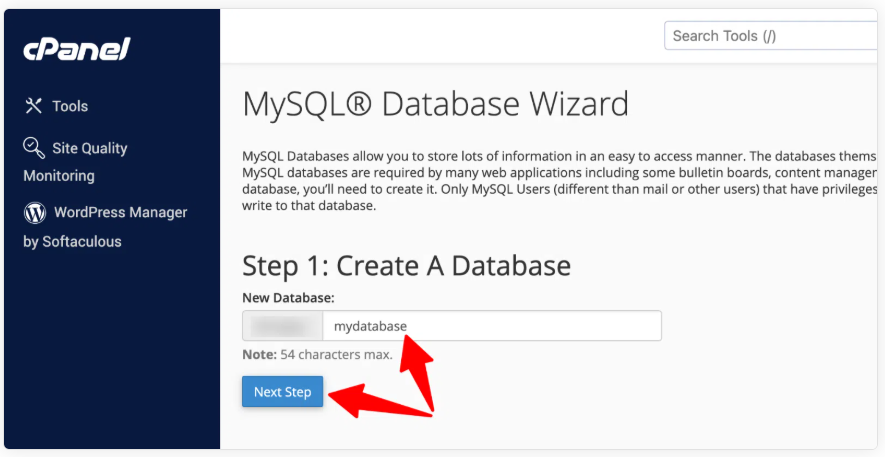
3. Enter a name for your database. (Some hosts may require adding a prefix to the name) and click “Next Step”.
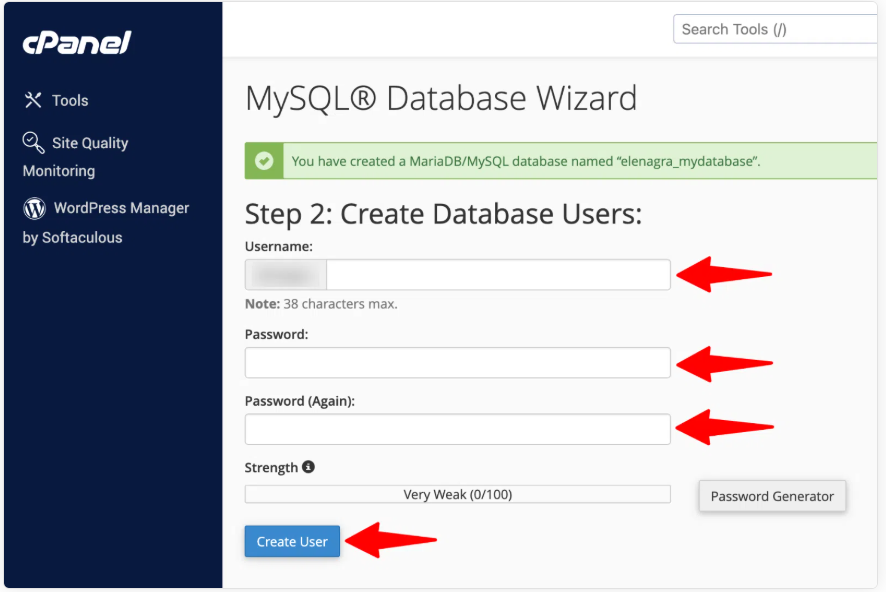
4. Create a username (make sure it is different from your cPanel login) and set a strong password. If available, use the password generator to create a secure password.
Note: Be sure to write down these details! You’ll need them for the WordPress setup.
Click on “Create User”.
5. On the next screen, check the box for “All Privileges”. This will grant WordPress full permissions to create tables and manage data in the database.
Click “Next Step”

6. Finish the process and save the following details for future reference:
- Database Name
- Username
- Password
- Database Host (usually “localhost”)
Step 5: Configure the wp-config.php file
Checking your Database
After creating the database, you can verify it was set up correctly:
1. Return to cPanel
2. Click on “phpMyAdmin” 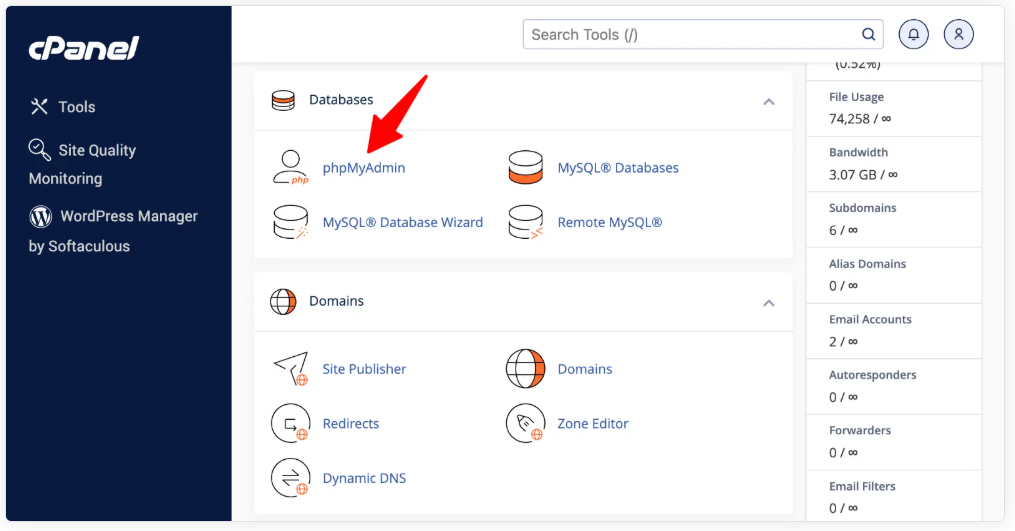
3. Look for your new database in the left sidebar
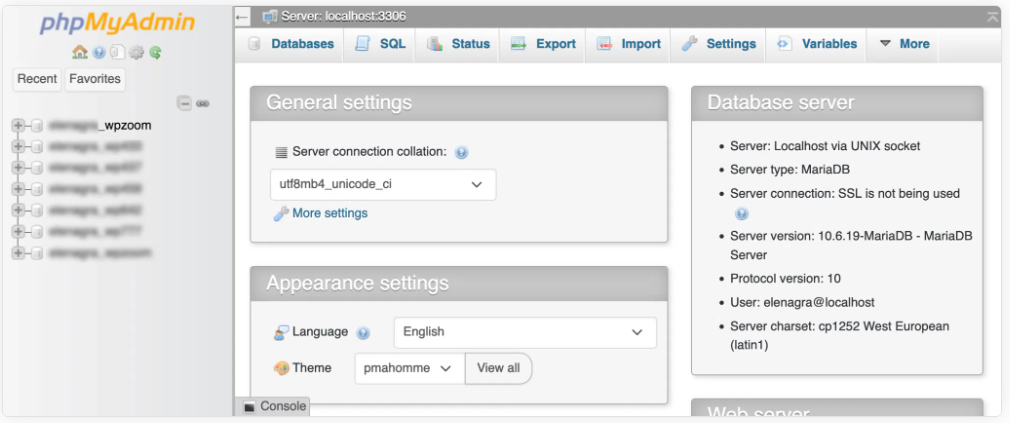
4. The database should exist but be empty (WordPress will create the tables during installation)
Step 6: Run the WordPress Installation script
Now it’s time to run the WordPress installation wizard, which will guide you through connecting to your database and setting up your configuration file.
1. Open your web browser and go to your website’s URL to automatically start the installation process:
- If you installed WordPress in the root directory: https://yourdomain.com
- If you installed in a subdirectory: https://yourdomain.com/subfolder
If the installation doesn’t start automatically, you can manually access it:
- For root directory installation: https://yourdomain.com/wp-admin/install.php
- For subdirectory installation:https://yourdomain.com/subfolder/wp-admin/install.php
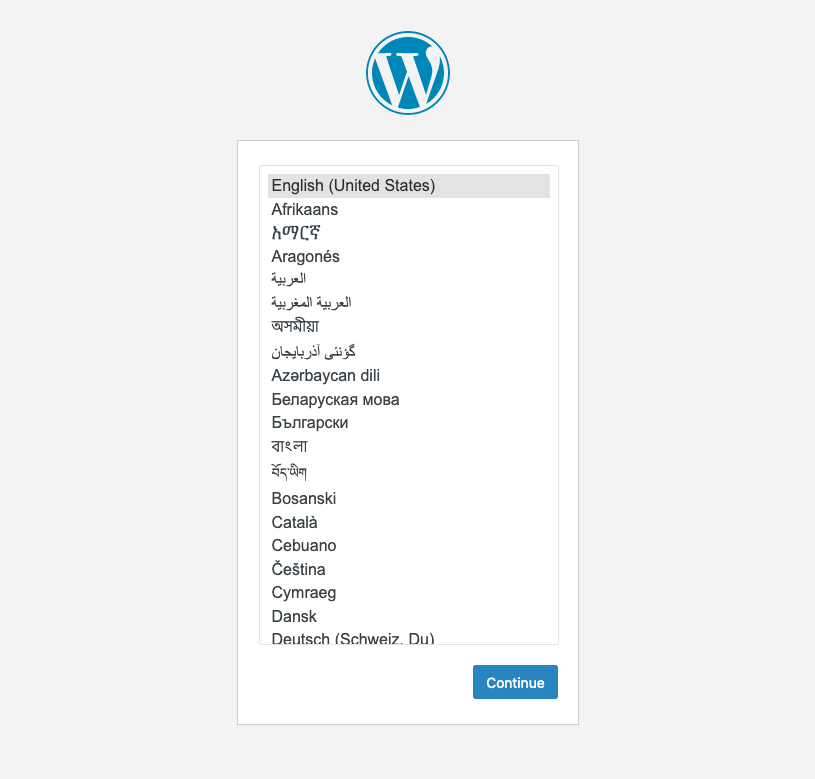
2. The first screen will ask you to select your preferred language. Choose your language from the dropdown and click “Continue” to proceed.
3. Next, you’ll see a welcome screen with an overview of the information required. Click “Let’s go!” to proceed to the database setup page.
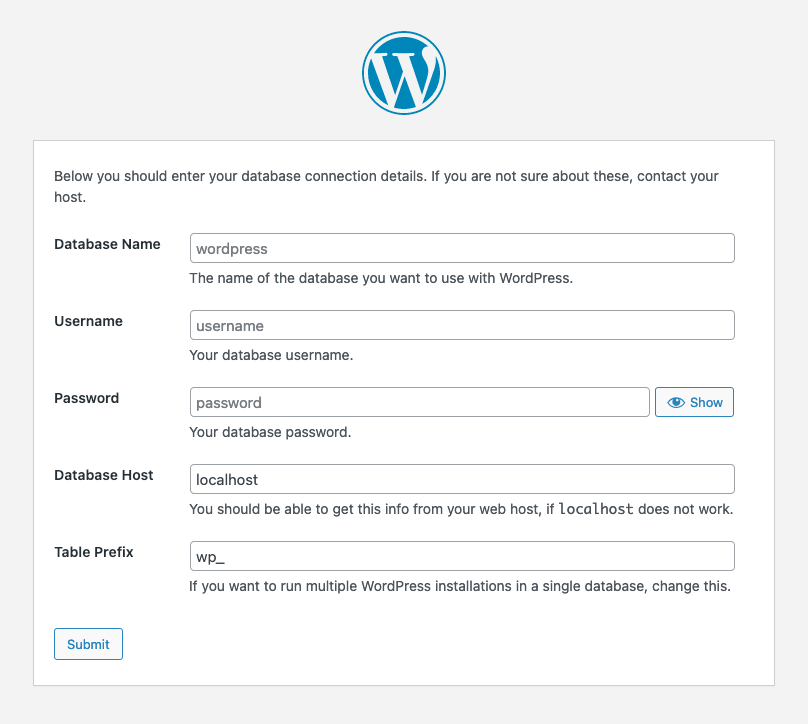
4. On the database setup page, enter your database details:
- Database Name: Enter the name you created in Step 4
- Username: Enter your database username
- Password: Enter your database password
- Database Host: Typically “localhost” (or the value provided by your host)
- Table Prefix: Leave as “wp_” or modify it for added security (especially if you have multiple WordPress installations in the same database)
Click “Submit” to test the database connection.
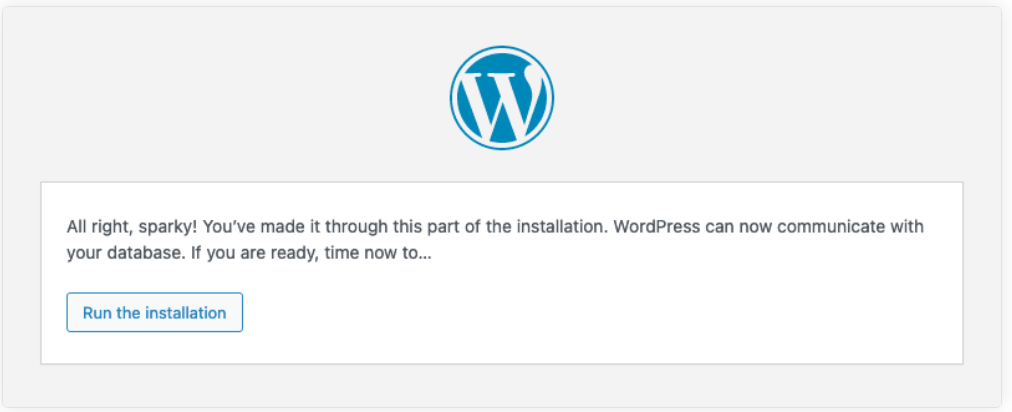
WordPress will attempt to connect to your database:
- If successful, you’ll see a “Success!” message.
- If unsuccessful, double-check your database details and try again.
5. Once the connection is successful, click “Run the installation” to continue.
Step 7: Complete the WordPress Installation
You’re now at the final step! It’s time to set up your WordPress site information and create an admin account.
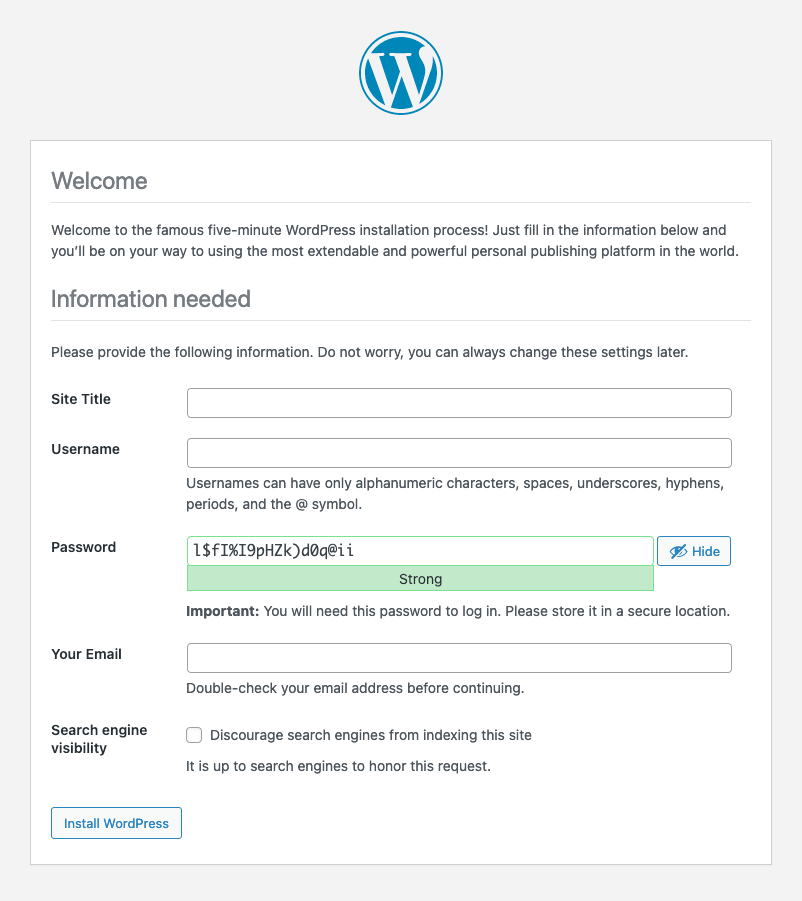
On the welcome screen, you’ll be prompted to fill in several key details:
- Site Title – Enter the name of your website. Don’t worry, you can always change this later.
- Username – Choose a username for your administrator account. For security purposes, avoid using “admin” as it’s a common target for brute force attacks.
- Password – WordPress will suggest a strong password, but you can create your own. The password strength indicator will help you gauge how secure it is. Be sure to use a strong password with a mix of letters, numbers, and special characters.
- Your Email – Provide a valid email address. This is where you’ll receive notifications about your site and where you can reset your password if necessary.
- Search Engine Visibility – If you don’t want search engines to index your site while it’s under development, check this box. You can uncheck it when your site is ready to go live.
Once you’ve filled out these fields, click the “Install WordPress” button at the bottom of the page.
Wait a few moments while WordPress sets up the necessary database tables.
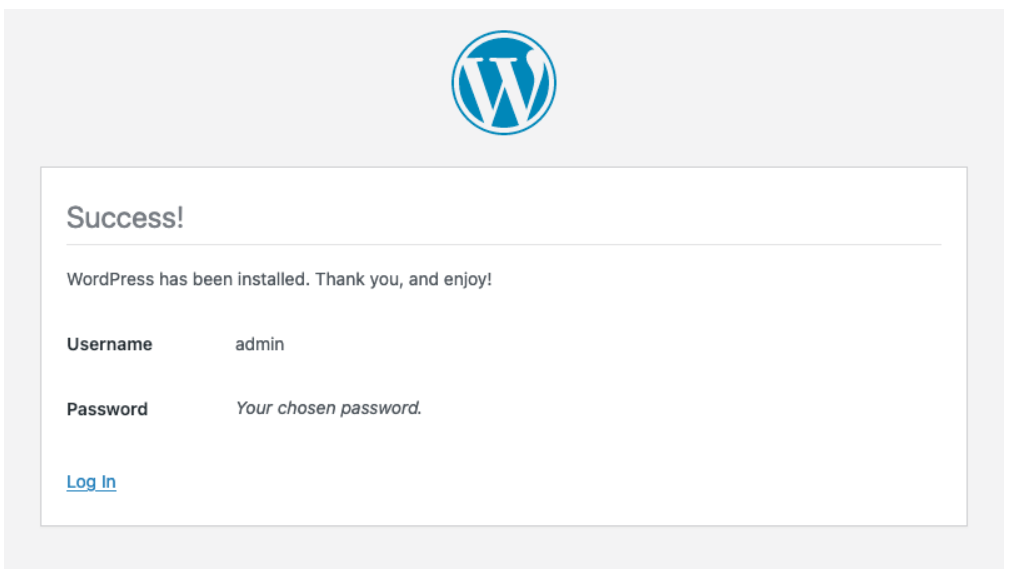
Success! You’ll see a confirmation message saying, “WordPress has been installed. Thank you, and enjoy!”
Logging In to Your Dashboard
1. Click the “Log In” button on the success screen.
2. Enter your username and password on the login page, then click “Log In” to access your WordPress dashboard.
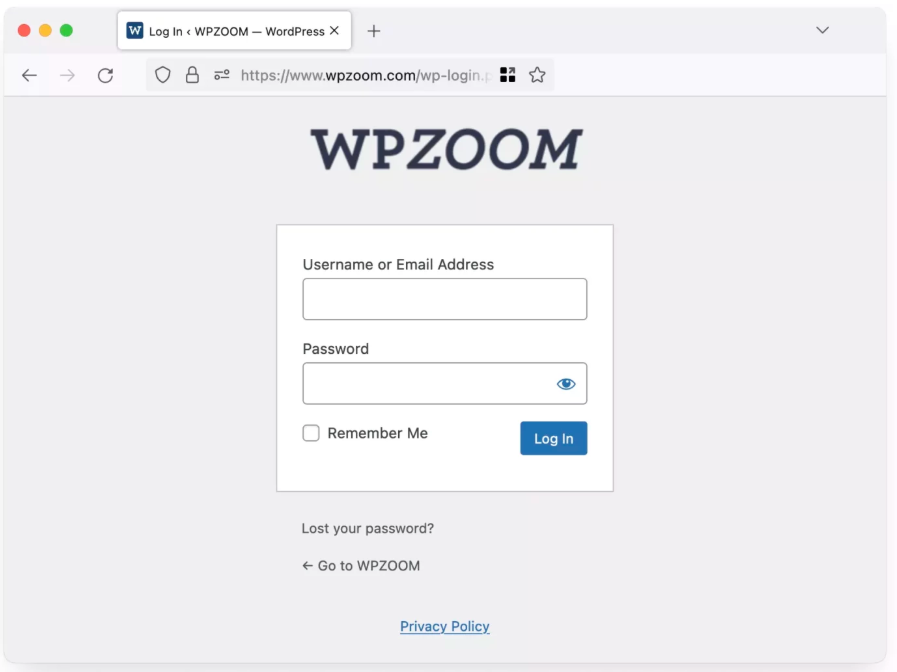
Congratulations! You now have a fresh WordPress installation up and running on your server.
Read more: After a successful installation, start customizing creative WordPress themes to build an engaging website
Common WordPress Installation Issues and Solutions
Database Connection Errors
Issue: You see the message “Error establishing a database connection” when trying to access your site.
Solution:
- Double-check your database name, username, and password in the wp-config.php file.
- Verify the database server name (it’s typically “localhost”).
- Ensure your database user has the proper privileges to access the database.
- Try resetting the database password via cPanel.
Blank White Screen After Installation
Issue: Your site shows a blank white page with no error message.
Solution:
- Check your .PHP memory in wp-config.php (add: define(‘WP_MEMORY_LIMIT’, ‘128M’); )
- Temporarily deactivate all plugins by renaming the plugins folder
- Switch to a default WordPress theme
- Enable PHP error reporting to see what’s causing the issue
Permission Issues
Issue: WordPress cannot create directories or write files during installation.
Solution:
- Adjust the file permissions: set directories to 755 and files to 644.
- Contact your hosting provider for assistance if you need help with permission changes.
- Ensure that PHP safe mode is not enabled on your server.
WordPress Files Not Found
Issue: You encounter 404 errors or “Page Not Found” messages when accessing admin pages.
Solution:
- Confirm that all WordPress files were uploaded properly.
- Check if your .htaccess file needs to be updated.
- Ensure that your site URL is correct in the database.
- Try re-uploading the /wp-admin/ folder.
Missing Images or Broken Links
Issue: After installation, your site displays missing images or broken links.
Solution:
- Make sure the site URL is correctly set in Settings > General.
- Refresh your permalinks by going to Settings > Permalinks and clicking Save Changes.
- Ensure that your theme is installed correctly.
If you’re still facing issues despite trying common solutions, don’t worry — the expert team at Arestós is always ready to help. Here’s why partnering with a professional team like Arestós is a smart and cost-effective choice for the long run:
- Deep technical expertise
- Save time and resources
- Enhanced security and long-term stability
- Optimized performance and user experience
- Timely and reliable support
Frequently asked questions about WordPress Installation
1. Should I install WordPress manually or use an auto-installer?
If you prefer speed and simplicity, auto-installers like Softaculous or Installatron are great options. However, manual installation offers more control and is ideal for advanced configurations or enhanced security.
2. Why am I seeing the “The site is experiencing technical difficulties” message?
This error often arises from plugin/theme issues or database problems. Disable all plugins and switch to a default theme to isolate the problem. Arestós can quickly identify and fix issues that may disrupt your site.
3. Do I need coding knowledge to install WordPress manually?
No, basic technical skills are helpful, but you don’t need to know how to code. As long as you follow step-by-step instructions, you can complete the installation successfully.
4. Is it easy to install WordPress?
WordPress is a top choice for building websites because it’s easy to use and doesn’t require any coding skills. That’s why so many beginners turn to it to start their online presence.
5. What is required to install WordPress?
To run properly, WordPress relies on three essential elements: PHP, a database system like MySQL or MariaDB, and a web server that supports HTTPS. These are the absolute minimum requirements of any WordPress installation to get your site online.
Conclusion
While WordPress installation is typically straightforward, technical issues can cause frustration and delays. By following the right steps, you can get your site up and running. However, if you encounter problems, seeking professional help is always a smart move.
At Arestós, our expert team is here to ensure your WordPress installation is seamless and secure. We provide installation, troubleshooting, and maintenance services to keep your website running smoothly.
Don’t let issues slow you down!
Contact Arestós today for expert support with your WordPress setup.
Subscribe to our newsletter!
Get updated to
the lastest IT trends
Related Posts
Update the latest technology trends for your business