Back to featured insights
How to Build a WooCommerce Webshop from Scratch (Step-by-Step)
In this step-by-step guide, we'll walk you through the process of setting up your WooCommerce webshop, from planning and installation to customization and optimization. By following these steps, you'll be well on your way to launching a successful online business.
Table of Content
Share
Launching an online store can feel overwhelming, but with a WooCommerce webshop, the process becomes far more approachable. Built on WordPress, WooCommerce provides a solid and flexible foundation for building a store that grows with your business.
Whether you’re just starting out or looking to expand, this guide will walk you through everything you need to create a fully functional, professional eCommerce site from the ground up.
What is WooCommerce?
WooCommerce is a powerful, open-source eCommerce plugin designed specifically for WordPress websites. It’s widely adopted by users who want to transform their sites into fully functional online stores.
Thanks to its flexibility, WooCommerce enables anyone to build and manage a digital shop without starting from scratch. It supports all essential eCommerce features—from product listings and order management to integrating multiple payment options.
One of its biggest advantages? It’s completely free. The WooCommerce plugin is readily available in the official WordPress plugin repository and can be installed in just a few clicks.
Designed with user-friendliness in mind, WooCommerce requires no advanced technical knowledge to get started. This makes it especially appealing to small businesses and entrepreneurs looking for a straightforward online selling solution.
You might also be interested in a series of comparison articles featuring:
WooCommerce vs BigCommerce
WooCommerce vs Magento
WooCommerce vs OpenCart
WooCommerce vs Shopify
WooCommerce vs Shopline
How to Build a WooCommerce Webshop
To get started with your WooCommerce webshop, here are 11 key steps you need to follow:
- Step 1: Choose a Web Hosting Provider
- Step 2: Register a Domain Name
- Step 3: Install WordPress
- Step 4: Install the WooCommerce Plugin
- Step 5: Set Up Your WooCommerce Store
- Step 6: Choose the Payment Gateway
- Step 7: Configure the Shipping Methods
- Step 8: Select the Recommended Extensions
- Step 9: Connect Your Store With Jetpack to Activate
- Step 10: Configure Settings, Products, and Payments
- Step 11: Optimize Design, User Experience, and Go Live
Step 1: Choose a Web Hosting Provider
Before launching a WordPress website, one of the first and most important steps is selecting a reliable web hosting provider. Your hosting environment stores your website’s data and delivers it to users, so the quality of your host directly impacts site performance and reliability.
Choosing the right host involves more than just picking the cheapest option — you’ll want to evaluate performance, available features, customer support, and scalability to ensure long-term success.
Here are a few key factors to keep in mind:
- Optimized for WordPress: While most hosting services are compatible with WordPress, some are specifically tailored for it. These typically include features like one-click installs, pre-configured settings, and automatic updates to simplify your setup and ongoing management.
- Performance & Uptime: Your site’s speed and availability depend largely on your hosting provider’s infrastructure. Look for hosts that offer strong uptime guarantees and consistently fast load times to deliver a smooth browsing experience.
- Support Availability: No matter your skill level, having access to reliable technical support can save time and headaches. Choose a provider with responsive, 24/7 support and a knowledgeable team ready to assist when needed.
- Scalability: As your website grows, your hosting plan should be able to scale with it. Seek out providers that offer upgrade paths, whether it’s more storage, increased bandwidth, or dedicated server resources.
- Pricing and Value: Price matters, but what you get in return is even more important. Aim for a host that balances affordability with dependable service and helpful features.
In summary, your choice of hosting provider can set the tone for your entire WordPress journey. A strong host will help your site perform at its best, while a poor one can lead to recurring issues and limitations.
Step 2: Register a Domain Name
After choosing a reliable hosting provider, the next step is selecting a domain name, which will serve as your website’s digital address. It’s how users will find, remember, and connect with your brand, so choosing wisely is essential.
How to Choose a Strong Domain Name:
- Think Simple and Relevant: Choose a name that aligns with your brand. Make sure it’s easy to spell, short, and memorable.
- Check Availability: Use domain search tools, usually offered by hosting providers or registrars, to see which names are available. If your first choice is taken, try slight variations or add a relevant keyword.
- Register Promptly: Once you find a suitable and available domain name, register it quickly to secure it. Most domains are billed annually.
- Use Familiar Extensions: Stick with well-known domain extensions like .com, .net, or .org to enhance credibility.
- Avoid Complexity: Stay away from hyphens, overly long names, or difficult spellings. A clear and concise domain is easier to remember and supports stronger brand recognition.
Your domain name plays a major role in your online identity. Choose one that reflects your business and is easy for your audience to find and recall.
Step 3: Set up WordPress
There are two main ways to install WordPress, depending on your hosting setup and technical comfort level:
One-click installation (ideal for beginners):
Most modern hosting providers offer a one-click WordPress install feature. With just a few steps in your hosting dashboard, like selecting a domain and clicking “Install,” you can launch your site quickly without any technical hassle. This is the easiest and fastest option for getting started.
Manual installation (for more control):
If your host doesn’t provide automatic setup, you can install WordPress manually. This involves downloading the WordPress files, uploading them to your server via FTP or file manager, and configuring the settings through your hosting control panel. While it takes more effort, it gives you better insight into how your website works.
Not sure which method is right for you? Check out our beginner-friendly WordPress installation guide to get started confidently.
Step 4: Install the WooCommerce Plugin
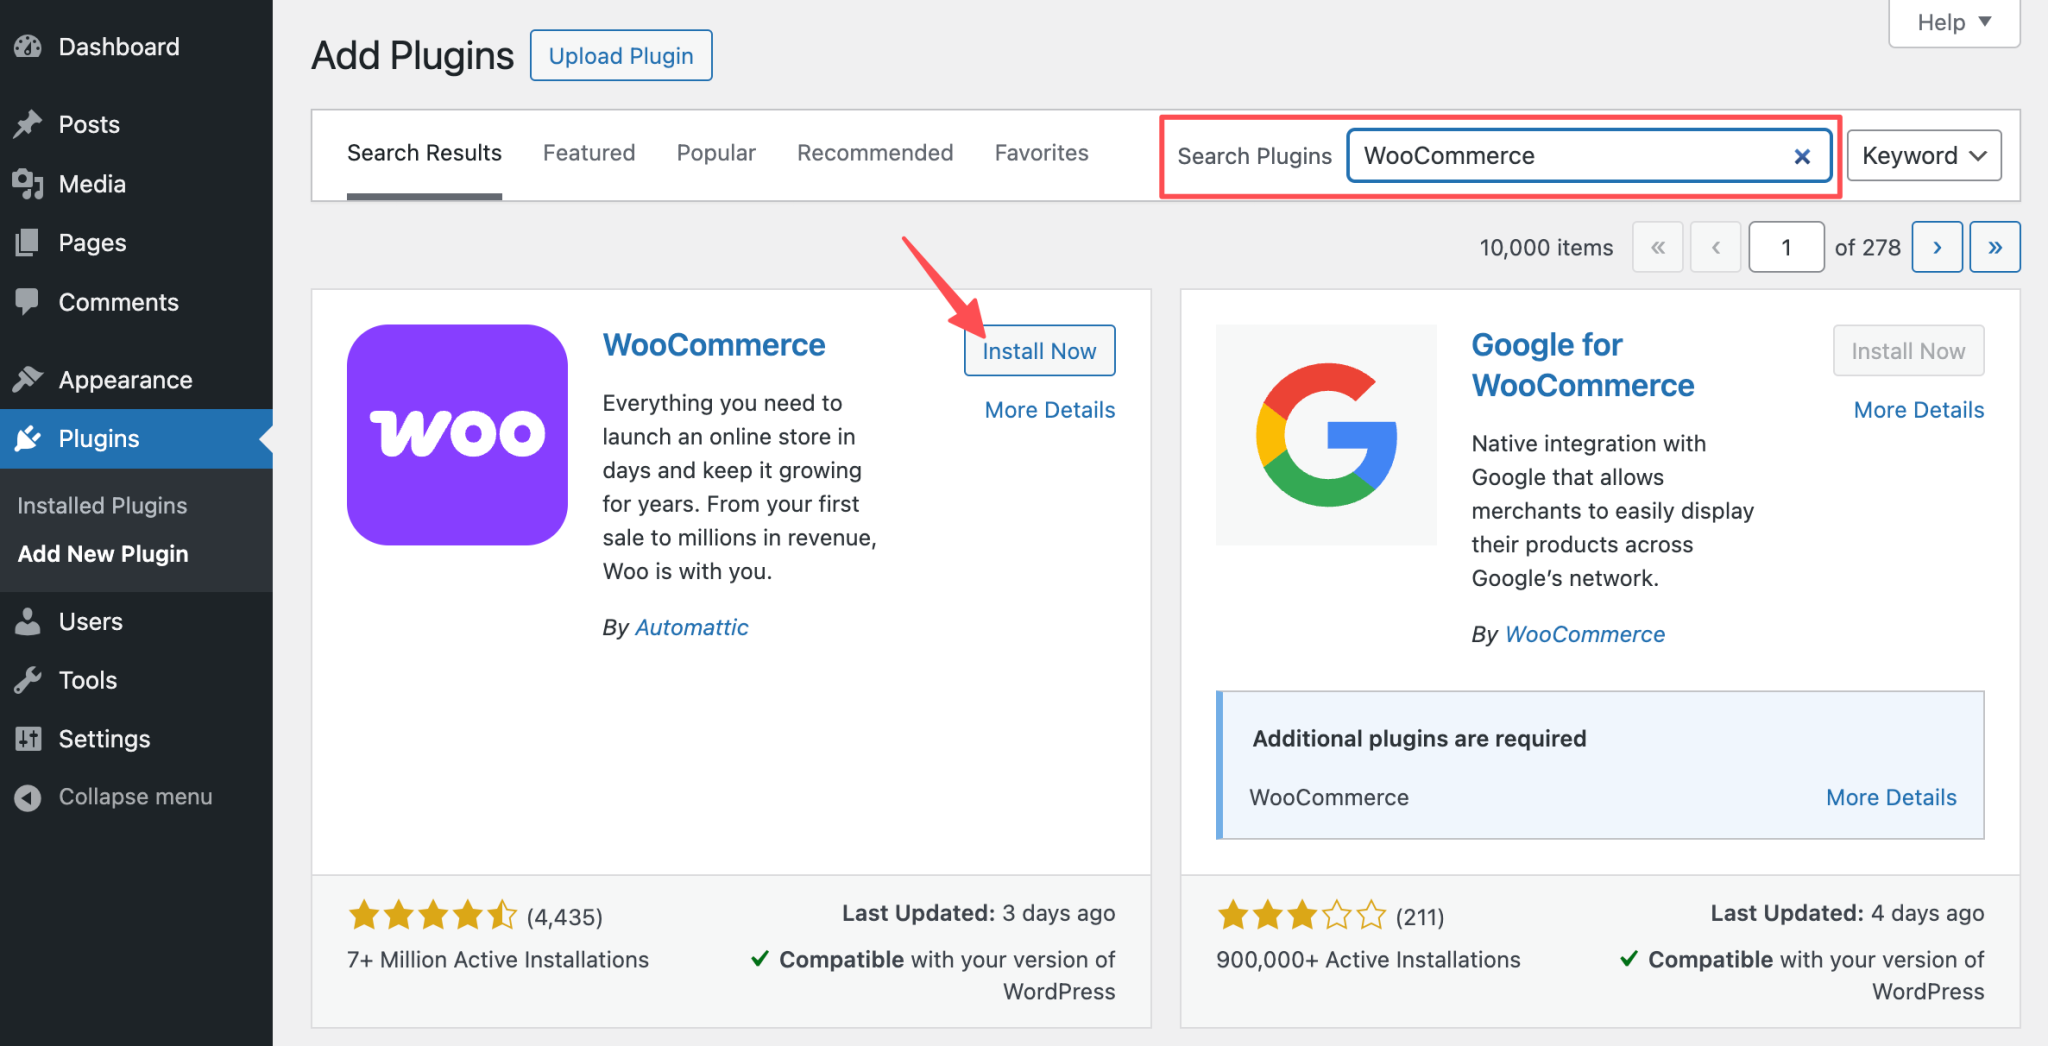
The process is quite straightforward. Head over to the “Plugins” section in your WordPress dashboard and click “Add New”. In the search bar, type “WooCommerce”, then install and activate the plugin. After activation, you’ll see the WooCommerce menu added to your dashboard, giving you access to set up and manage your store.
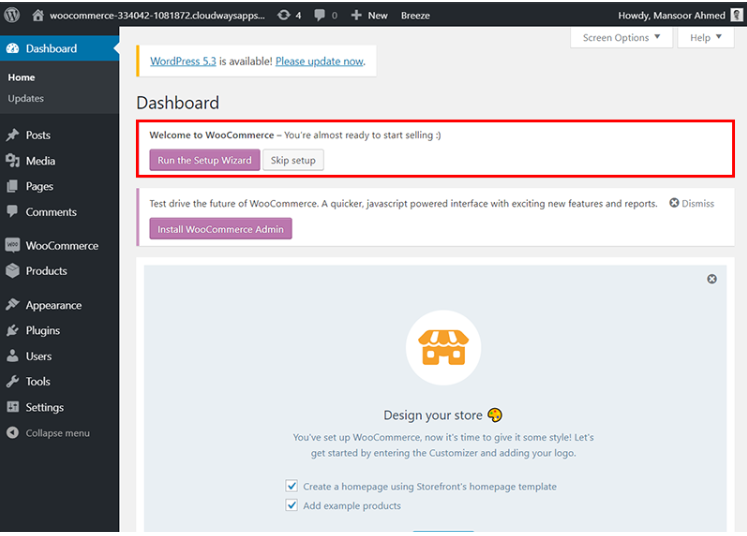
WooCommerce on WordPress makes store setup easy with a built-in setup wizard. Simply click the “Run the Setup Wizard” button to get started. If you happen to click “Skip setup” by mistake, don’t worry, you can access the wizard anytime later by going to Help → Setup Wizard in your dashboard.
Step 5: Set Up Your WooCommerce Store
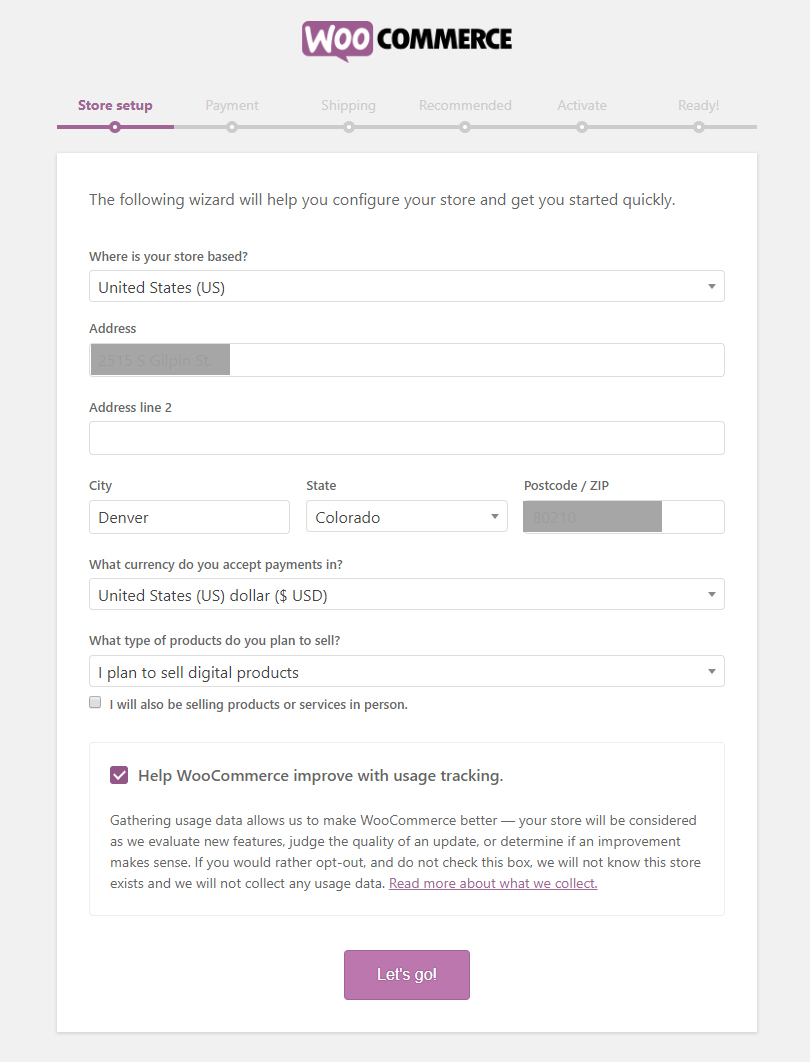
In this step of setting up WooCommerce, you’ll need to enter your store’s physical location.
This detail is essential, as WooCommerce uses it to automatically calculate shipping rates and applicable taxes on invoices.
The fields shown in this step may vary depending on the country you select — some regions may require additional information to ensure accurate configuration.
- Where is your store based? (select the country)
- Address
- City
- State
- Postal Code/ZIP
Next, you’ll need to choose the currency your store will use for transactions. After that, specify the type of products you plan to sell. WooCommerce for WordPress provides three main product categories to select from, helping tailor the store setup to your business needs.
- I plan to sell both physical and digital products
- I plan to sell physical products
- I plan to sell digital products
Finally, the WooCommerce setup wizard will prompt you to allow usage data collection. To proceed, simply click “Let’s go!” and continue to the next step.
Step 6: Choose the Payment Gateway
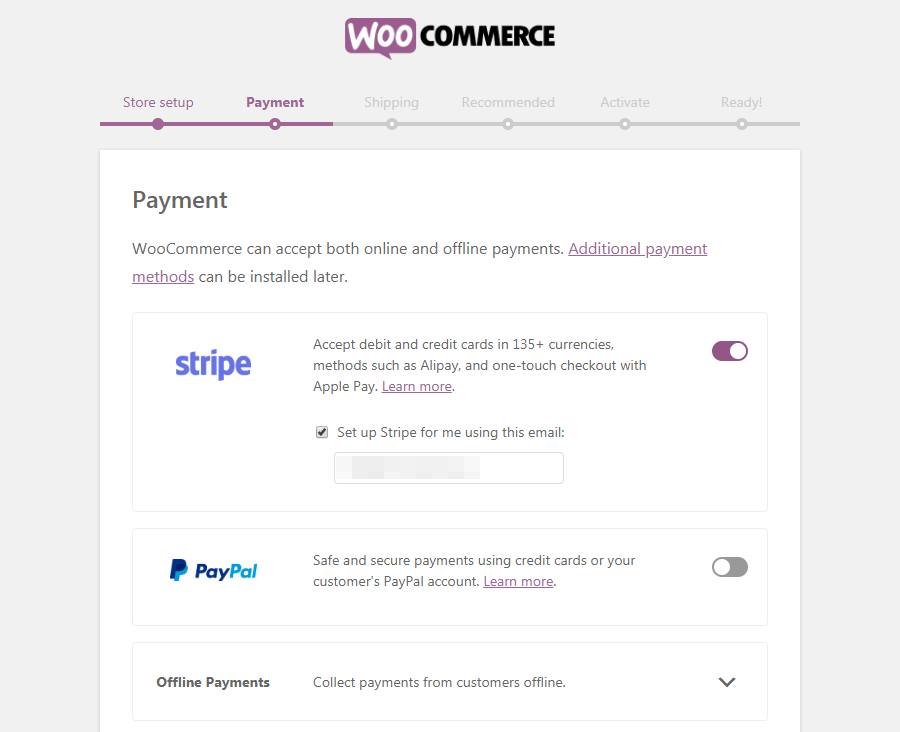
In the second step of our WordPress WooCommerce tutorial, you’ll choose the payment methods to integrate into your store. The two main options available are:
- Stripe
- PayPal
Both platforms let customers pay without leaving the checkout page. While PayPal is widely used, Stripe often has lower transaction fees. You can enable one or both to offer flexibility to your customers.
Additionally, under Offline payments, you’ll find more traditional methods such as:
- Check
- Bank transfer
- Cash on delivery
Depending on your selection in this step of the WordPress WooCommerce tutorial, WooCommerce will install different plugins necessary for your store. Click Continue to go to the next section of our WooCommerce tutorial.
Looking for the best payment solutions? Explore the top 8 WooCommerce payment gateways for online stores.
Step 7: Configure the Shipping Methods
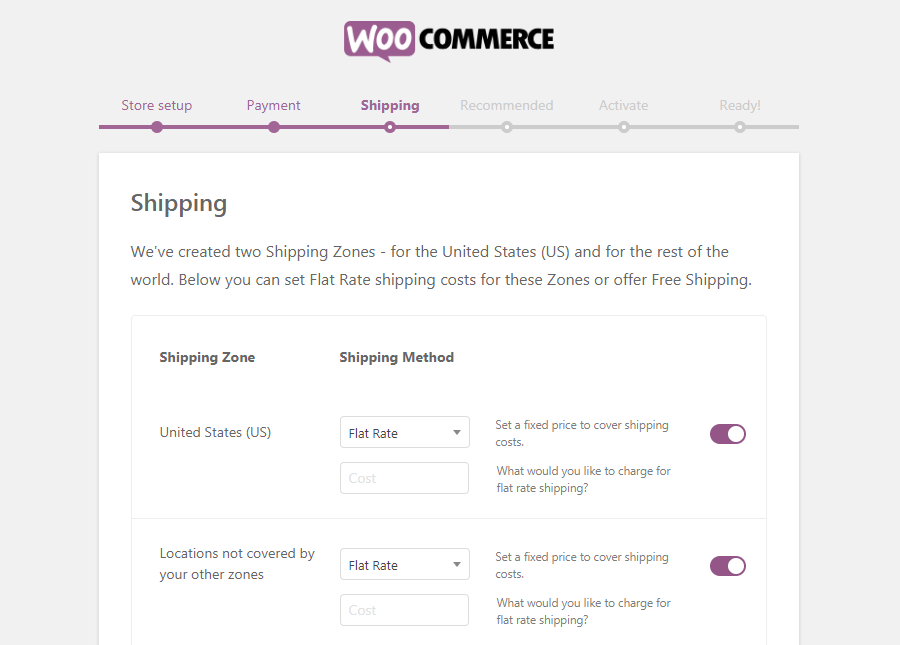
WooCommerce allows you to define two shipping zones from which your store can deliver products. During the setup process, you’ll also need to choose a shipping method and pricing model, either flat rate or free shipping.
Depending on the countries you plan to sell in, you may need to fine-tune your WooCommerce shipping settings after completing the setup wizard.
Finally, the WooCommerce setup wizard will prompt you to choose a measurement system. I chose to keep the default settings (Ounces and Inches) and proceeded to the next step.
Step 8: Select the Recommended Extensions
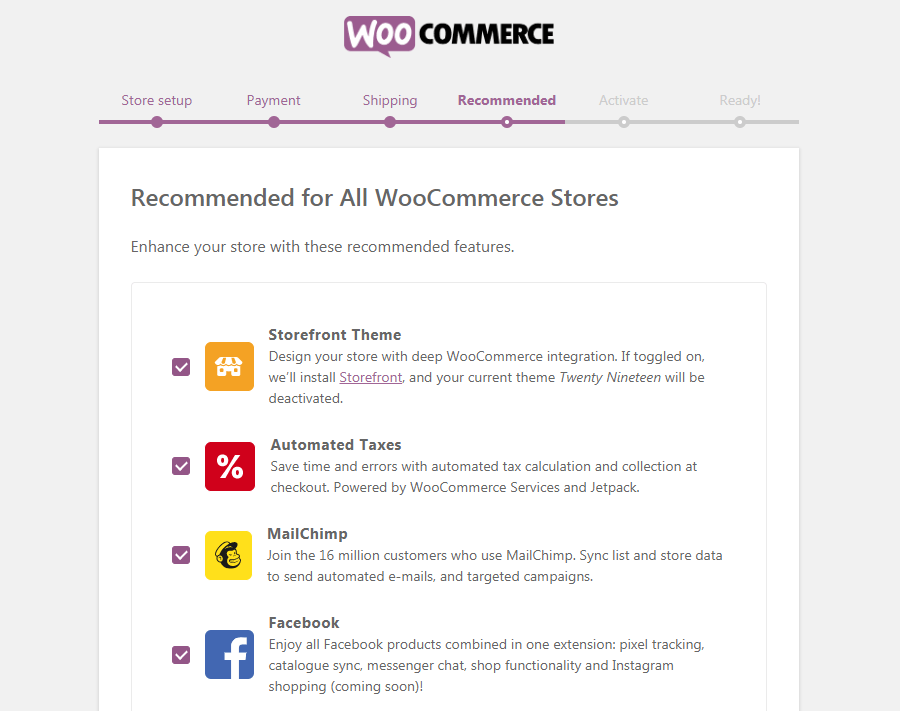
Based on your store’s location and how you’ve configured WooCommerce, the setup wizard may recommend installing several optional extensions to enhance your store’s functionality.
It’s a good idea to enable all four suggested extensions by clicking the Continue button:
- Automated Taxes: This tool automatically calculates taxes for each order. Note that tax rates will only be shown to customers at checkout, so be sure to display relevant tax information clearly on your site.
- MailChimp: A powerful email marketing platform that helps you grow your subscriber list and send targeted emails to boost sales.
- Facebook: Enables social media integration, including tracking with the Facebook Pixel and syncing your product catalog for marketing and ad campaigns.
These tools streamline key processes and can significantly improve your store’s efficiency and customer engagement.
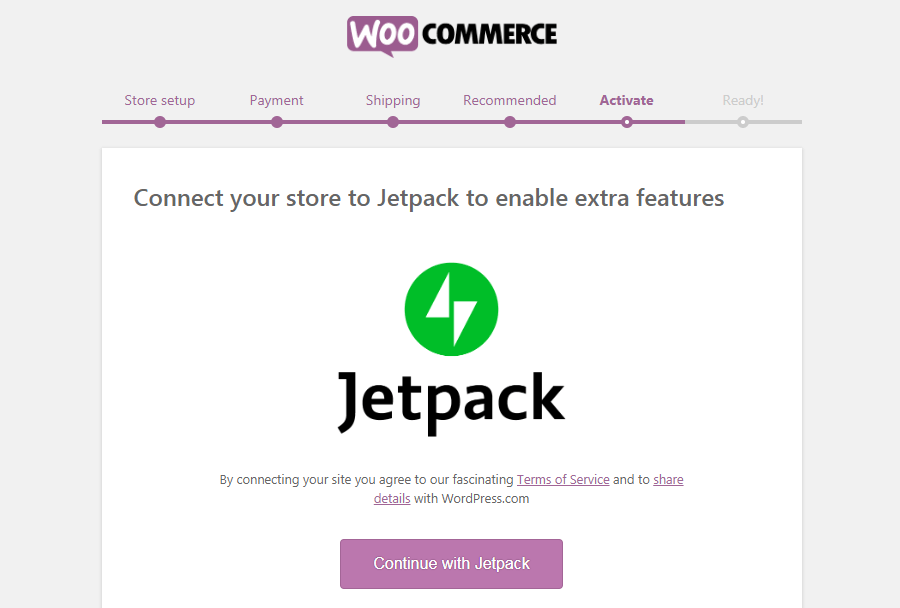
Step 9: Connect Your Store With Jetpack to Activate
The next step in this WooCommerce tutorial involves deciding whether to connect your WooCommerce store with the Jetpack extension for WordPress. This integration is required to activate the features you selected earlier in the setup.
Click “Continue with Jetpack” and follow the on-screen instructions. After completing the connection, you will be taken to the final page of the setup wizard. Keep in mind that Jetpack is not exclusive to WooCommerce; it also functions independently on regular WordPress sites.
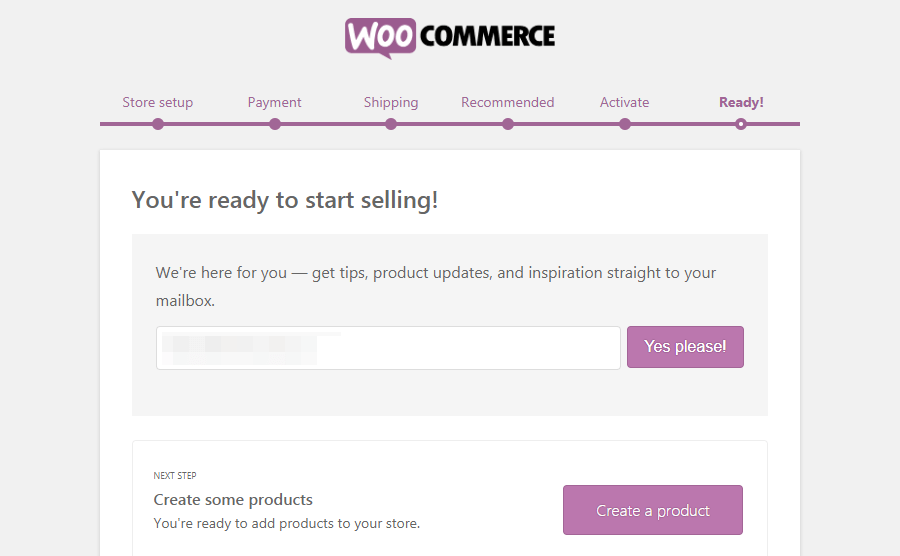
You’re Ready to Launch Your Store!
You’ve reached the final step of the WooCommerce setup wizard. With the initial configuration complete, you’re now ready to start adding products to your store.
To help you get started, WooCommerce provides a quick link labeled “Create a product,” allowing you to add your first item right away. If you already have a product catalog in CSV format, you can easily import the file to upload all products at once.
Before going live, take some time to review your store’s settings and design. Depending on your business model, it’s essential to ensure that all configurations, from shipping to taxes, are properly set up to support your operations.
As a recommendation, click “Review Settings” and see what else you can optimize.
Step 10: Configure Settings, Products, and Payments
Now that your WooCommerce store is up and running, it’s time to fine-tune the key settings, set up your products, and ensure your payment options are working smoothly. This will lay the foundation for a seamless shopping experience.
WooCommerce Settings
To ensure your store operates efficiently, it’s important to fine-tune several essential settings:
- General Configuration: Adjust fundamental options such as currency formats, product display preferences, and checkout flow.
- Customer Account Settings: Set up user registration, login permissions, and privacy preferences to build credibility and protect user data.
- Email Notifications: Manage the automated emails your store sends—keeping customers informed about their orders and store updates.
- Product Management: Control how products appear on your site and configure inventory tracking for better stock management.
- Shipping Options: Define shipping zones, delivery charges, and available methods to streamline the order fulfillment process.
- Payment Gateways: Choose and configure the payment providers your store will support—ensuring secure and convenient transactions for your customers.
Adding Product Categories
Before you start adding products, take time to organize them into clear categories. This improves the shopping experience by helping customers locate items more easily. For instance, if you’re running a clothing store, you could create categories such as “Men,” “Women,” and “Kids.”
To set up product categories, navigate to WooCommerce > Products in your WordPress dashboard, then select Categories to begin organizing your catalog.
Adding Products
You have the option to add products to your WordPress e-commerce store either individually or in bulk through a CSV upload. To add products one by one:
- Navigate to Products > “Add New.”
- Fill in the product title and description, then upload an image of the product.
- Select the product type, set the pricing, and manage stock quantities.
- On the right sidebar, assign relevant categories and tags to the product.
- When everything is set, hit “Publish” to make the product live.
Additionally, WooCommerce provides inventory management features that help you keep track of stock levels, preventing you from selling items that are out of stock.
Configure Payments
The next crucial step in setting up your WordPress store is enabling payment gateways to accept customer transactions. WooCommerce supports multiple payment options such as PayPal, Stripe, and credit/debit card payments.
To get started, head to the “Payments” tab in your WooCommerce settings and activate the methods that best fit your needs. Don’t forget to review the associated transaction fees so you can choose the most cost-effective and reliable solutions for your business.
Step 11: Optimize Design, User Experience, and Go Live
Create Beautiful Product Pages
When creating your e-commerce site with WordPress, it’s important to design a visually appealing storefront that captures your brand. Start by refining essential pages like the homepage, product catalog, and checkout. Using tools like Gutenberg, you can effortlessly build stylish, user-friendly layouts—no coding skills required.
Optimize checkout experience
Improving the WooCommerce checkout process is a smart way to increase conversions and offer a more seamless shopping experience. Here are several practical tips to enhance your checkout flow:
- Provide diverse payment options: Support methods like credit cards, digital wallets, and mobile payments to suit different customer preferences and reduce abandoned carts.
- Keep the checkout form simple: Request only the necessary information and remove non-essential fields such as company name or phone number to make checkout faster.
- Show security indicators: Adding trust badges and SSL icons can reassure customers that their information is safe, which helps drive purchase completion.
- Allow guest checkout: Letting users complete purchases without creating an account makes the process quicker and less of a hassle, often leading to higher conversion rates.
By applying these techniques, you can build a smooth, customer-friendly checkout process that supports sales and encourages return visits.
Install Essential Plugins
To enhance your store’s functionality and ensure smooth operation, it’s essential to install a few key WordPress plugins:
- Advertising Plugins: Boost traffic with tools like Advanced Ads, which integrate with Google Ads and Facebook Ads to help you target customers more effectively.
- Conversion Optimization Tools: Use plugins like OptinMonster to grow your email list and improve conversion rates through features like popups, A/B testing, and campaign tracking.
- Dropshipping Plugins: Simplify dropshipping with tools like AliDropship, WooCommerce Dropshipping, and Dropified—each offering automation for product imports, order management, and inventory tracking.
These plugins help streamline store operations, attract more customers, and increase sales.
Optimize Images
Image optimization is essential for any WordPress e-commerce website. It enhances loading speed and delivers a better user experience. Here are some effective ways to optimize your images:
- Resize images appropriately: Use smaller images for basic products and larger ones for items requiring zoom or high-detail viewing.
- Compress image files: Tools like Imagify can automatically reduce file sizes during upload, preserving quality while improving performance.
- Use a CDN: A Content Delivery Network speeds up image delivery across different regions. Many hosting providers offer built-in CDN support, such as Cloudflare—check if it’s included in your plan.
Tweak for SEO
Enhancing your SEO is key to boosting your store’s visibility in search results and attracting more visitors to your WordPress site. Here are some practical tips to improve your SEO strategy:
- Craft effective meta descriptions: These short previews appear in search engine listings, so make sure they’re clear, relevant, and rich in keywords to encourage clicks.
- Use SEO plugins: Tools like Yoast SEO help you fine-tune your keywords, manage metadata, and automatically generate sitemaps.
- Optimize your URLs: Keep URLs short, descriptive, and keyword-focused to improve both user navigation and search engine indexing.
By implementing these SEO practices during setup, you’ll set a solid foundation for long-term growth through organic traffic.
Launching your online store
Once your WooCommerce store is set up, test all key functions such as payments, shipping, and plugins to ensure everything runs smoothly. A soft launch to a small group can help you gather early feedback and make necessary tweaks.
When you’re ready to go live, build excitement through social media, email marketing, and blog content, highlighting your store’s unique features and special offers.
On launch day, ensure your site is visually appealing and fully responsive on mobile devices. After launch, keep a close eye on site performance, listen to customer feedback, and resolve any issues quickly. With this thoughtful approach, your WordPress e-commerce store will be well-positioned for success.
Frequently Asked Questions
1. Is WooCommerce still relevant?
Yes, WooCommerce remains a top choice for eCommerce thanks to its flexibility and widespread adoption. It powers millions of online stores and integrates seamlessly with WordPress, offering excellent scalability and customization options.
2. Is WooCommerce no longer free?
WooCommerce is free to use at its core, but additional costs may arise from premium extensions, themes, or hosting services based on your specific needs.
3. Do I need coding skills to set up a WooCommerce store?
No. WooCommerce is designed to be user-friendly, and most tasks can be done without any coding knowledge. Page builders like Gutenberg or Elementor also make it easy to design your store visually.
4. Can I sell both physical and digital products?
Yes. WooCommerce supports both product types. You can also offer subscriptions, bookings, or memberships with the help of additional plugins.
Conclusion
Building a successful WooCommerce webshop may seem challenging at first, but with the right approach, it becomes a clear and rewarding process. From choosing a theme, configuring key settings, and adding products, to optimizing checkout and improving SEO, each step plays a critical role in shaping a smooth and professional shopping experience for your customers. By following this guide, you’re well on your way to launching a fully functional and user-friendly online store.
At Arestós, we specialize in delivering tailored WooCommerce solutions for businesses of all sizes. Whether you need help with setup, customization, integration, or ongoing support, our team is here to ensure your webshop performs flawlessly and grows with your business. With deep expertise in both WordPress and WooCommerce, we help you streamline operations and create an engaging customer experience from day one.
Contact us now to get expert support for your WooCommerce webshop — and turn your idea into a powerful eCommerce presence.
Subscribe to our newsletter!
Get updated to
the lastest IT trends

